Professional Water Damage Restoration in South Ponte Vedra Beach, Florida: Comprehensive Mold Remediation and Structural Repair
When a homeowner in South Ponte Vedra Beach, St. Johns County, Florida discovered extensive water damage from an improperly sealed exterior air compressor line, they called The Great Handyman for a comprehensive restoration solution. What started as a minor leak turned into a major project involving exterior siding replacement, mold remediation, structural repairs, and complete floor reconstruction. This detailed case study shows how we tackled every aspect of this water damage restoration project to restore the home to perfect condition.
Here’s a comprehensive look at how we handled this complex water damage restoration project, from exterior siding repair to interior structural work, mold treatment, and finishing touches including luxury vinyl plank flooring installation.
The Challenge: Extensive Water Damage from Improper Exterior Sealing
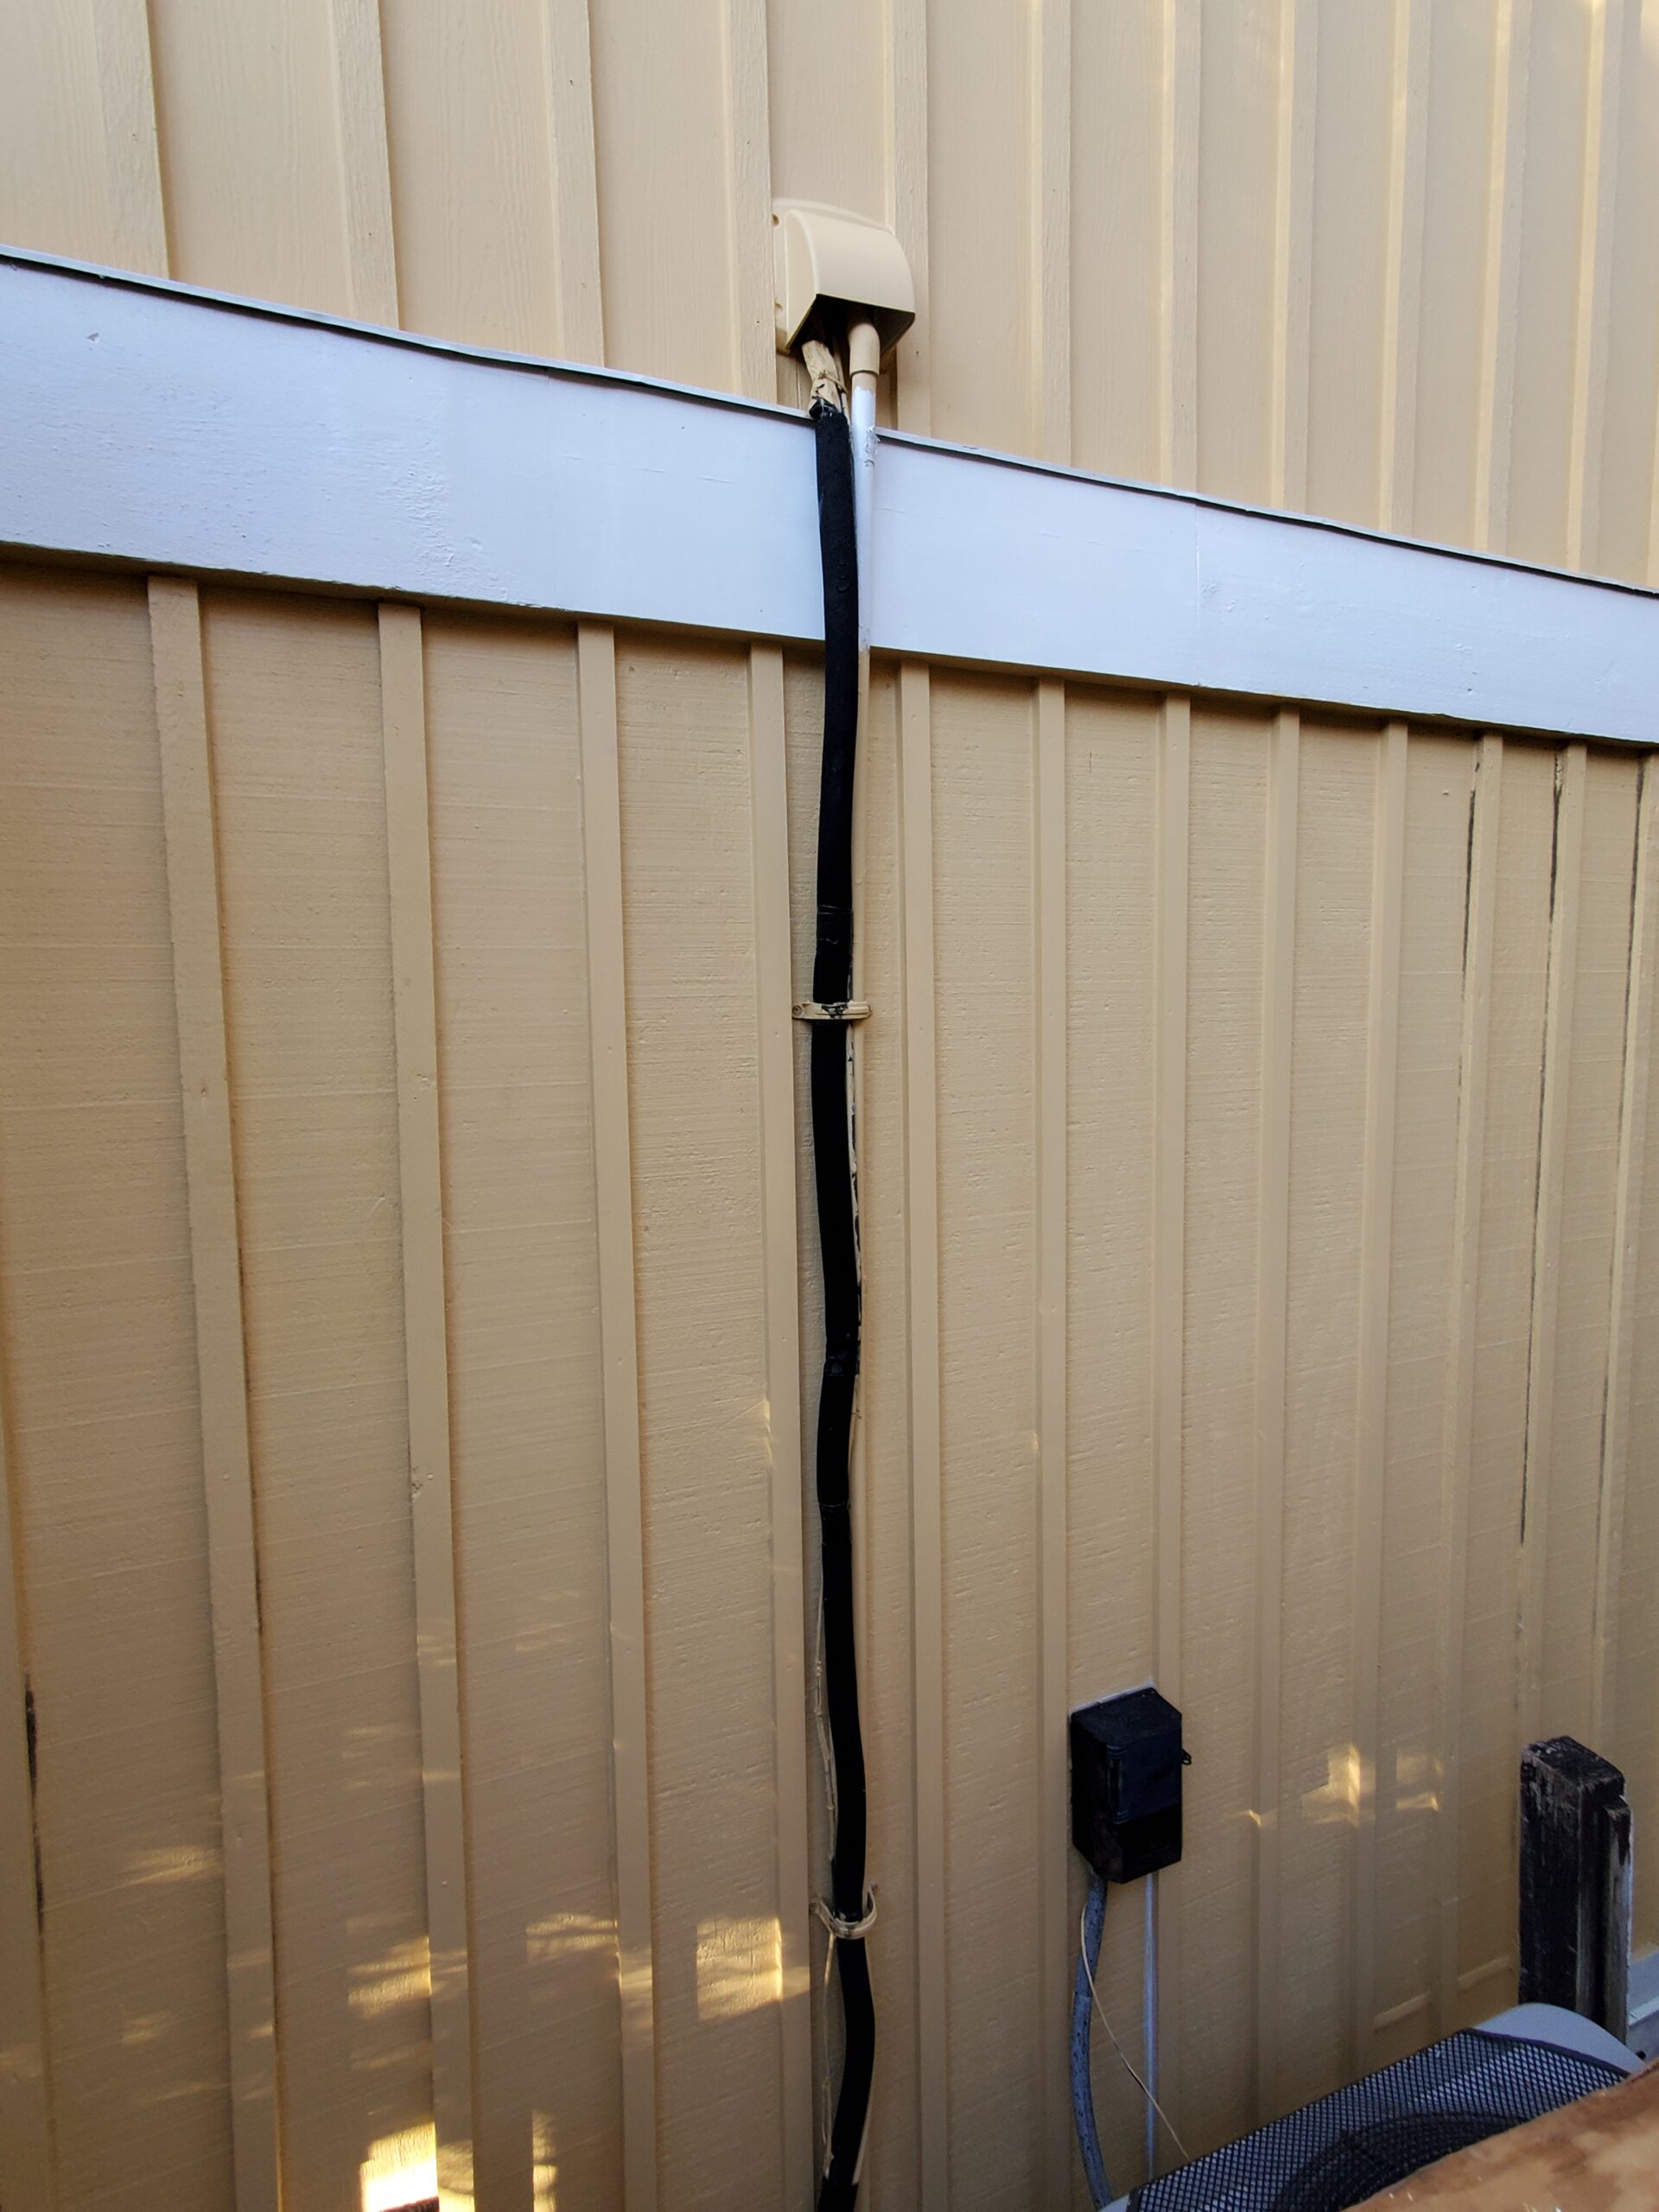
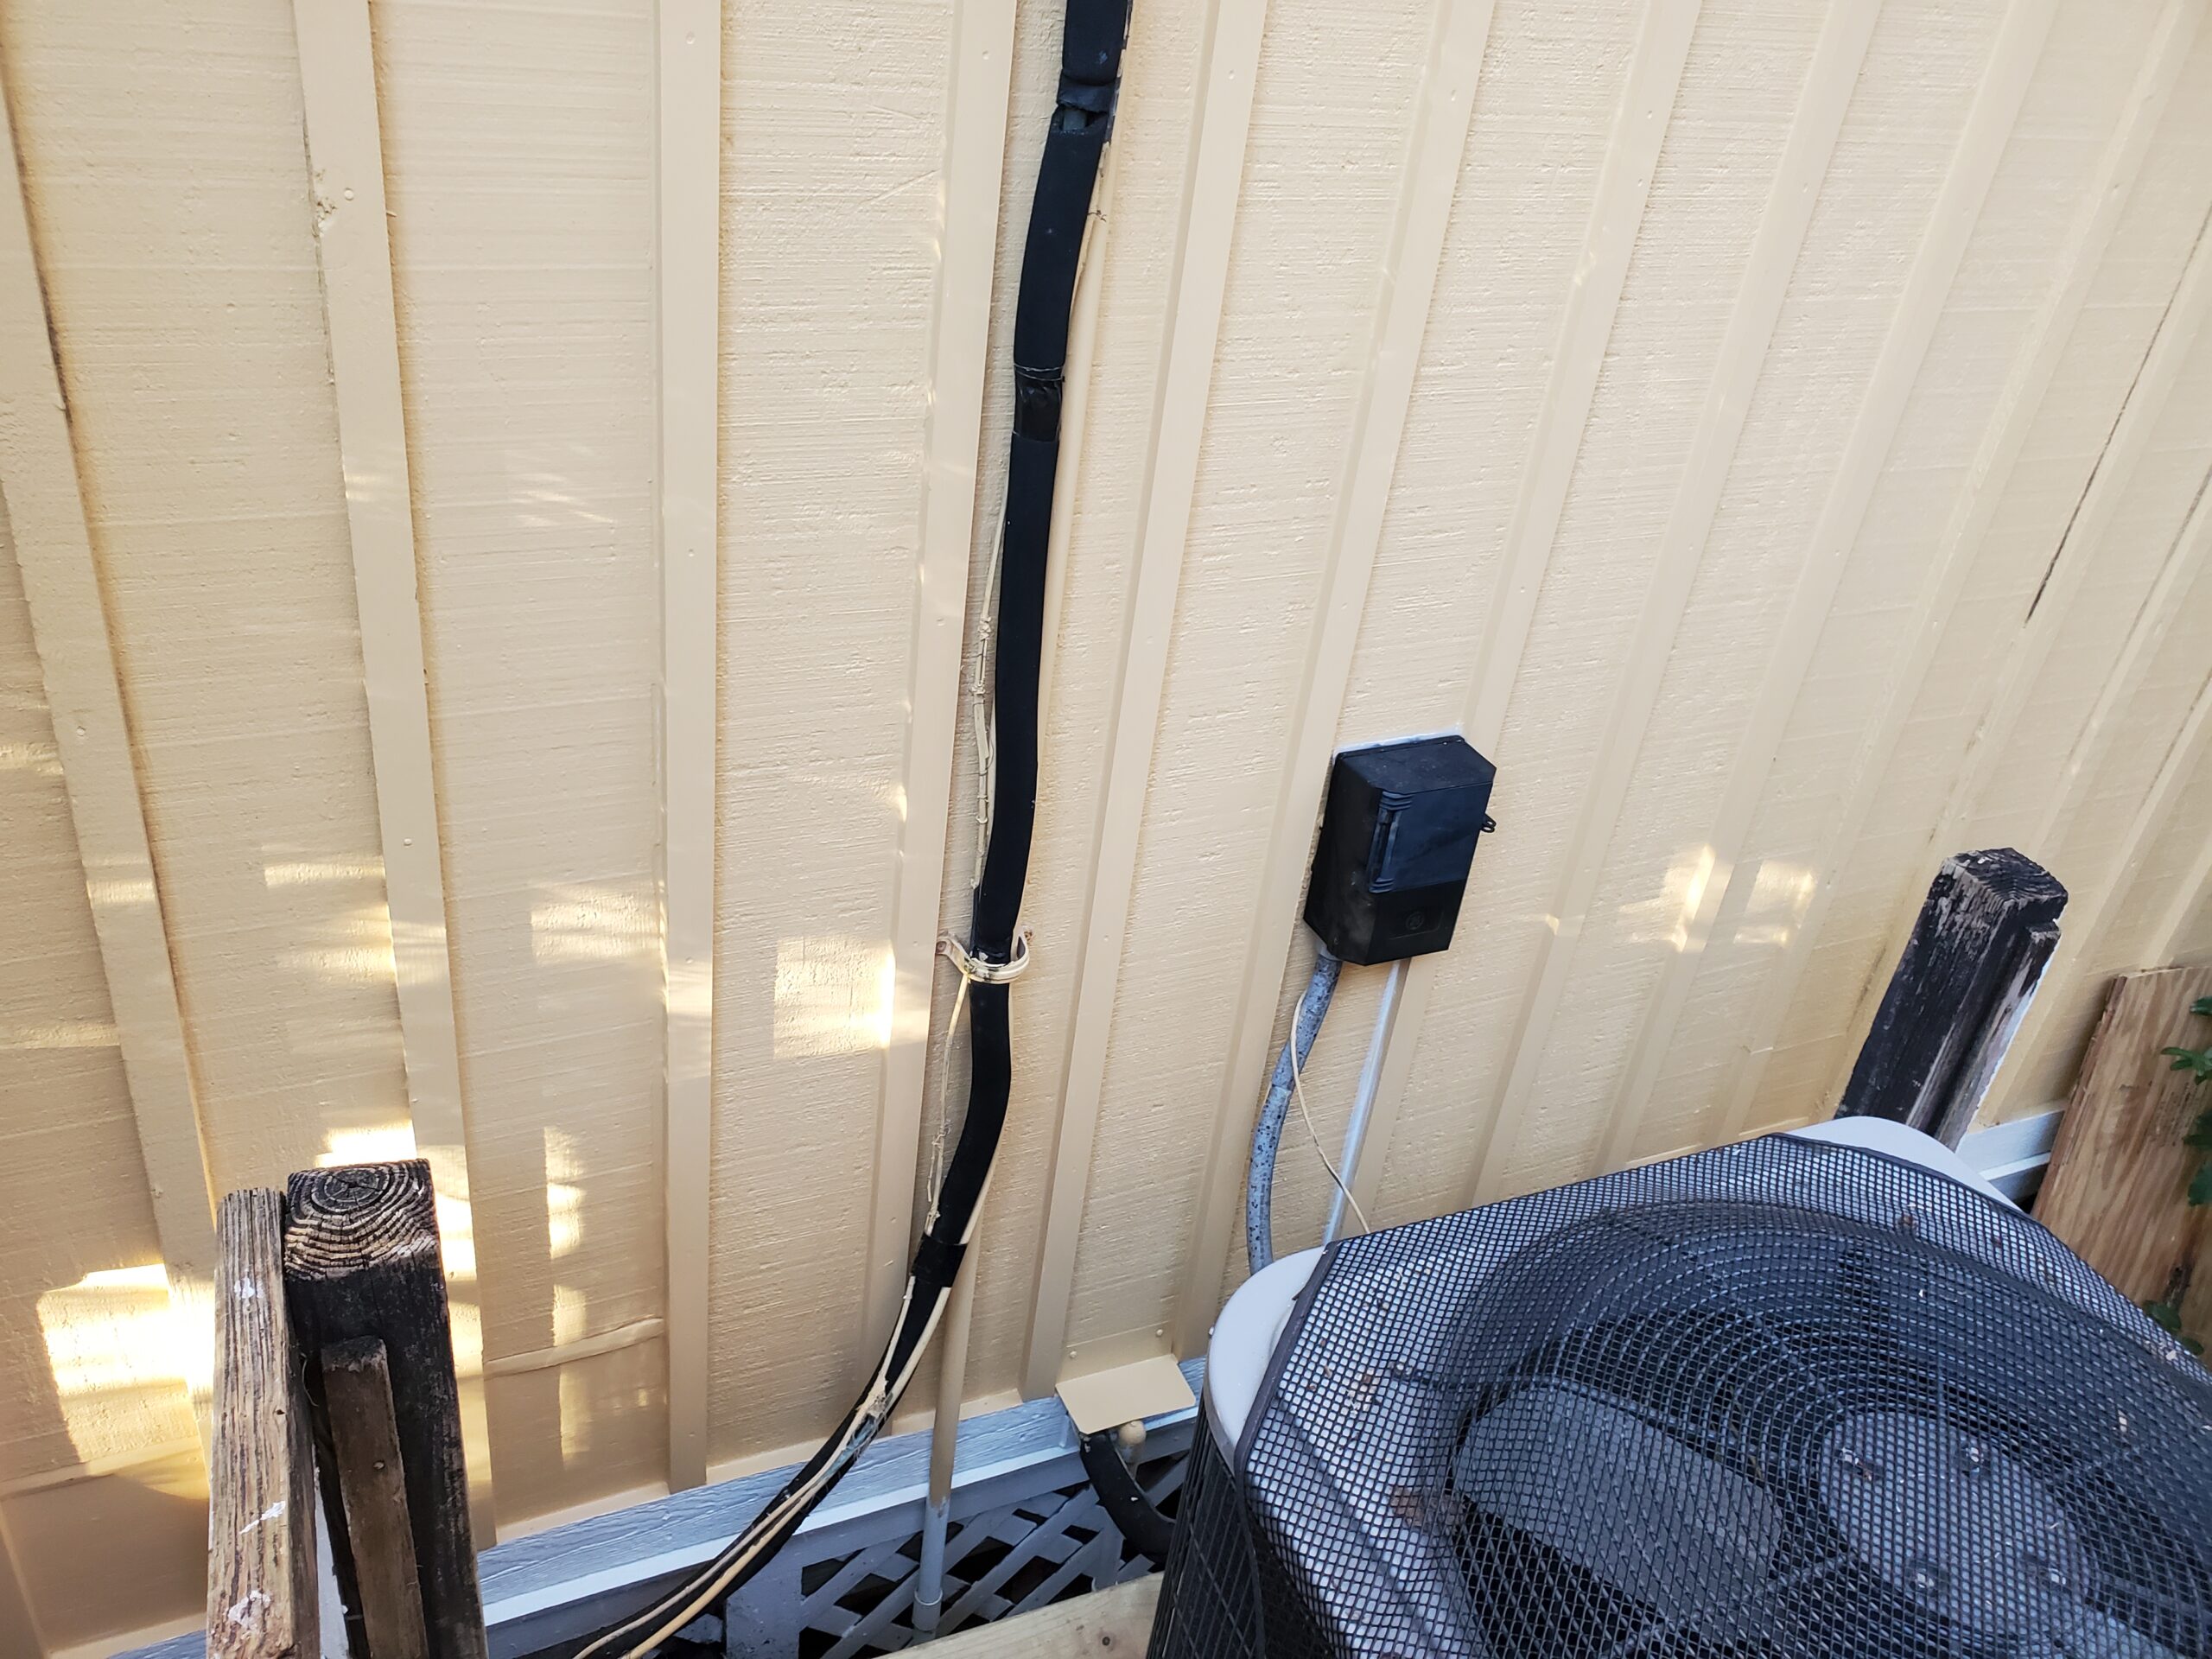
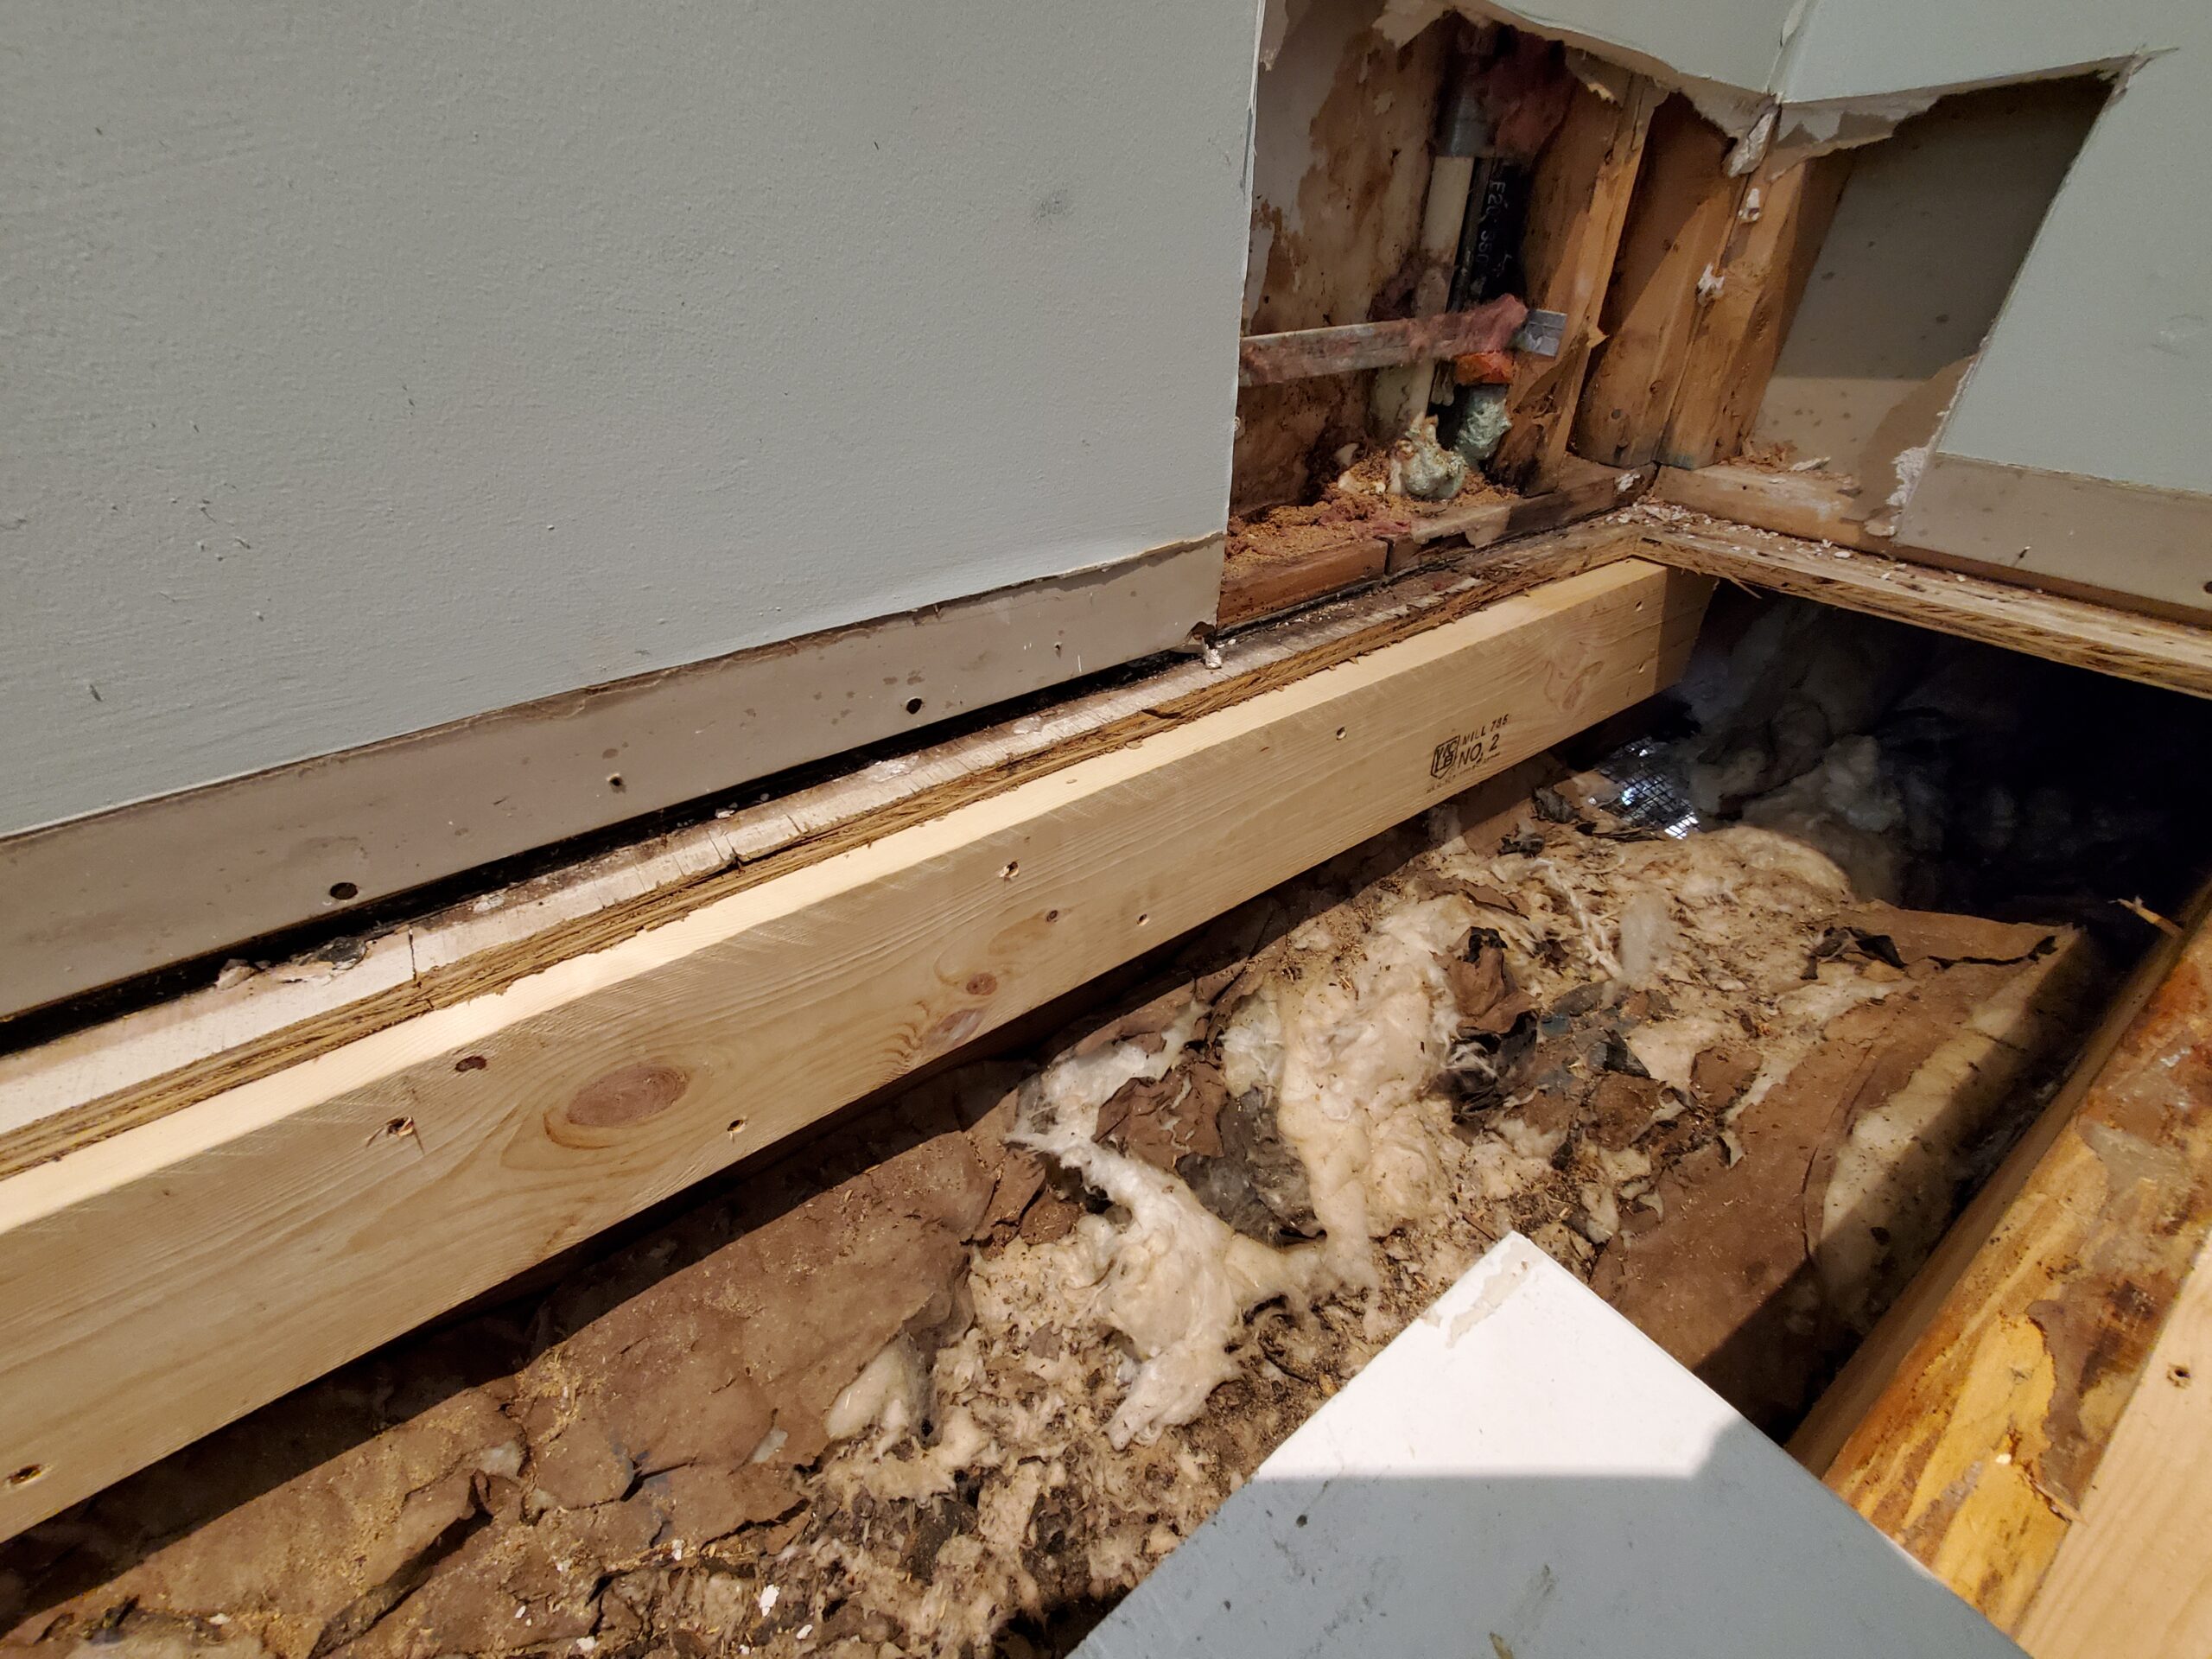
The problem originated with an exterior air compressor line that entered the side of the home but was never properly sealed. This seemingly small oversight created a pathway for water to infiltrate the home’s structure, causing damage that spread throughout multiple building systems:
- Exterior T1-11 siding – water-damaged and rotten
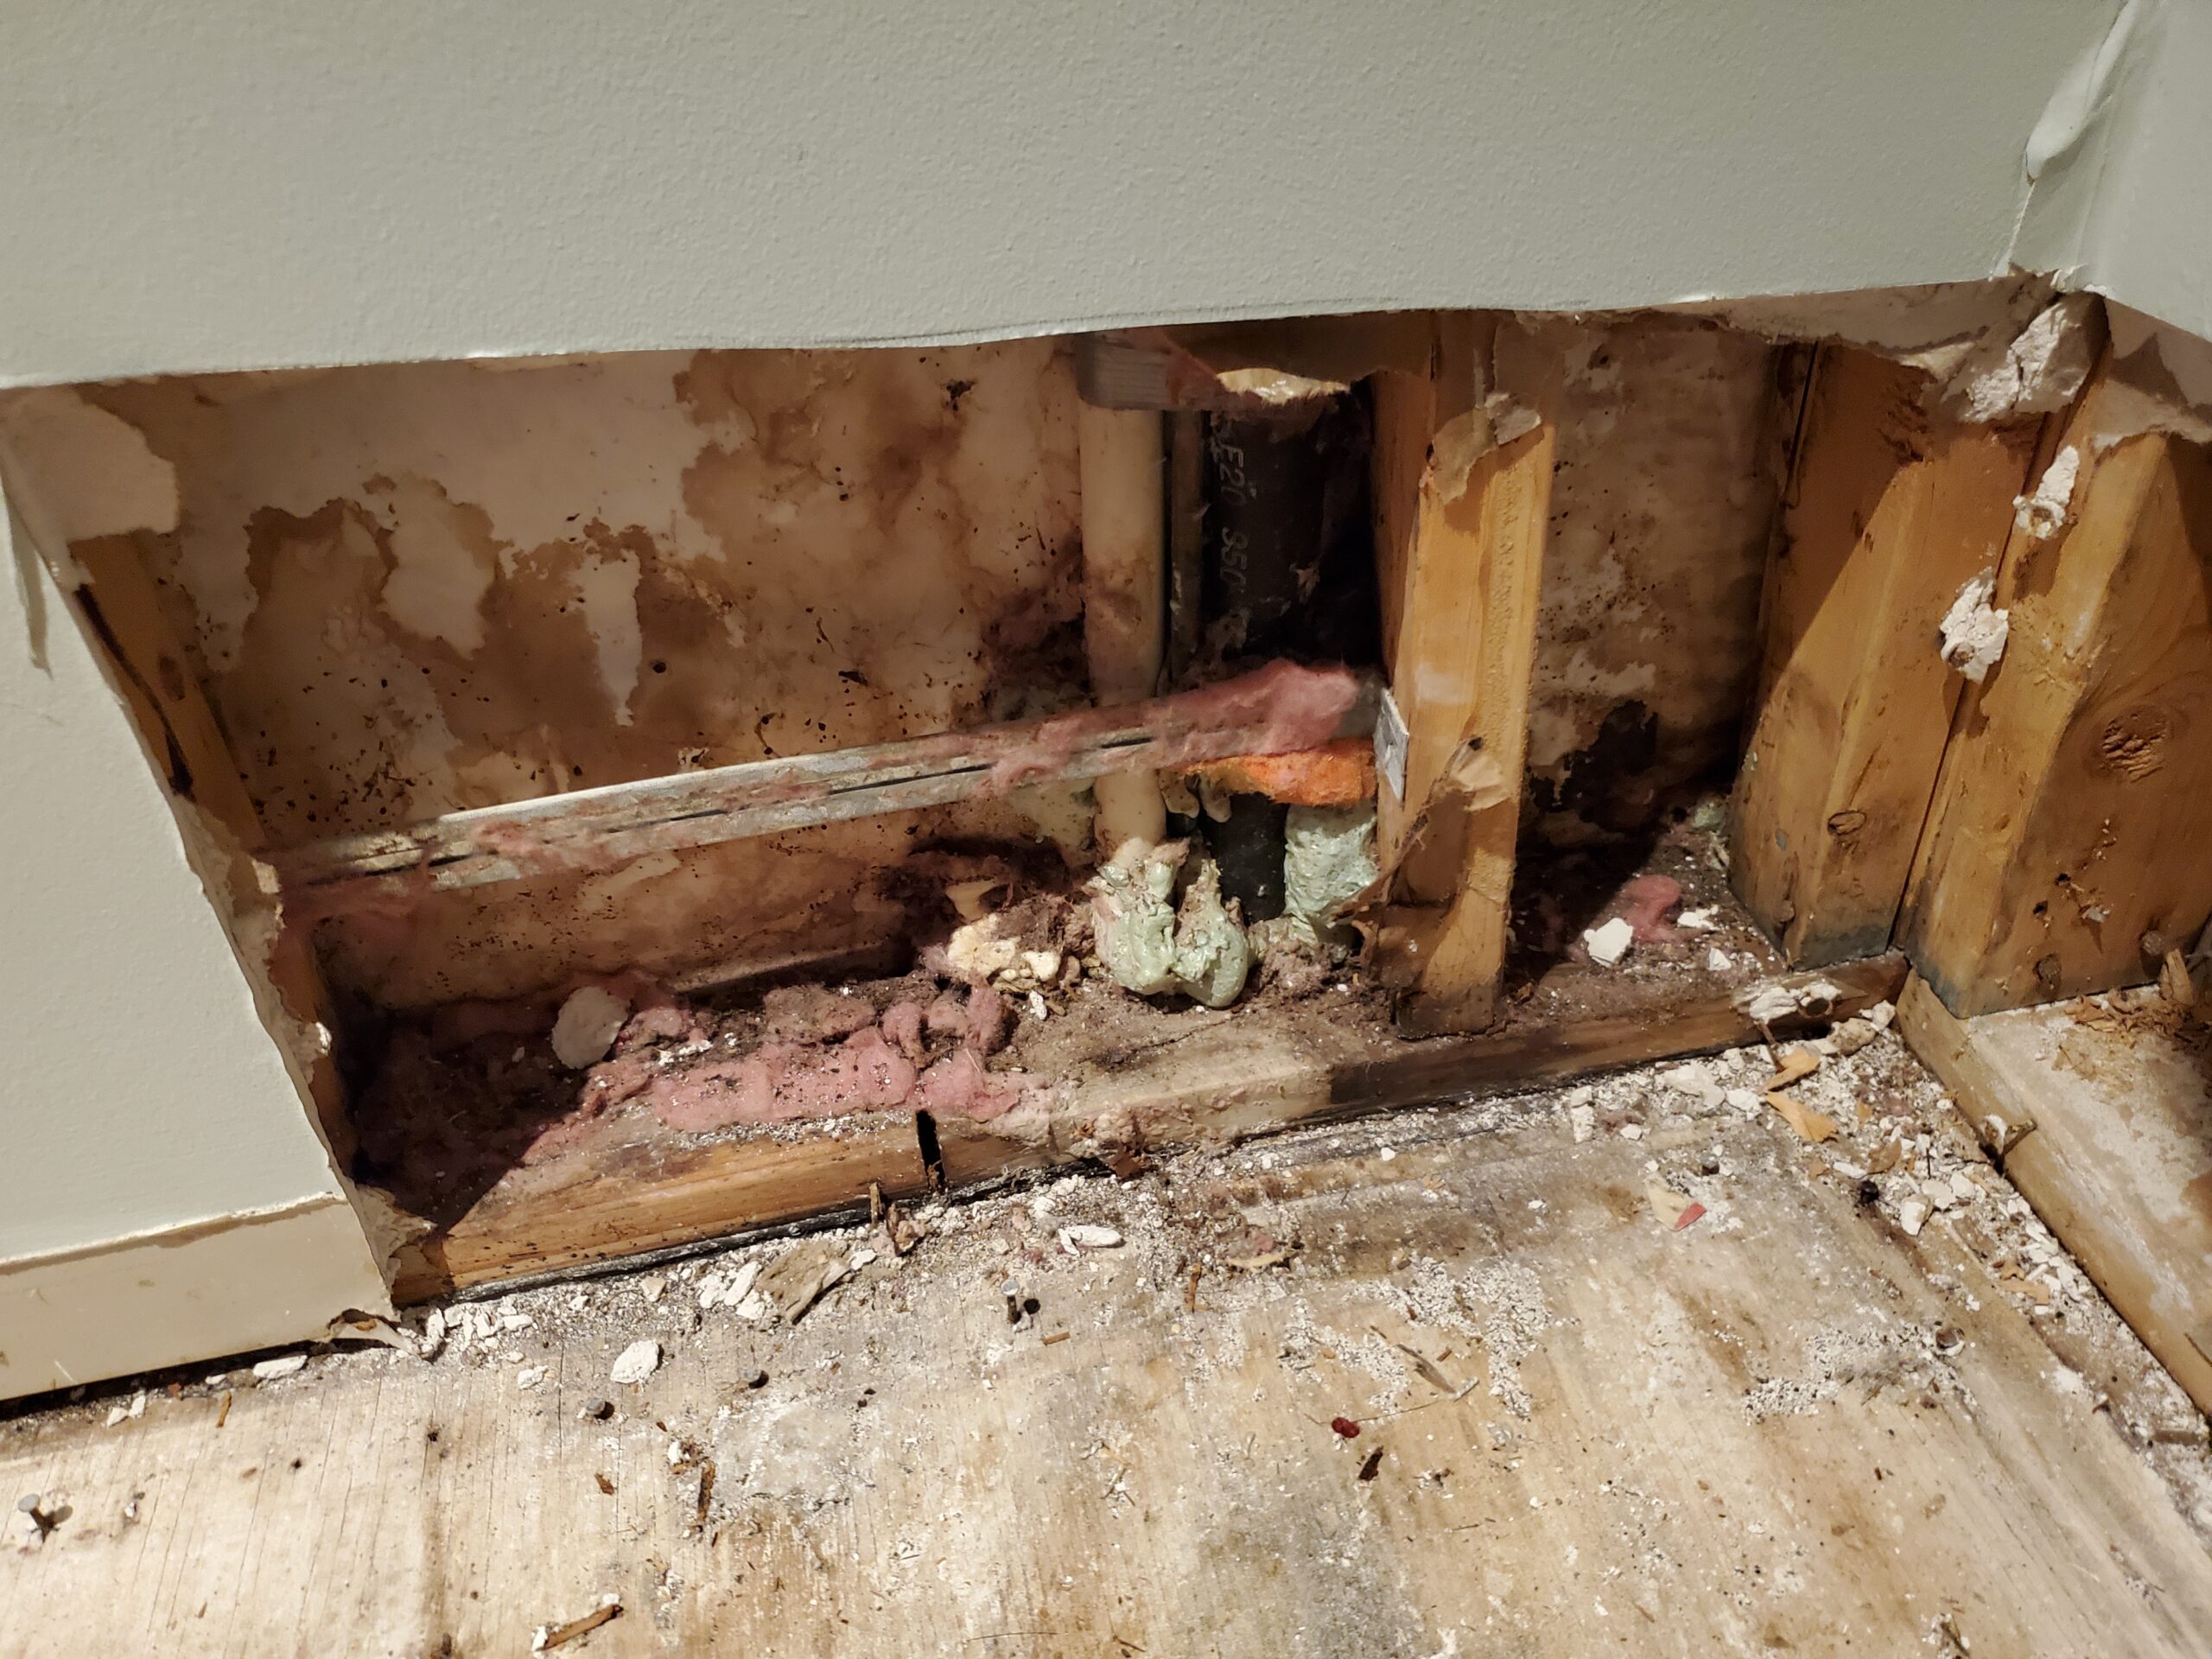
- Wall cavity insulation – completely saturated
- Wall studs – moisture rot at lower sections
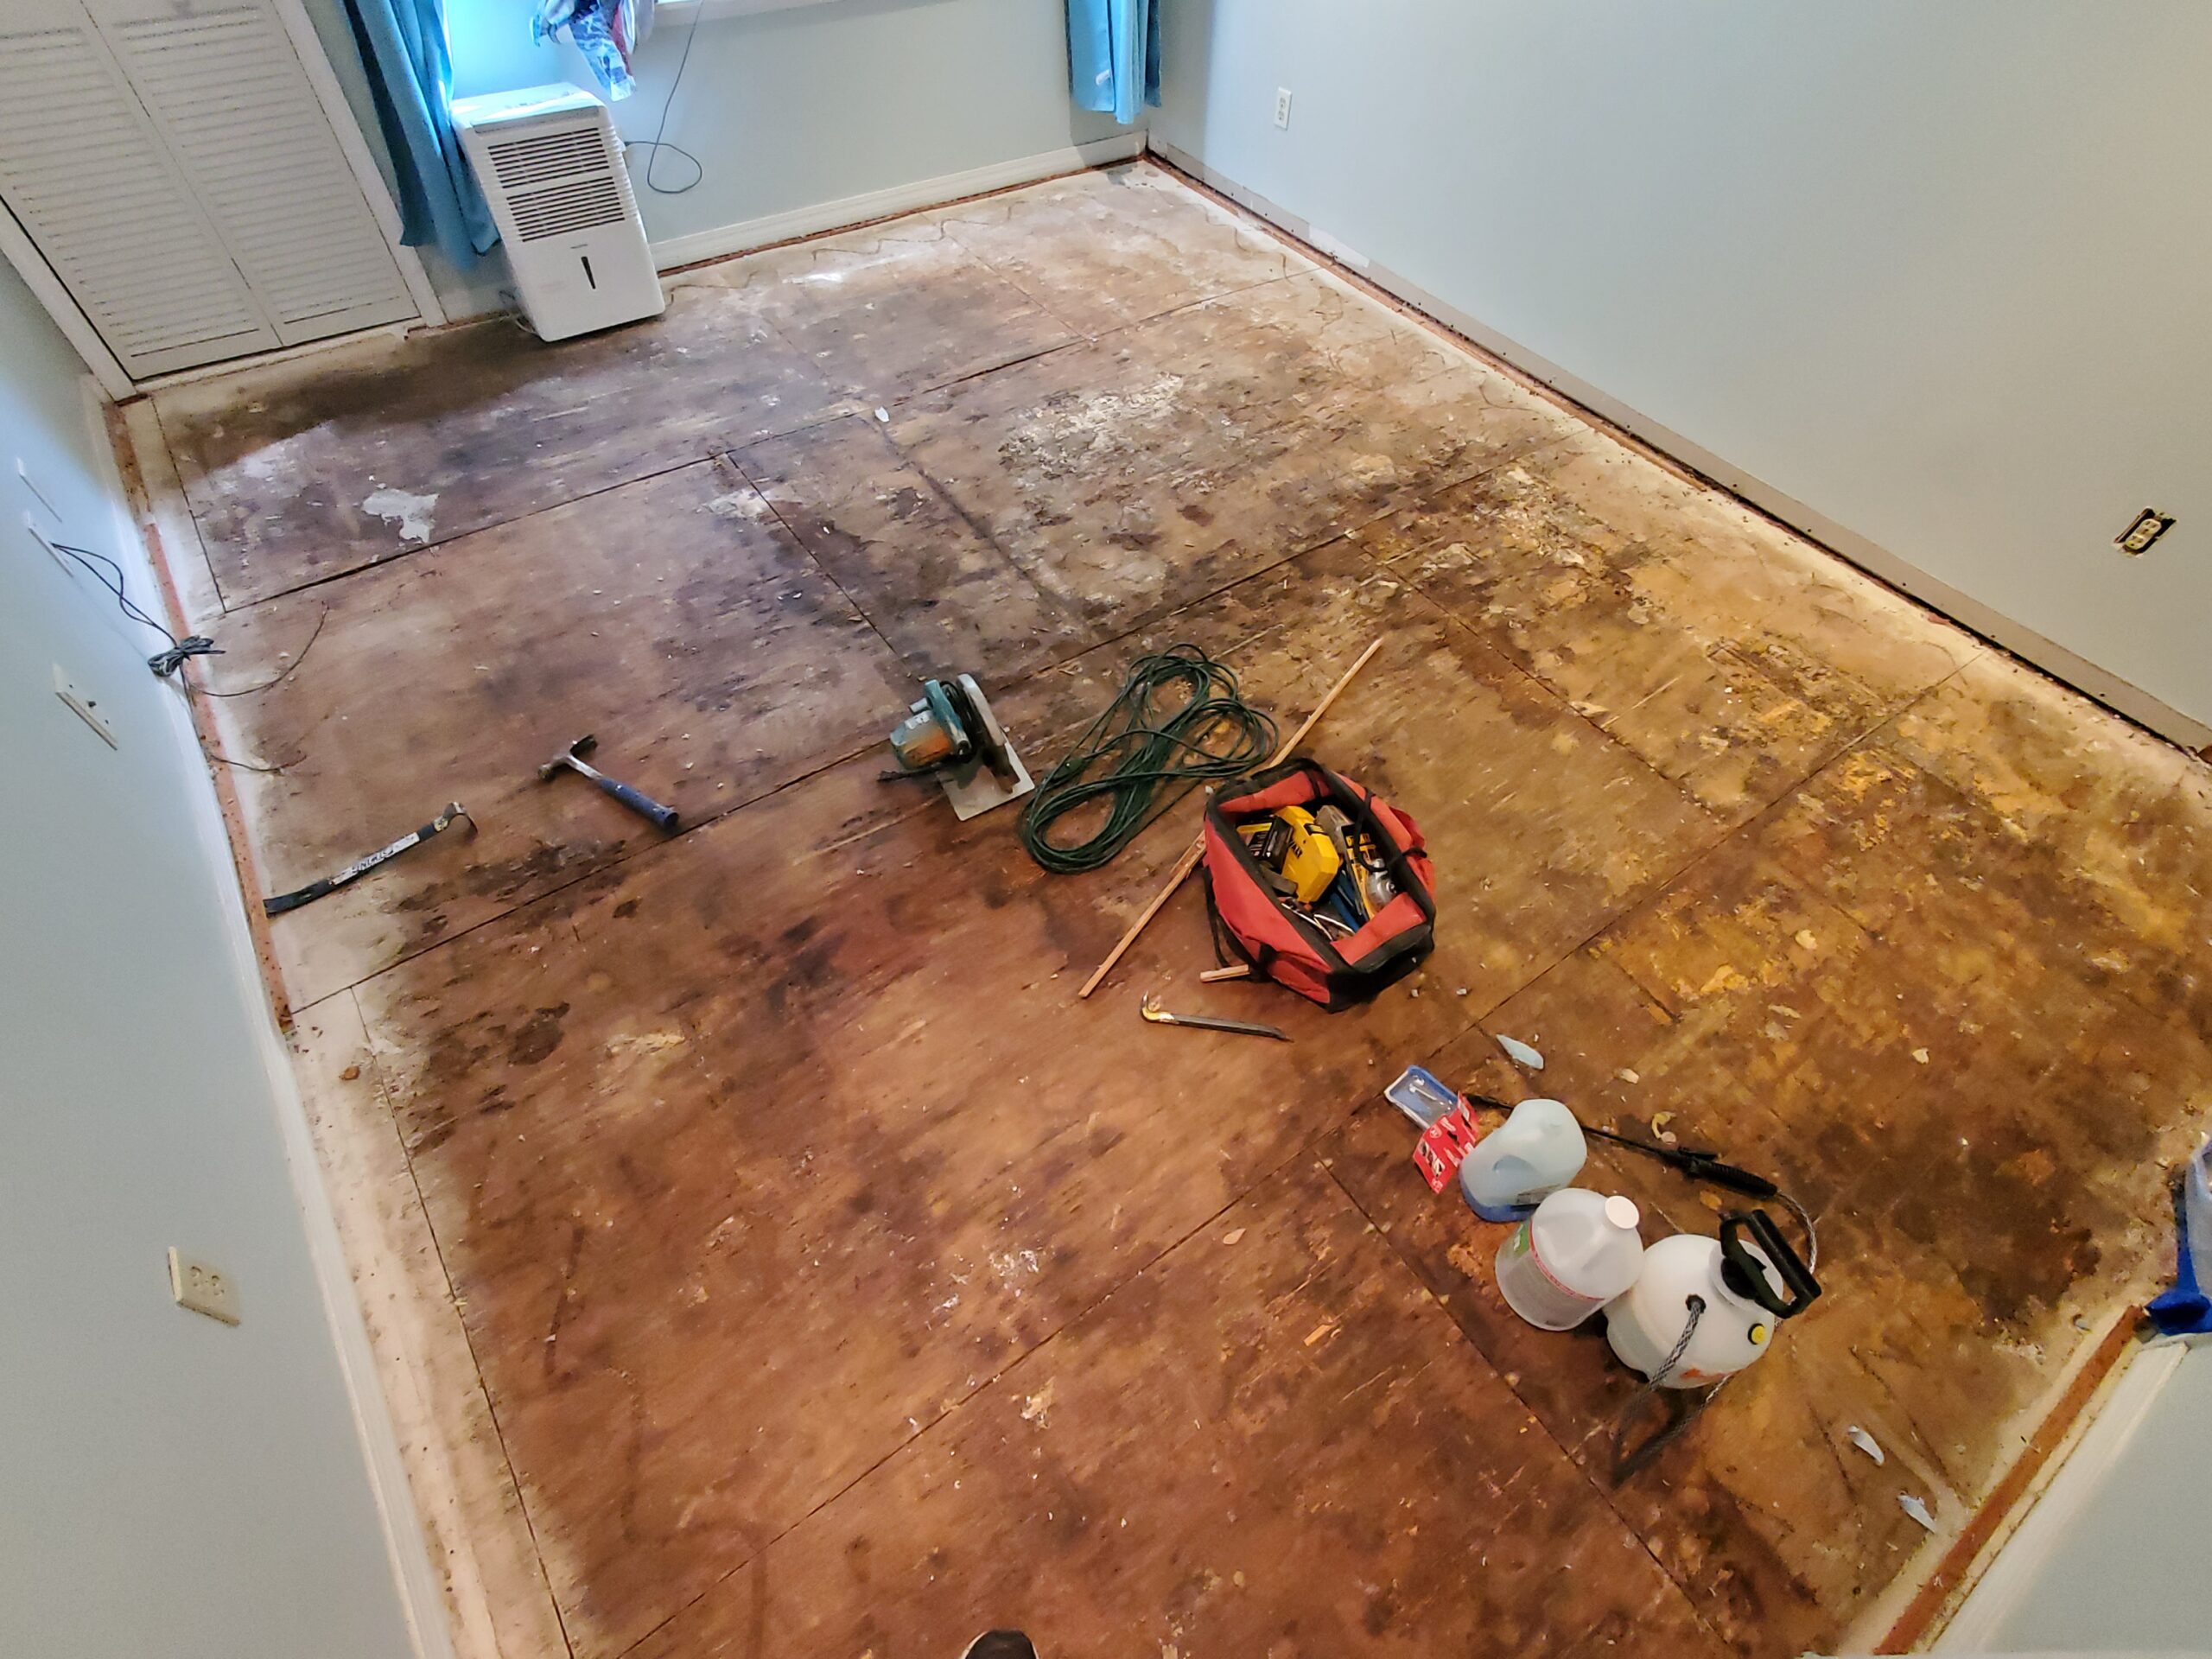
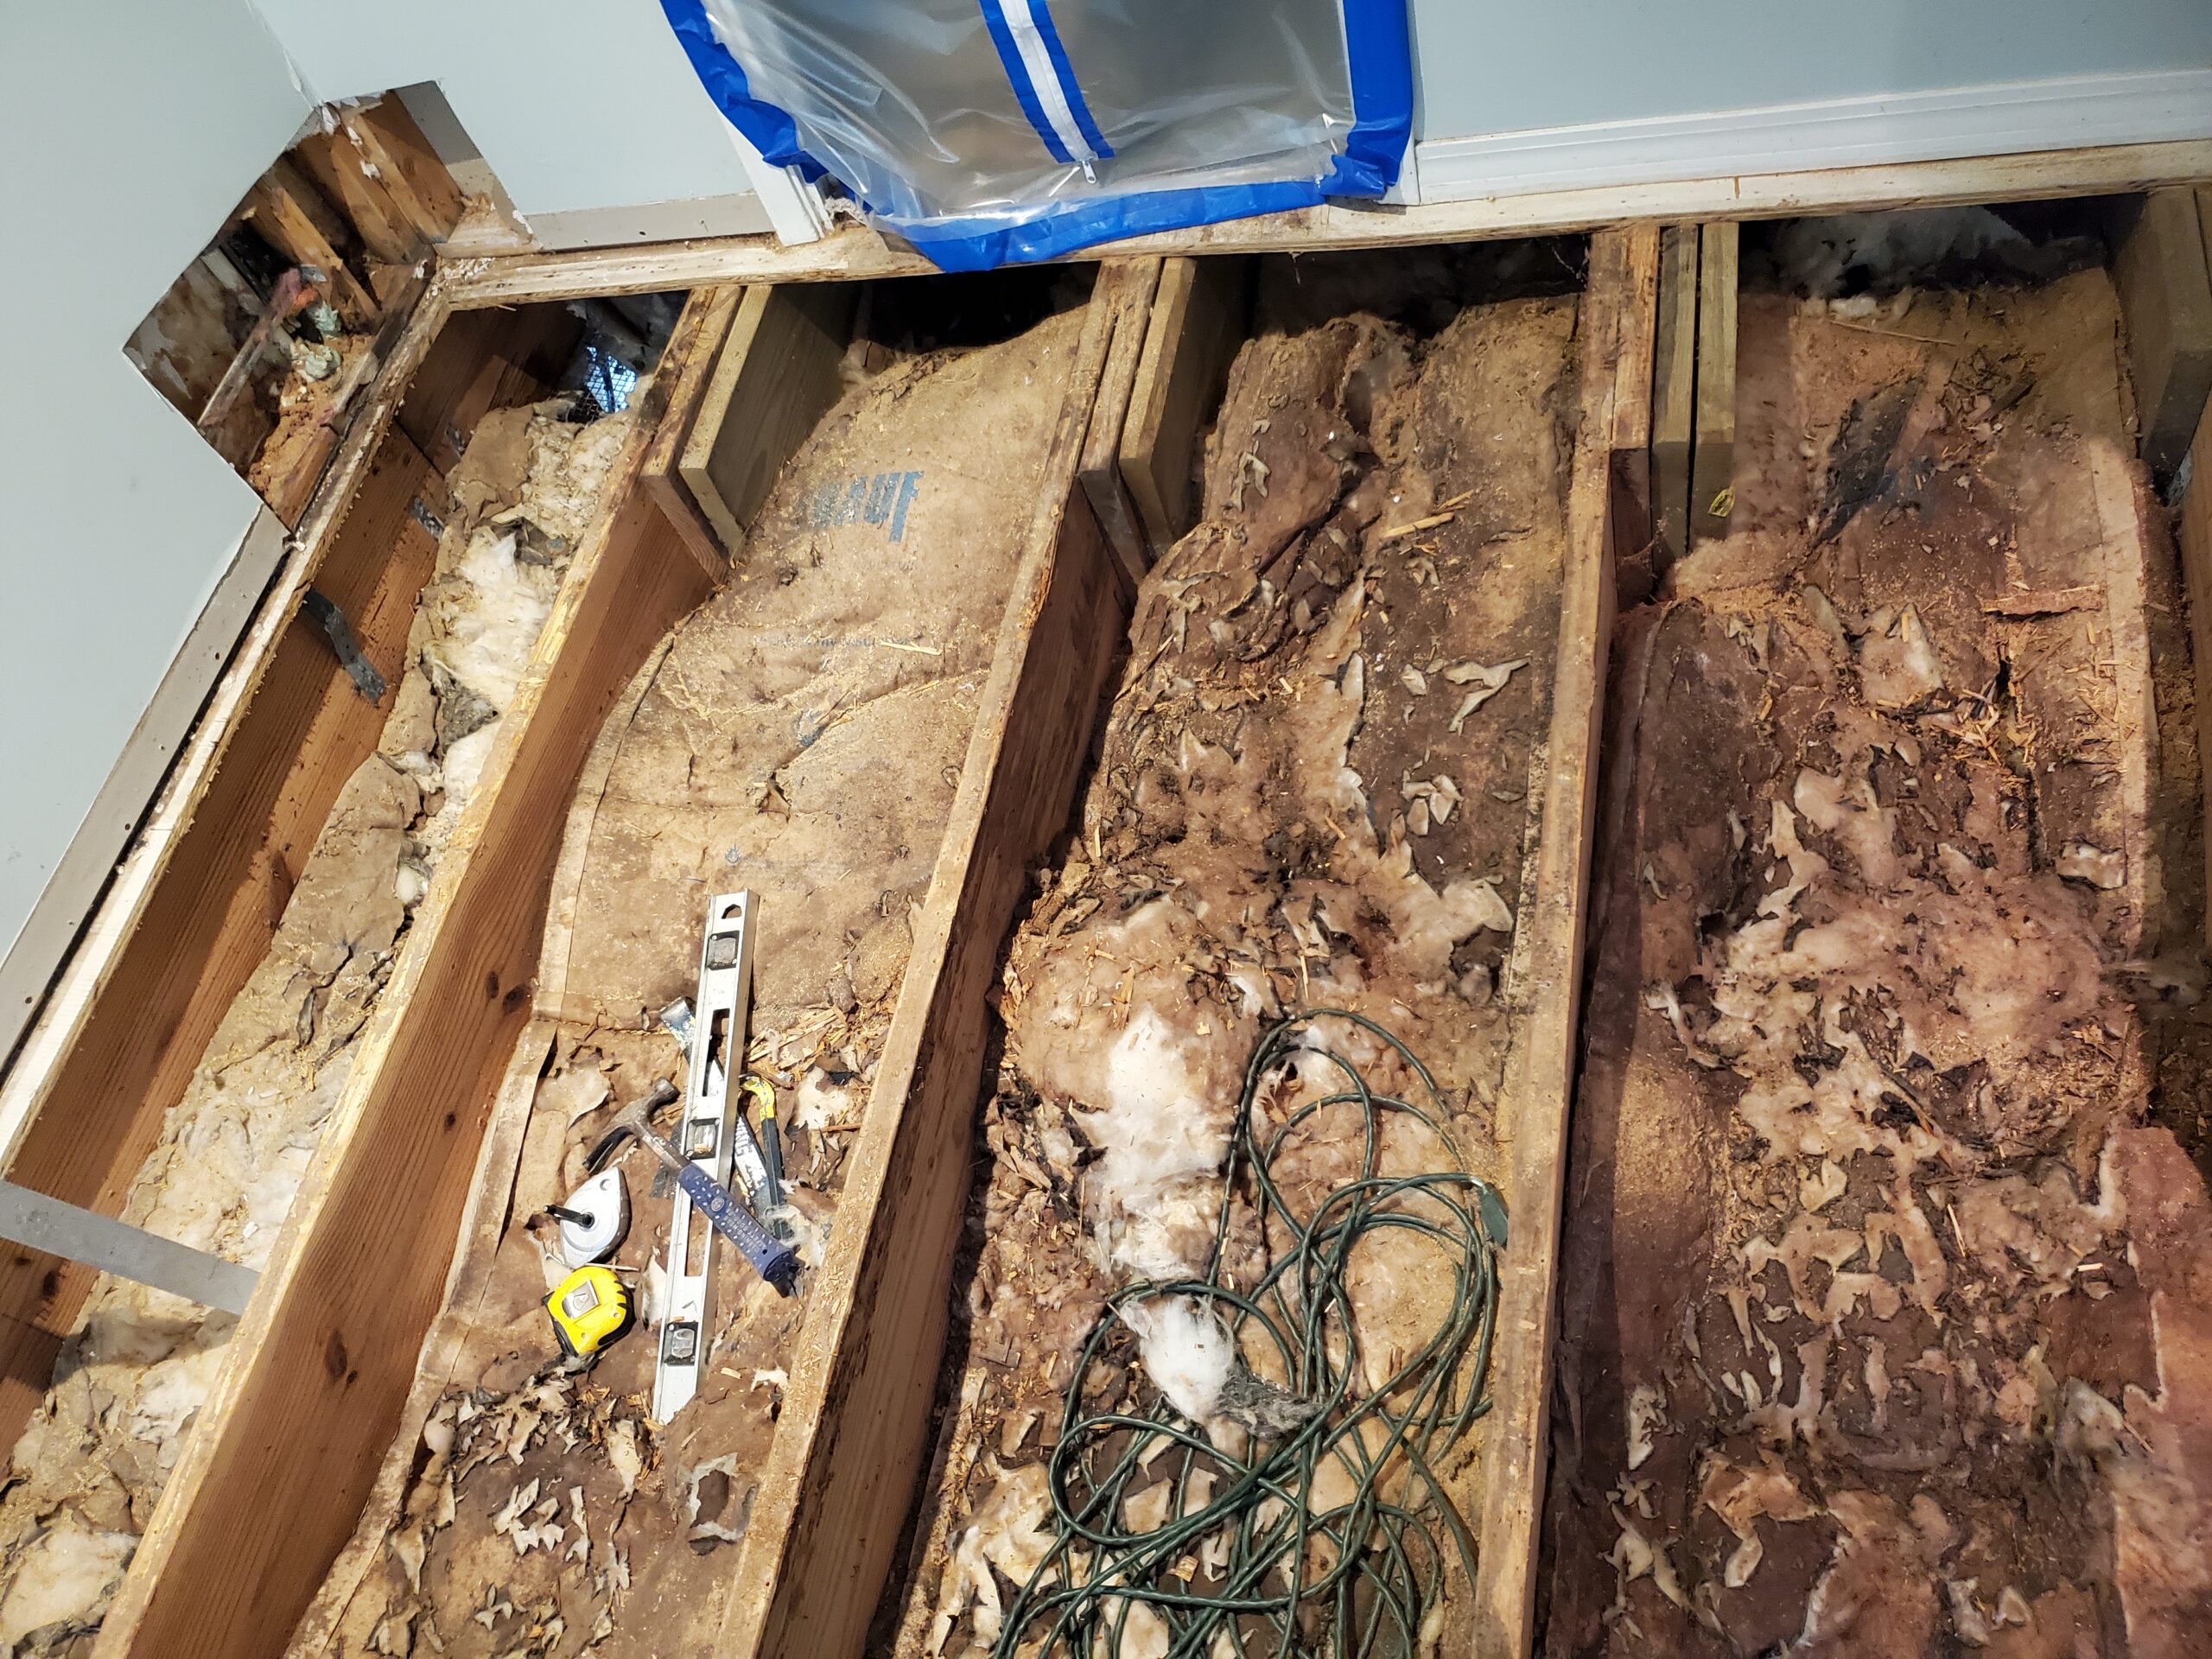
- Plywood subfloor – saturated, moldy, and rotting
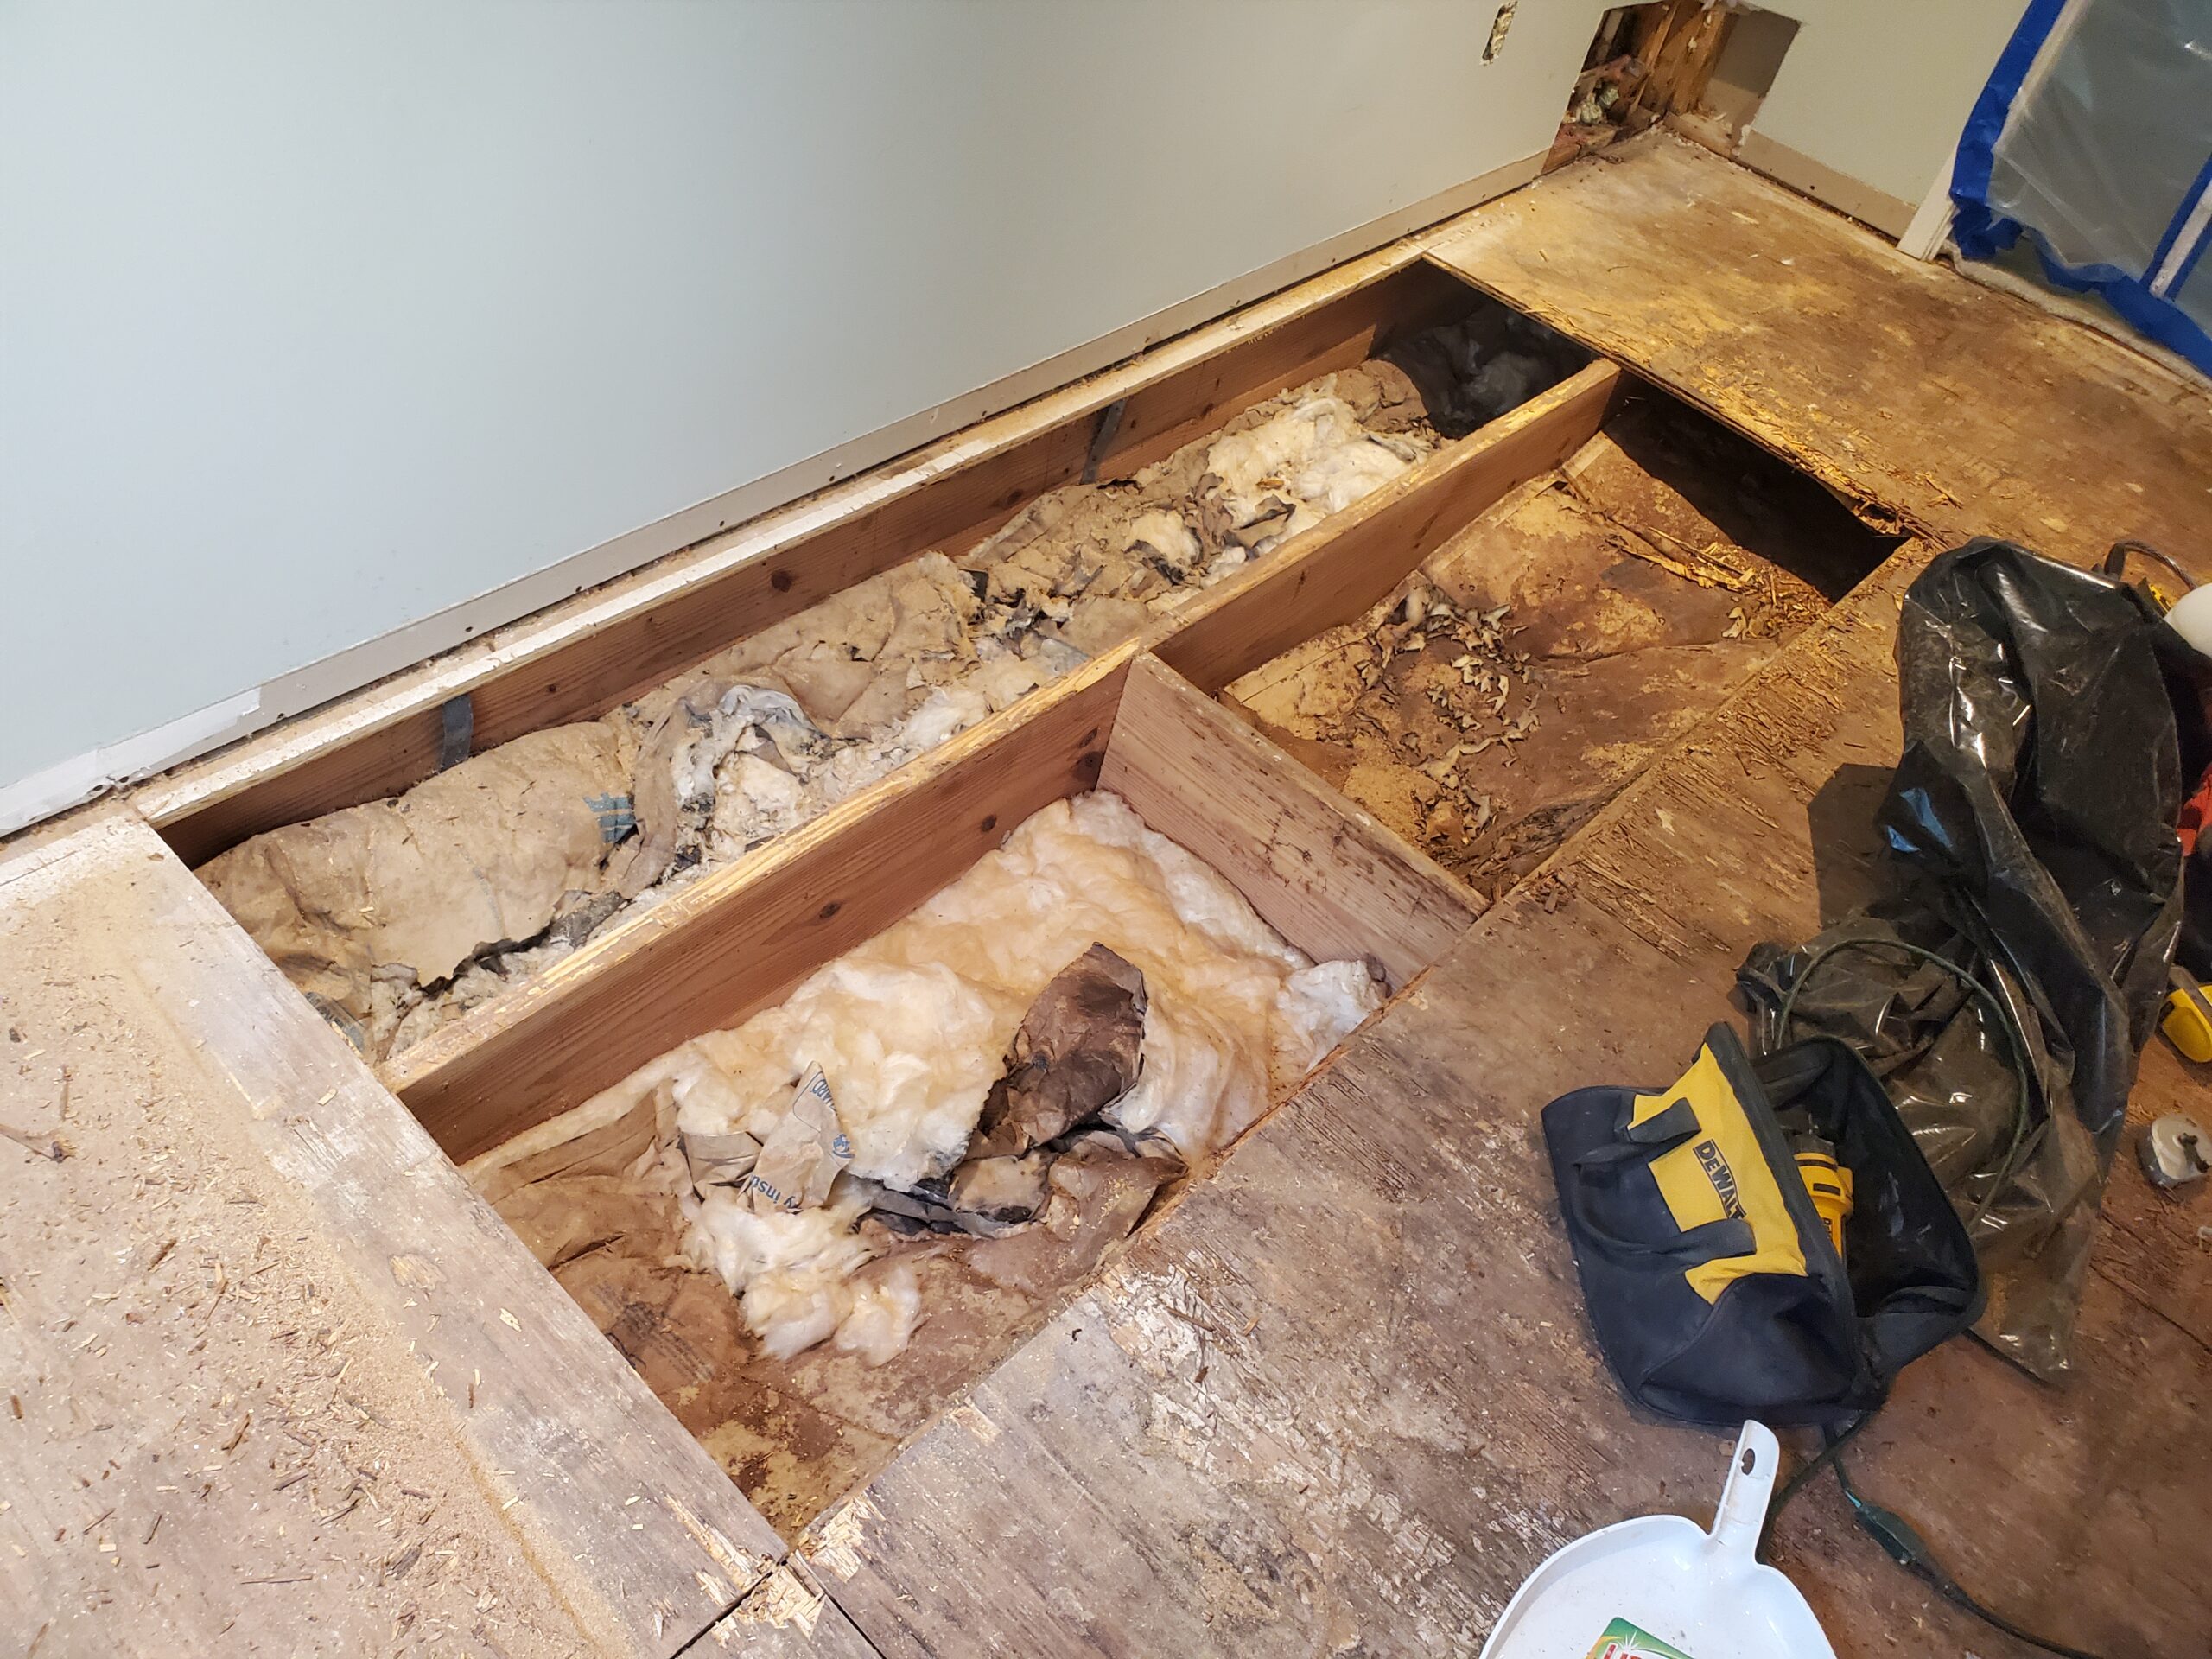
- Floor joists – multiple joists damaged by moisture
- Drywall and baseboard – water damage requiring replacement
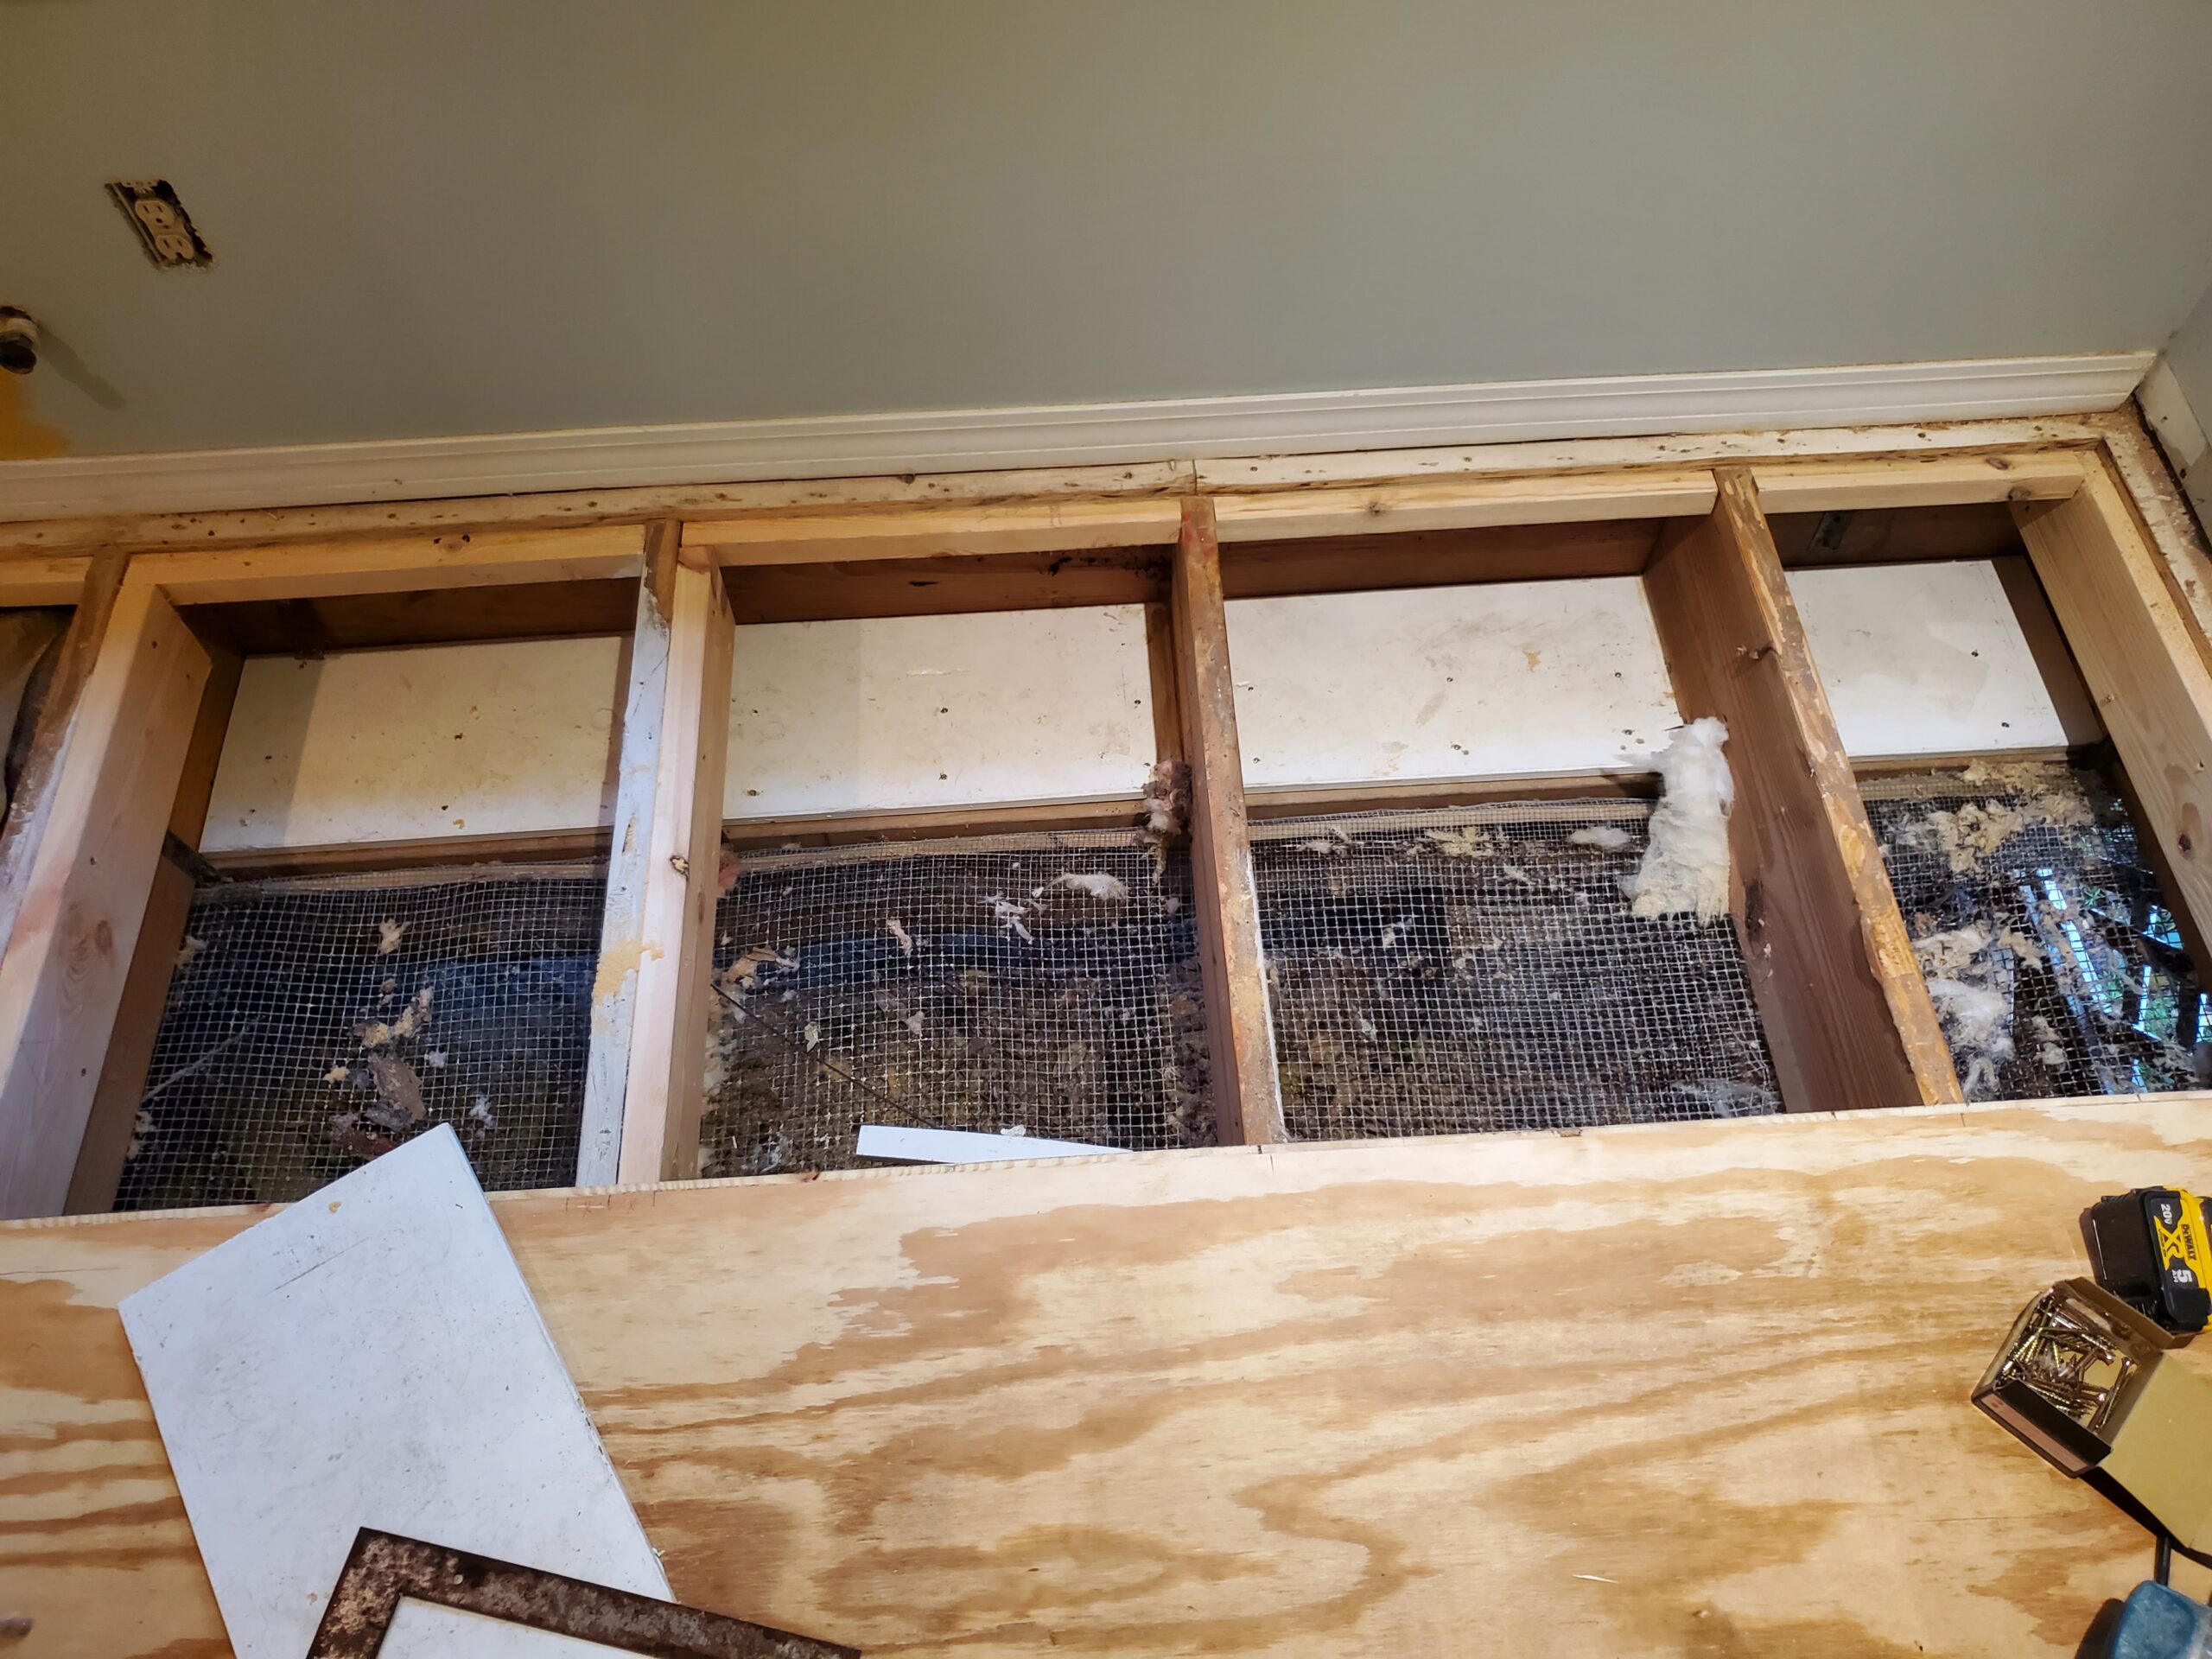
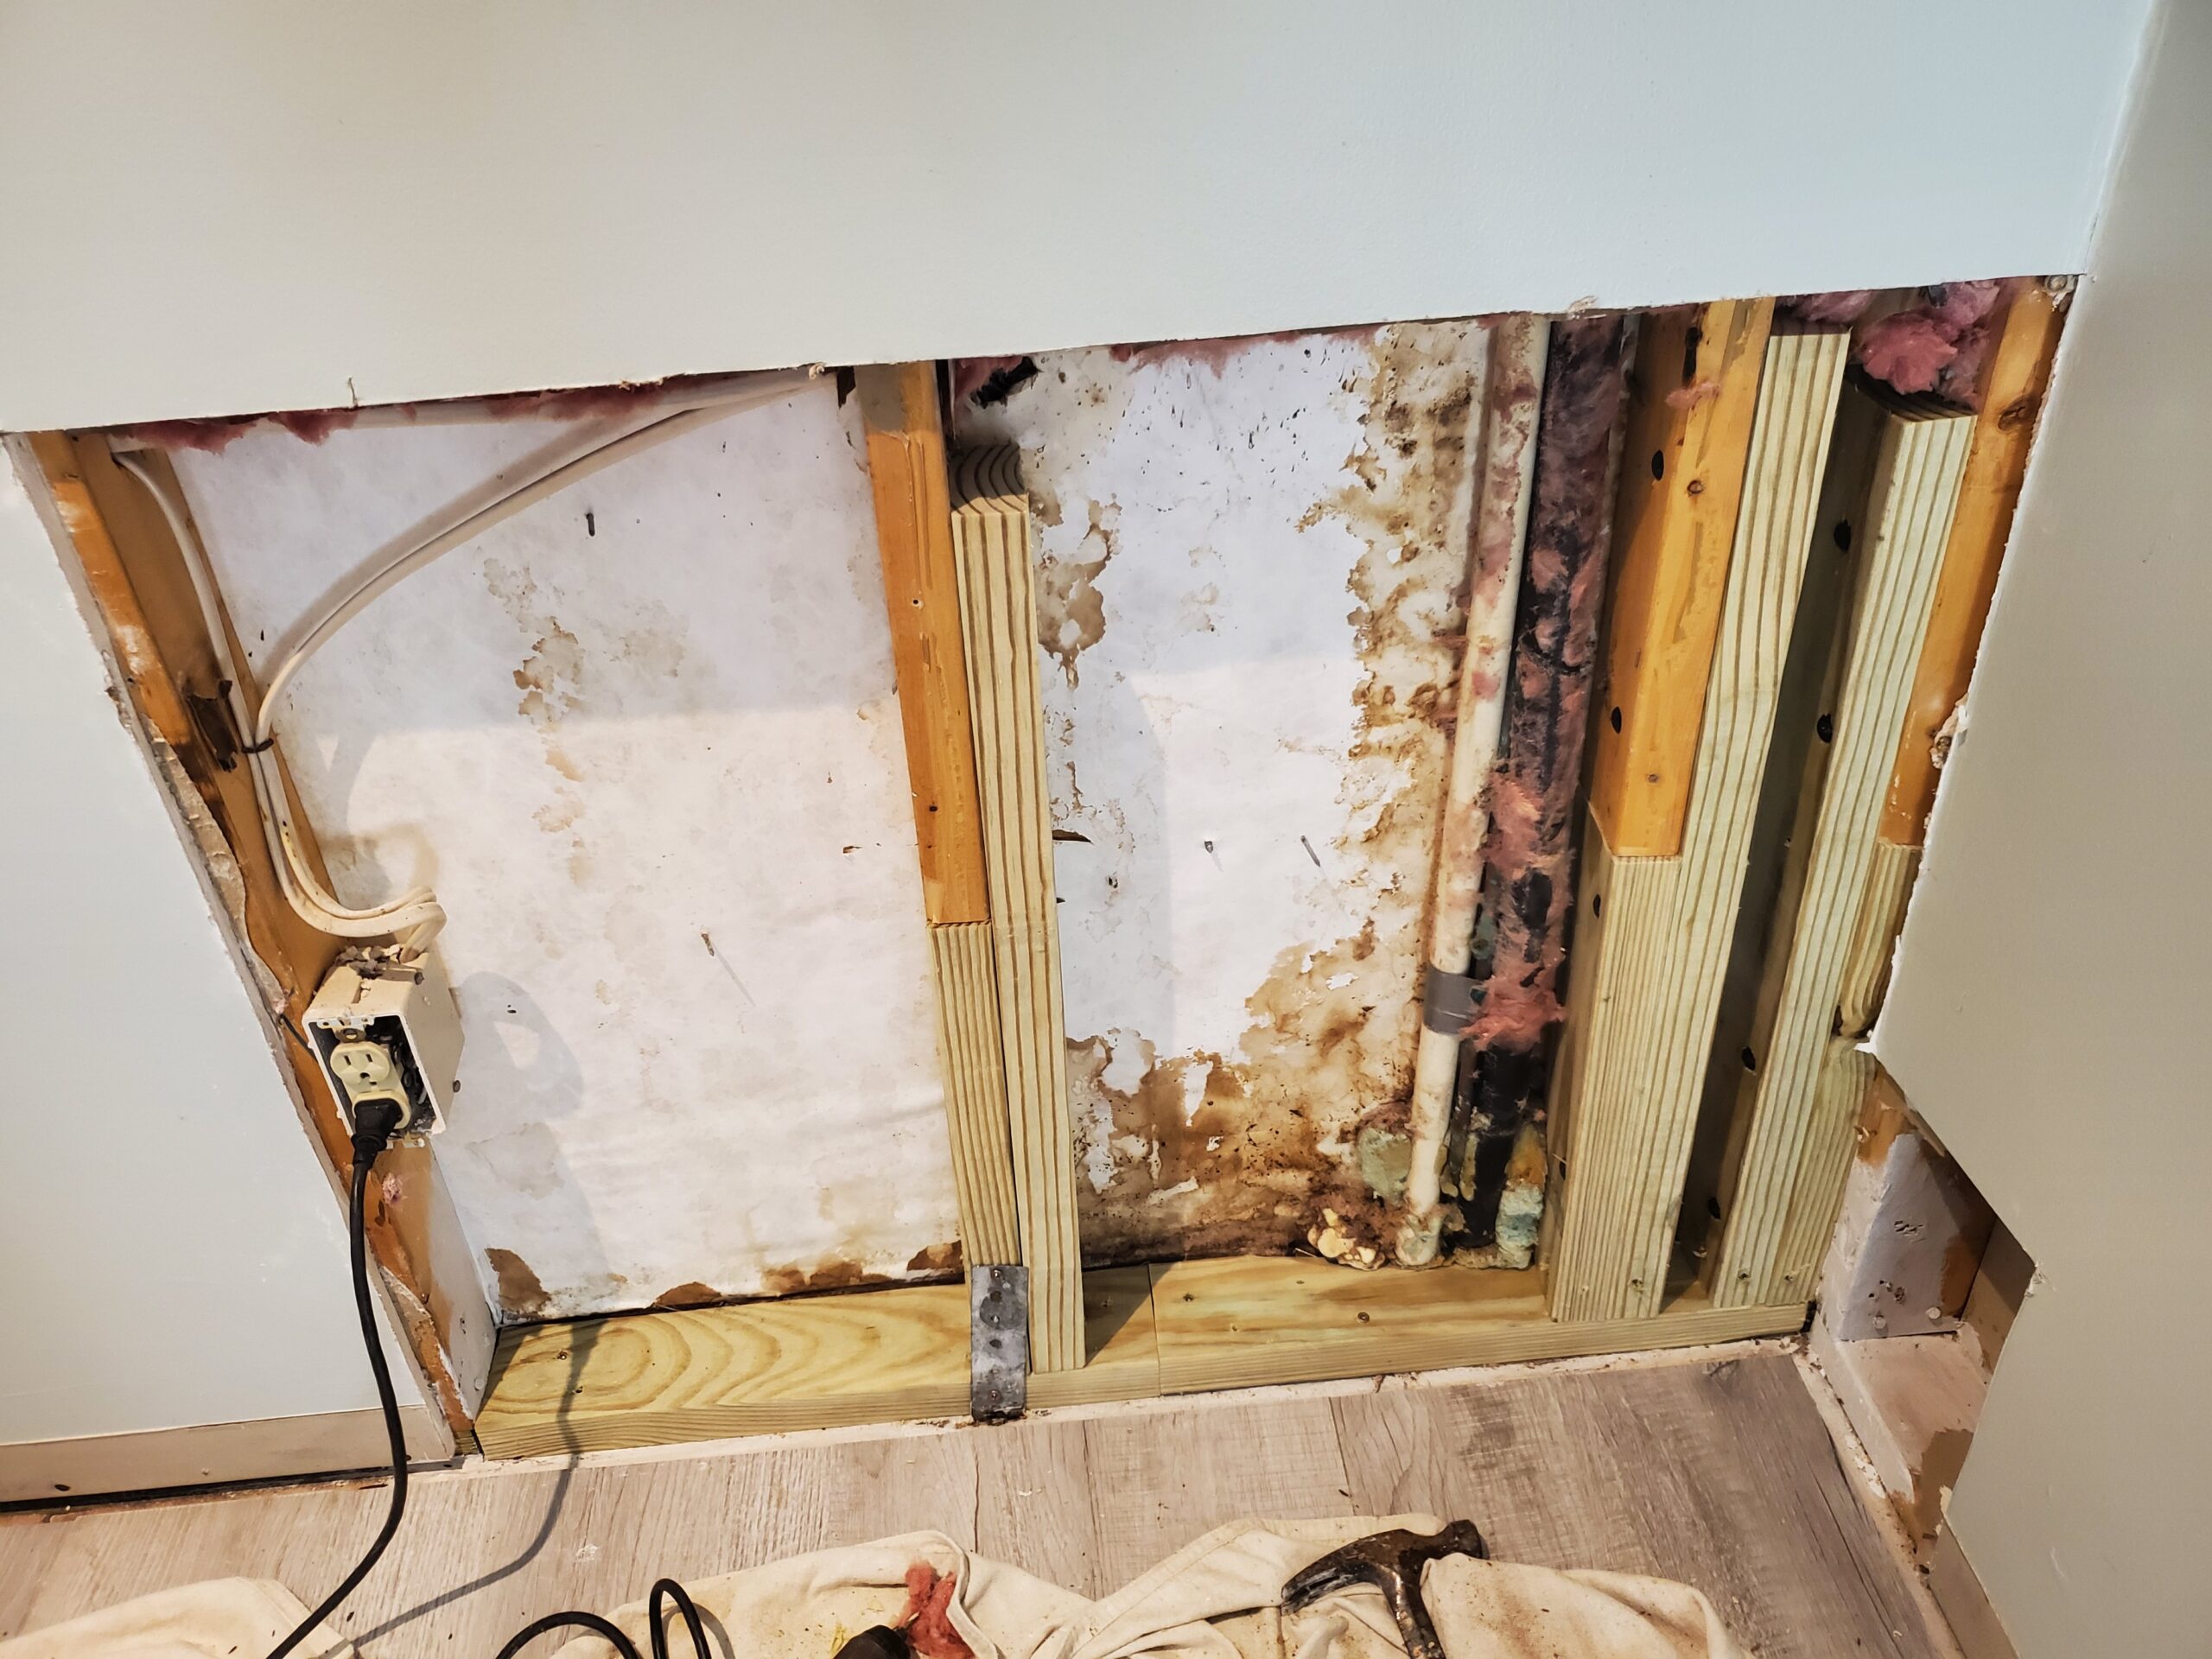
- Mold growth – present in both wall and floor cavities
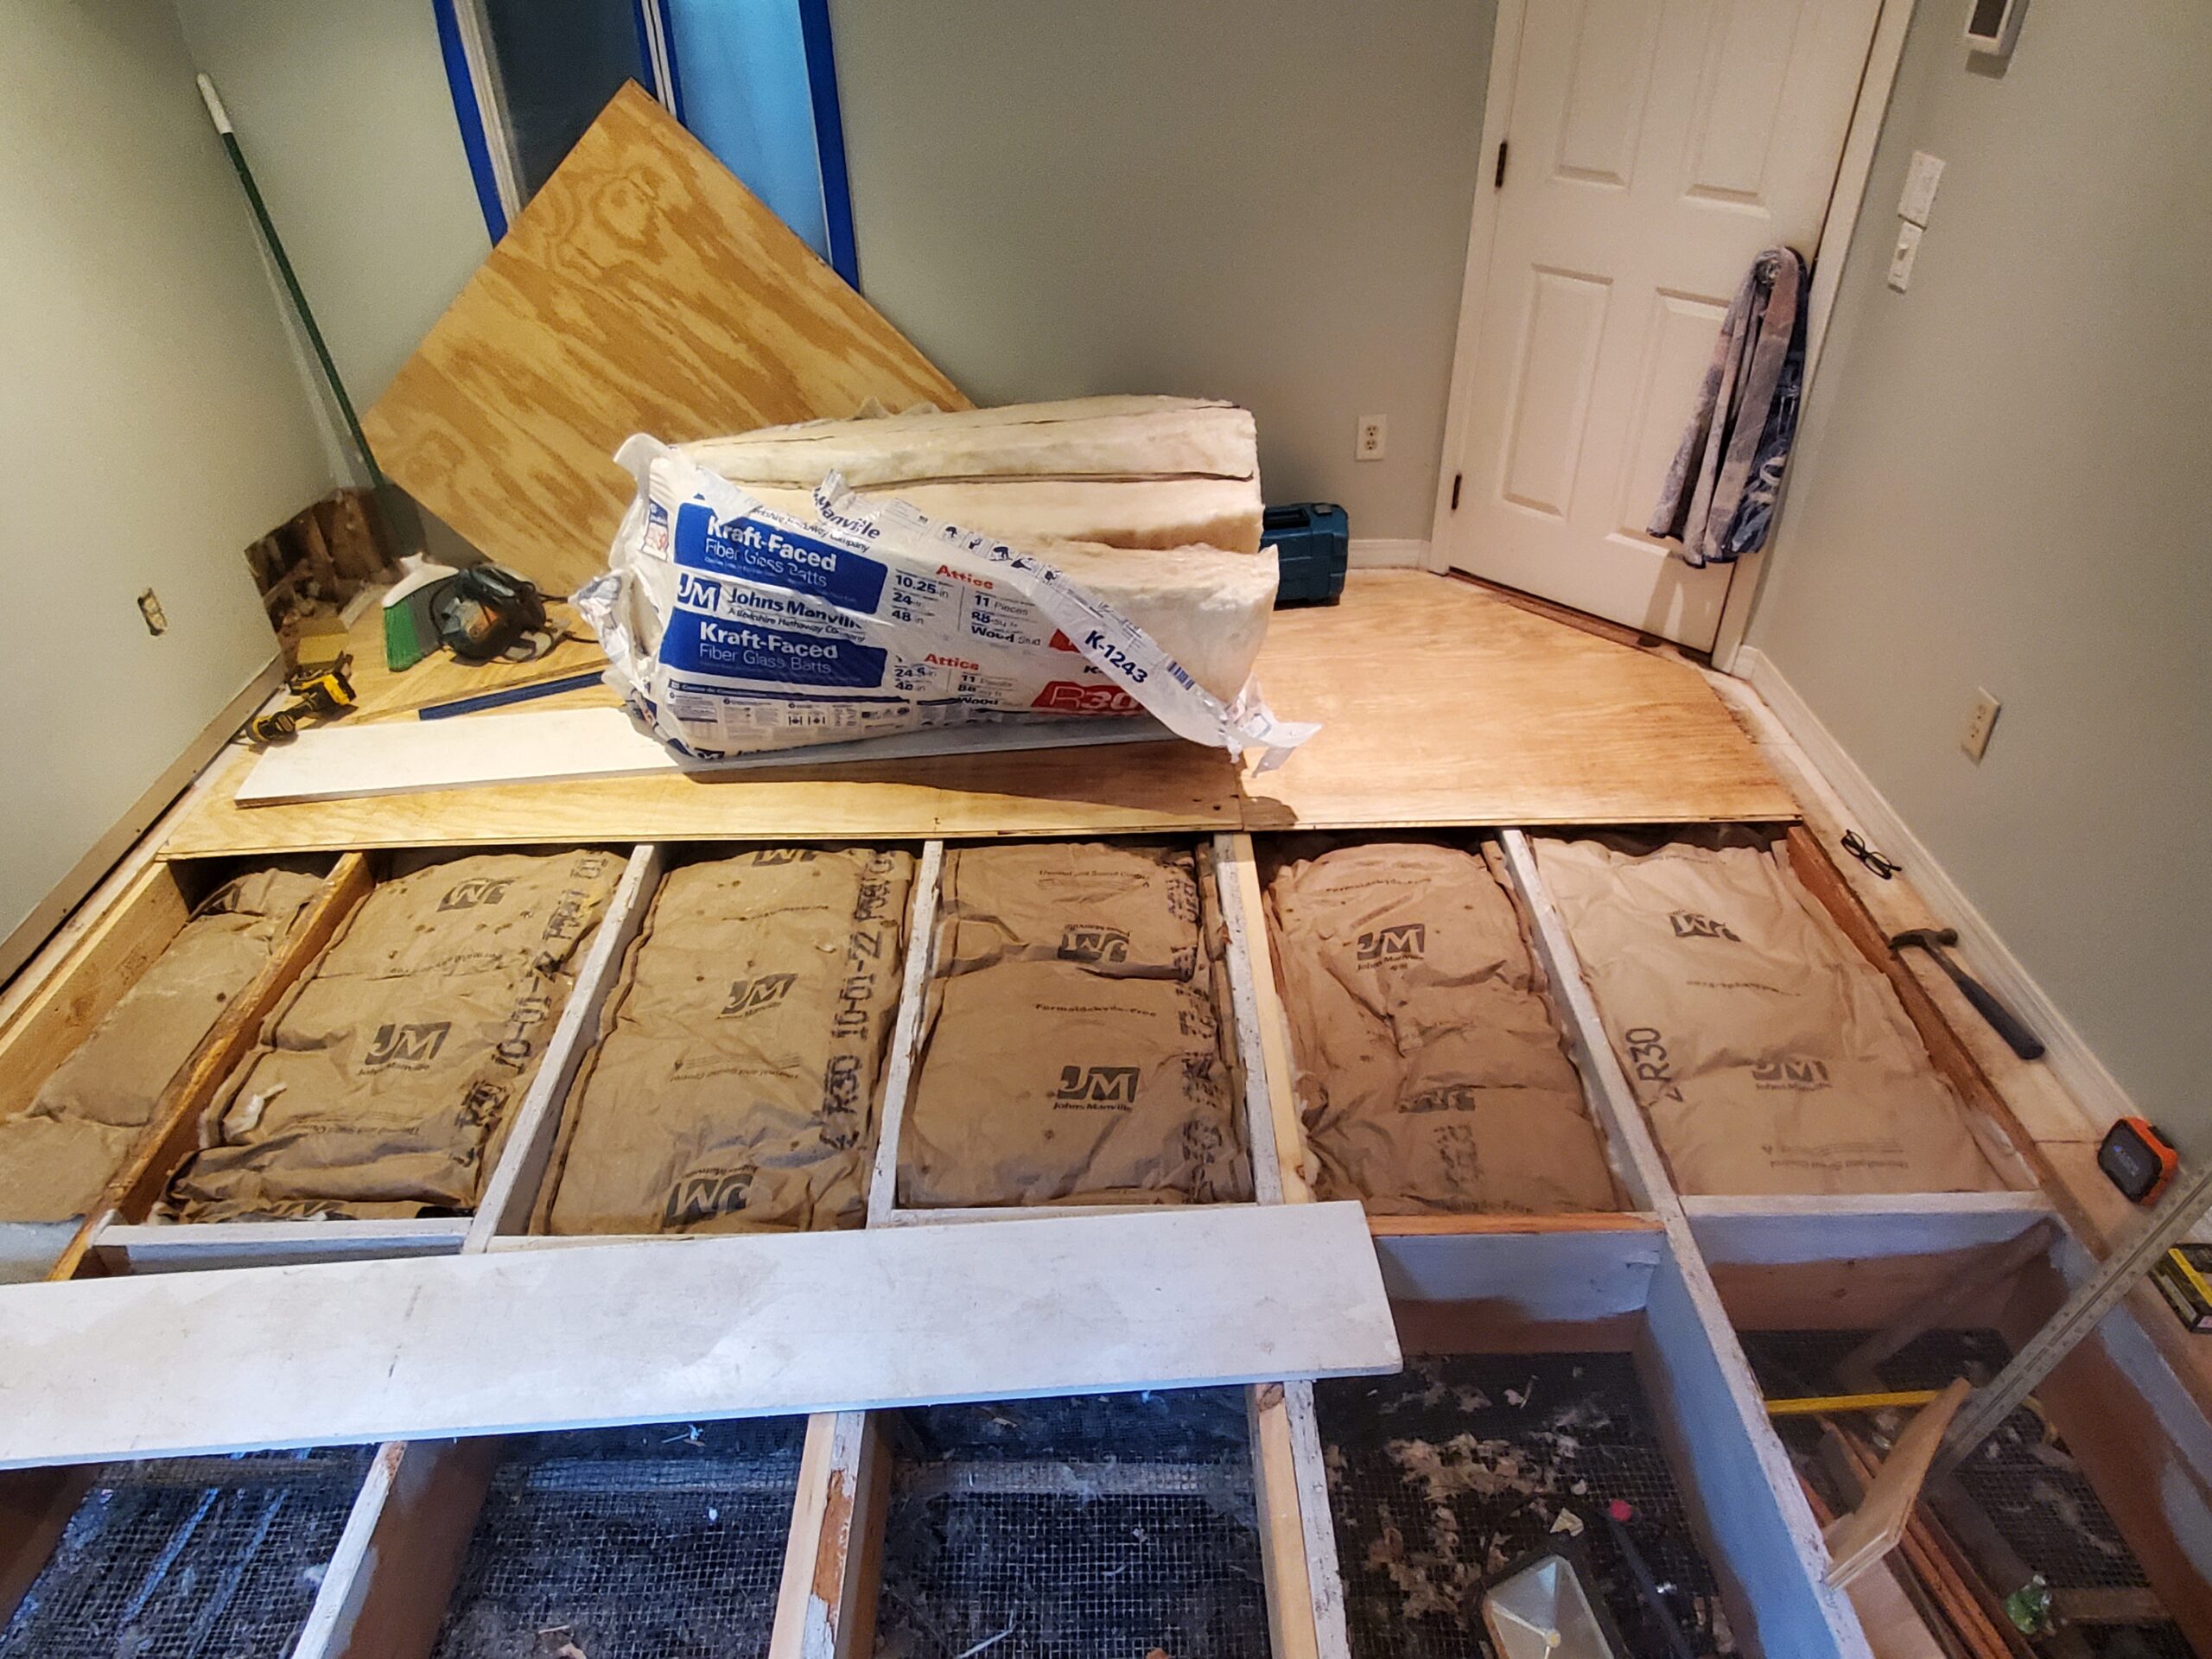
The home was built on stilts (common in flood-prone areas), which meant the floor system was exposed underneath, requiring careful work in the crawl space for joist repair and insulation replacement. This comprehensive water damage restoration would require expertise in carpentry, mold remediation, drywall finishing, and flooring installation.
Key Project Requirements
- Remove and replace damaged exterior T1-11 siding and trim
- Properly seal the air compressor line entry point to prevent future water intrusion
- Kill and treat all mold in wall and floor cavities using vinegar solution and mold primer
- Repair or replace damaged wall studs and floor joists
- Install new insulation in both wall and floor cavities
- Replace damaged drywall, tape, mud, sand, and finish
- Install new tongue and groove plywood subfloor
- Install luxury vinyl plank flooring with proper transitions
Comprehensive Project Breakdown: Exterior and Interior Restoration
Phase 1: Exterior Siding and Water Infiltration Point Repair
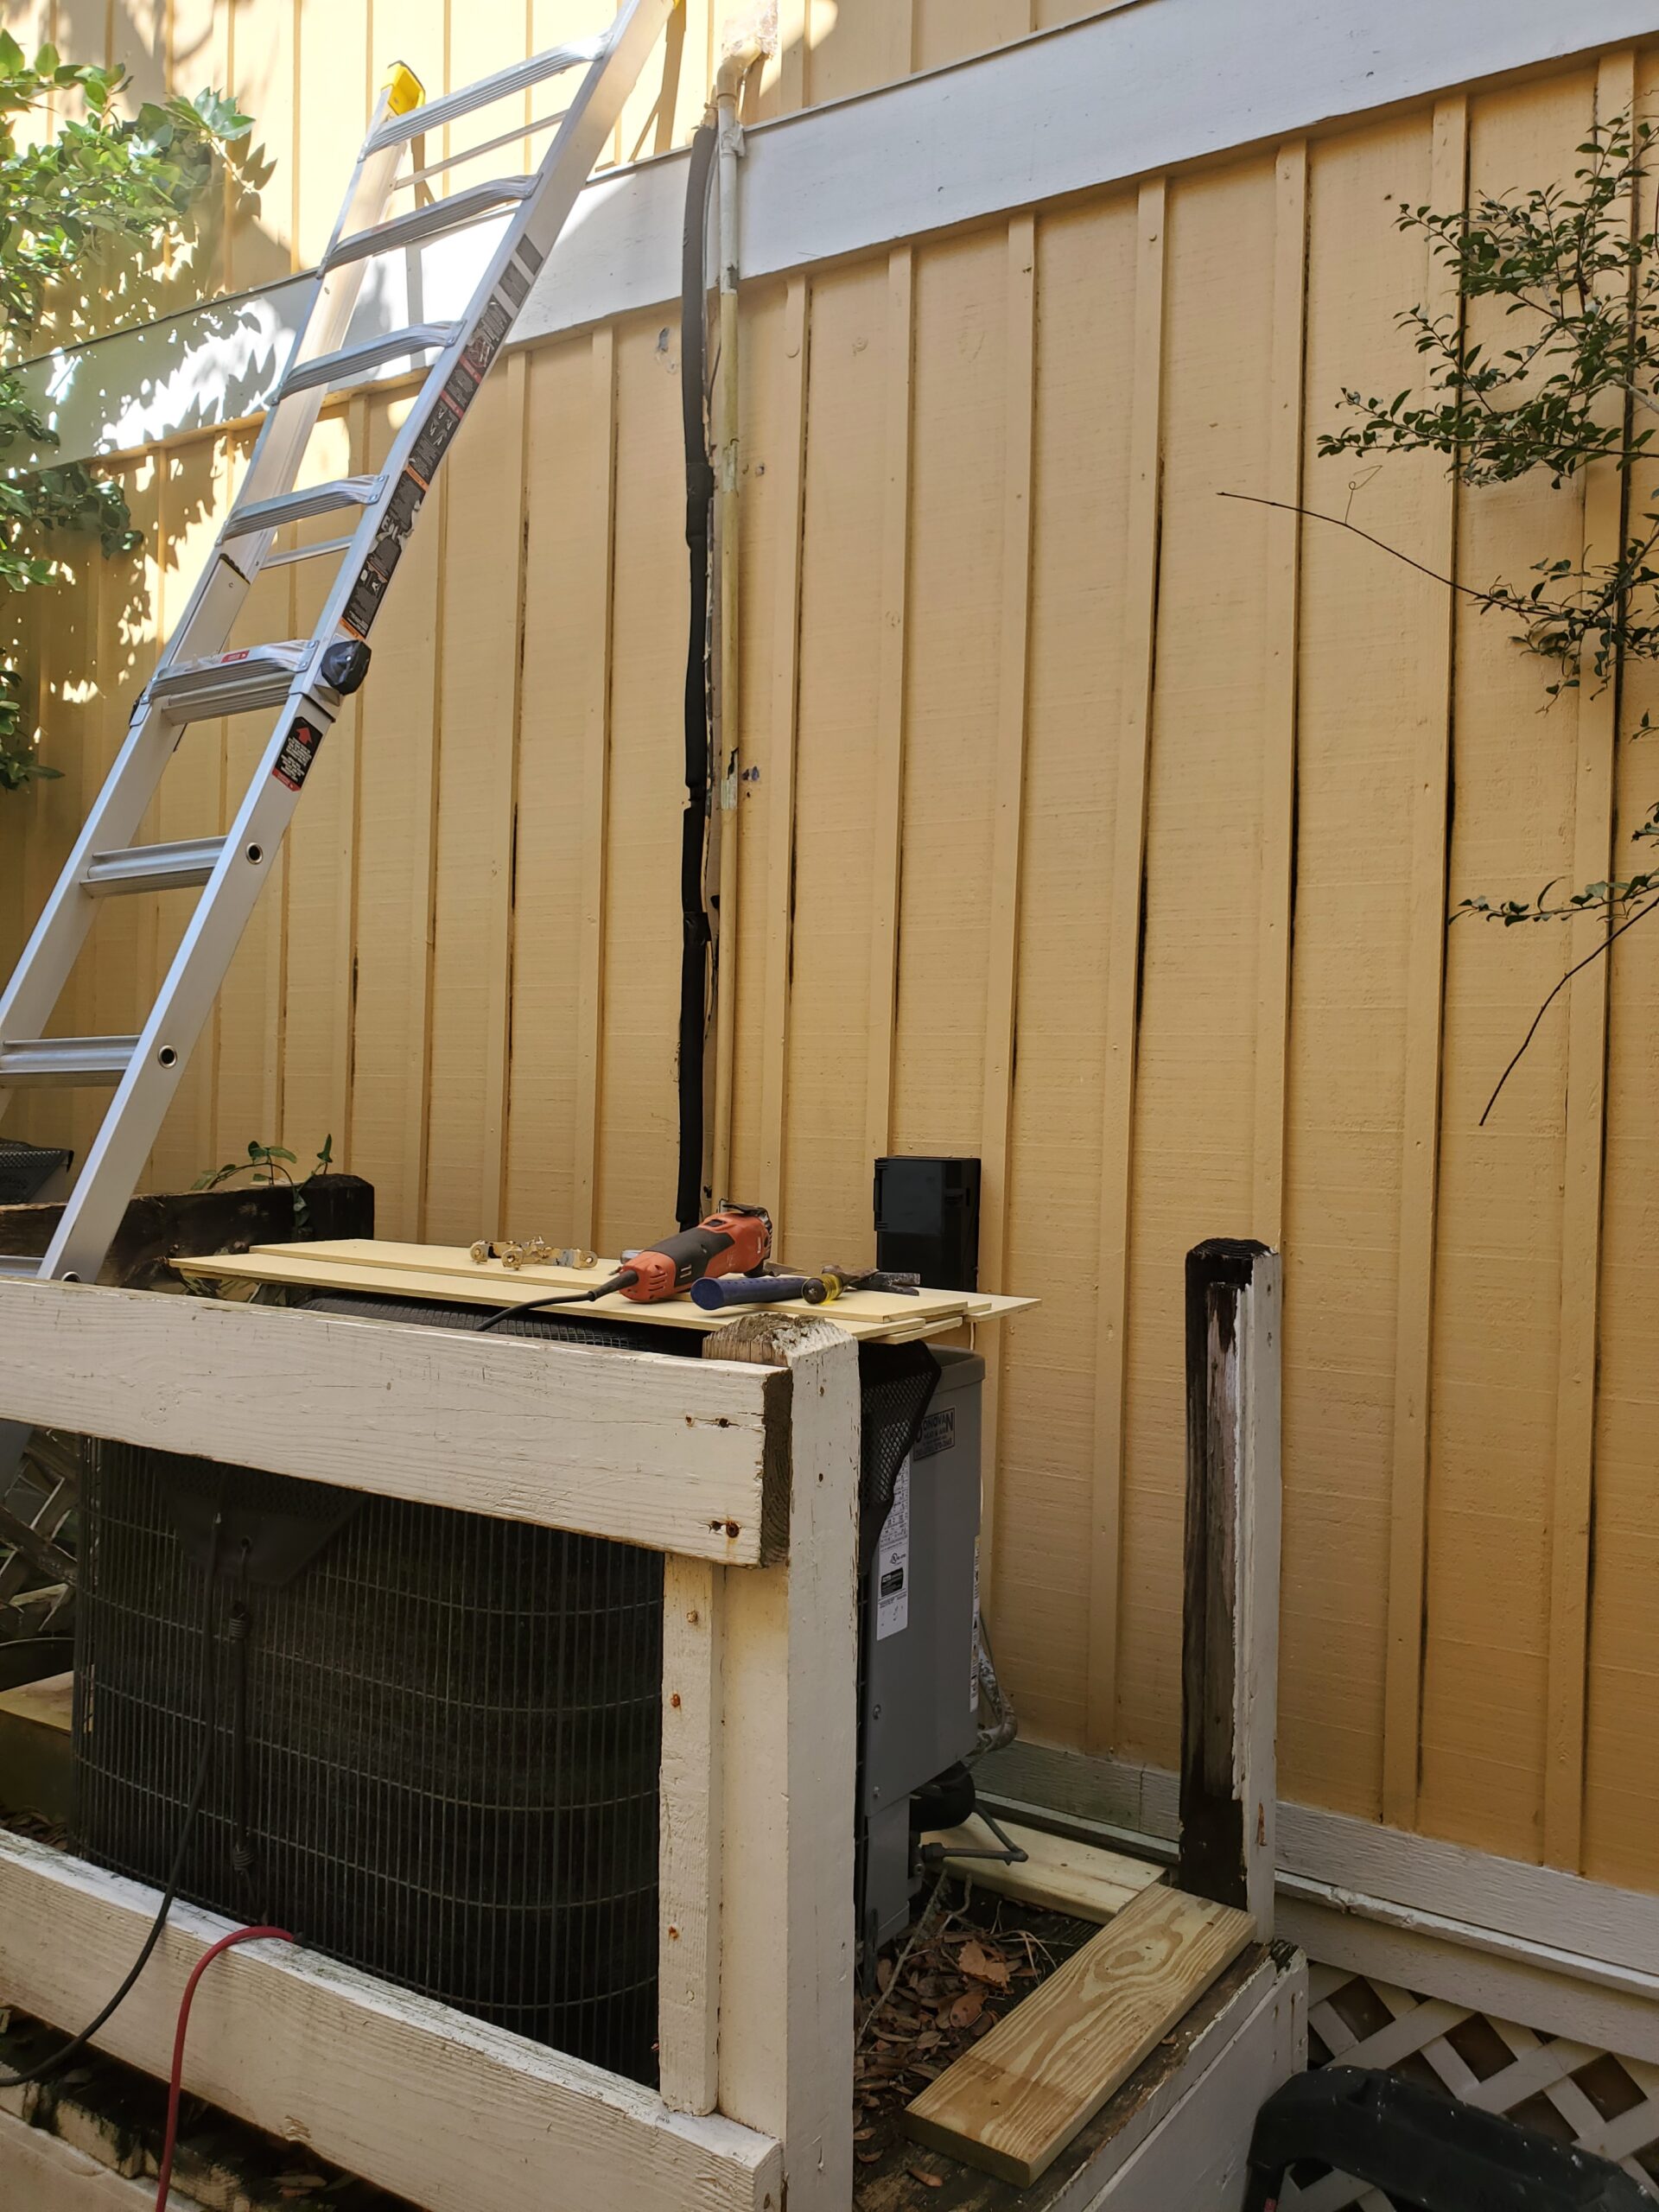
The first priority was stopping water from continuing to enter the structure. I began by carefully removing all damaged T1-11 board and batten siding and 1×2 trim boards in the affected area, which measured approximately 32-48 inches wide by 8 feet high. This demolition revealed the full extent of water penetration and the improperly sealed air compressor line entry point.
After removing the damaged siding, I inspected all framing members behind it. Some 2×4 wall studs had developed rot at their lower sections where they’d been exposed to prolonged moisture. I repaired or replaced these rotten framing members to restore structural integrity before installing any new siding.
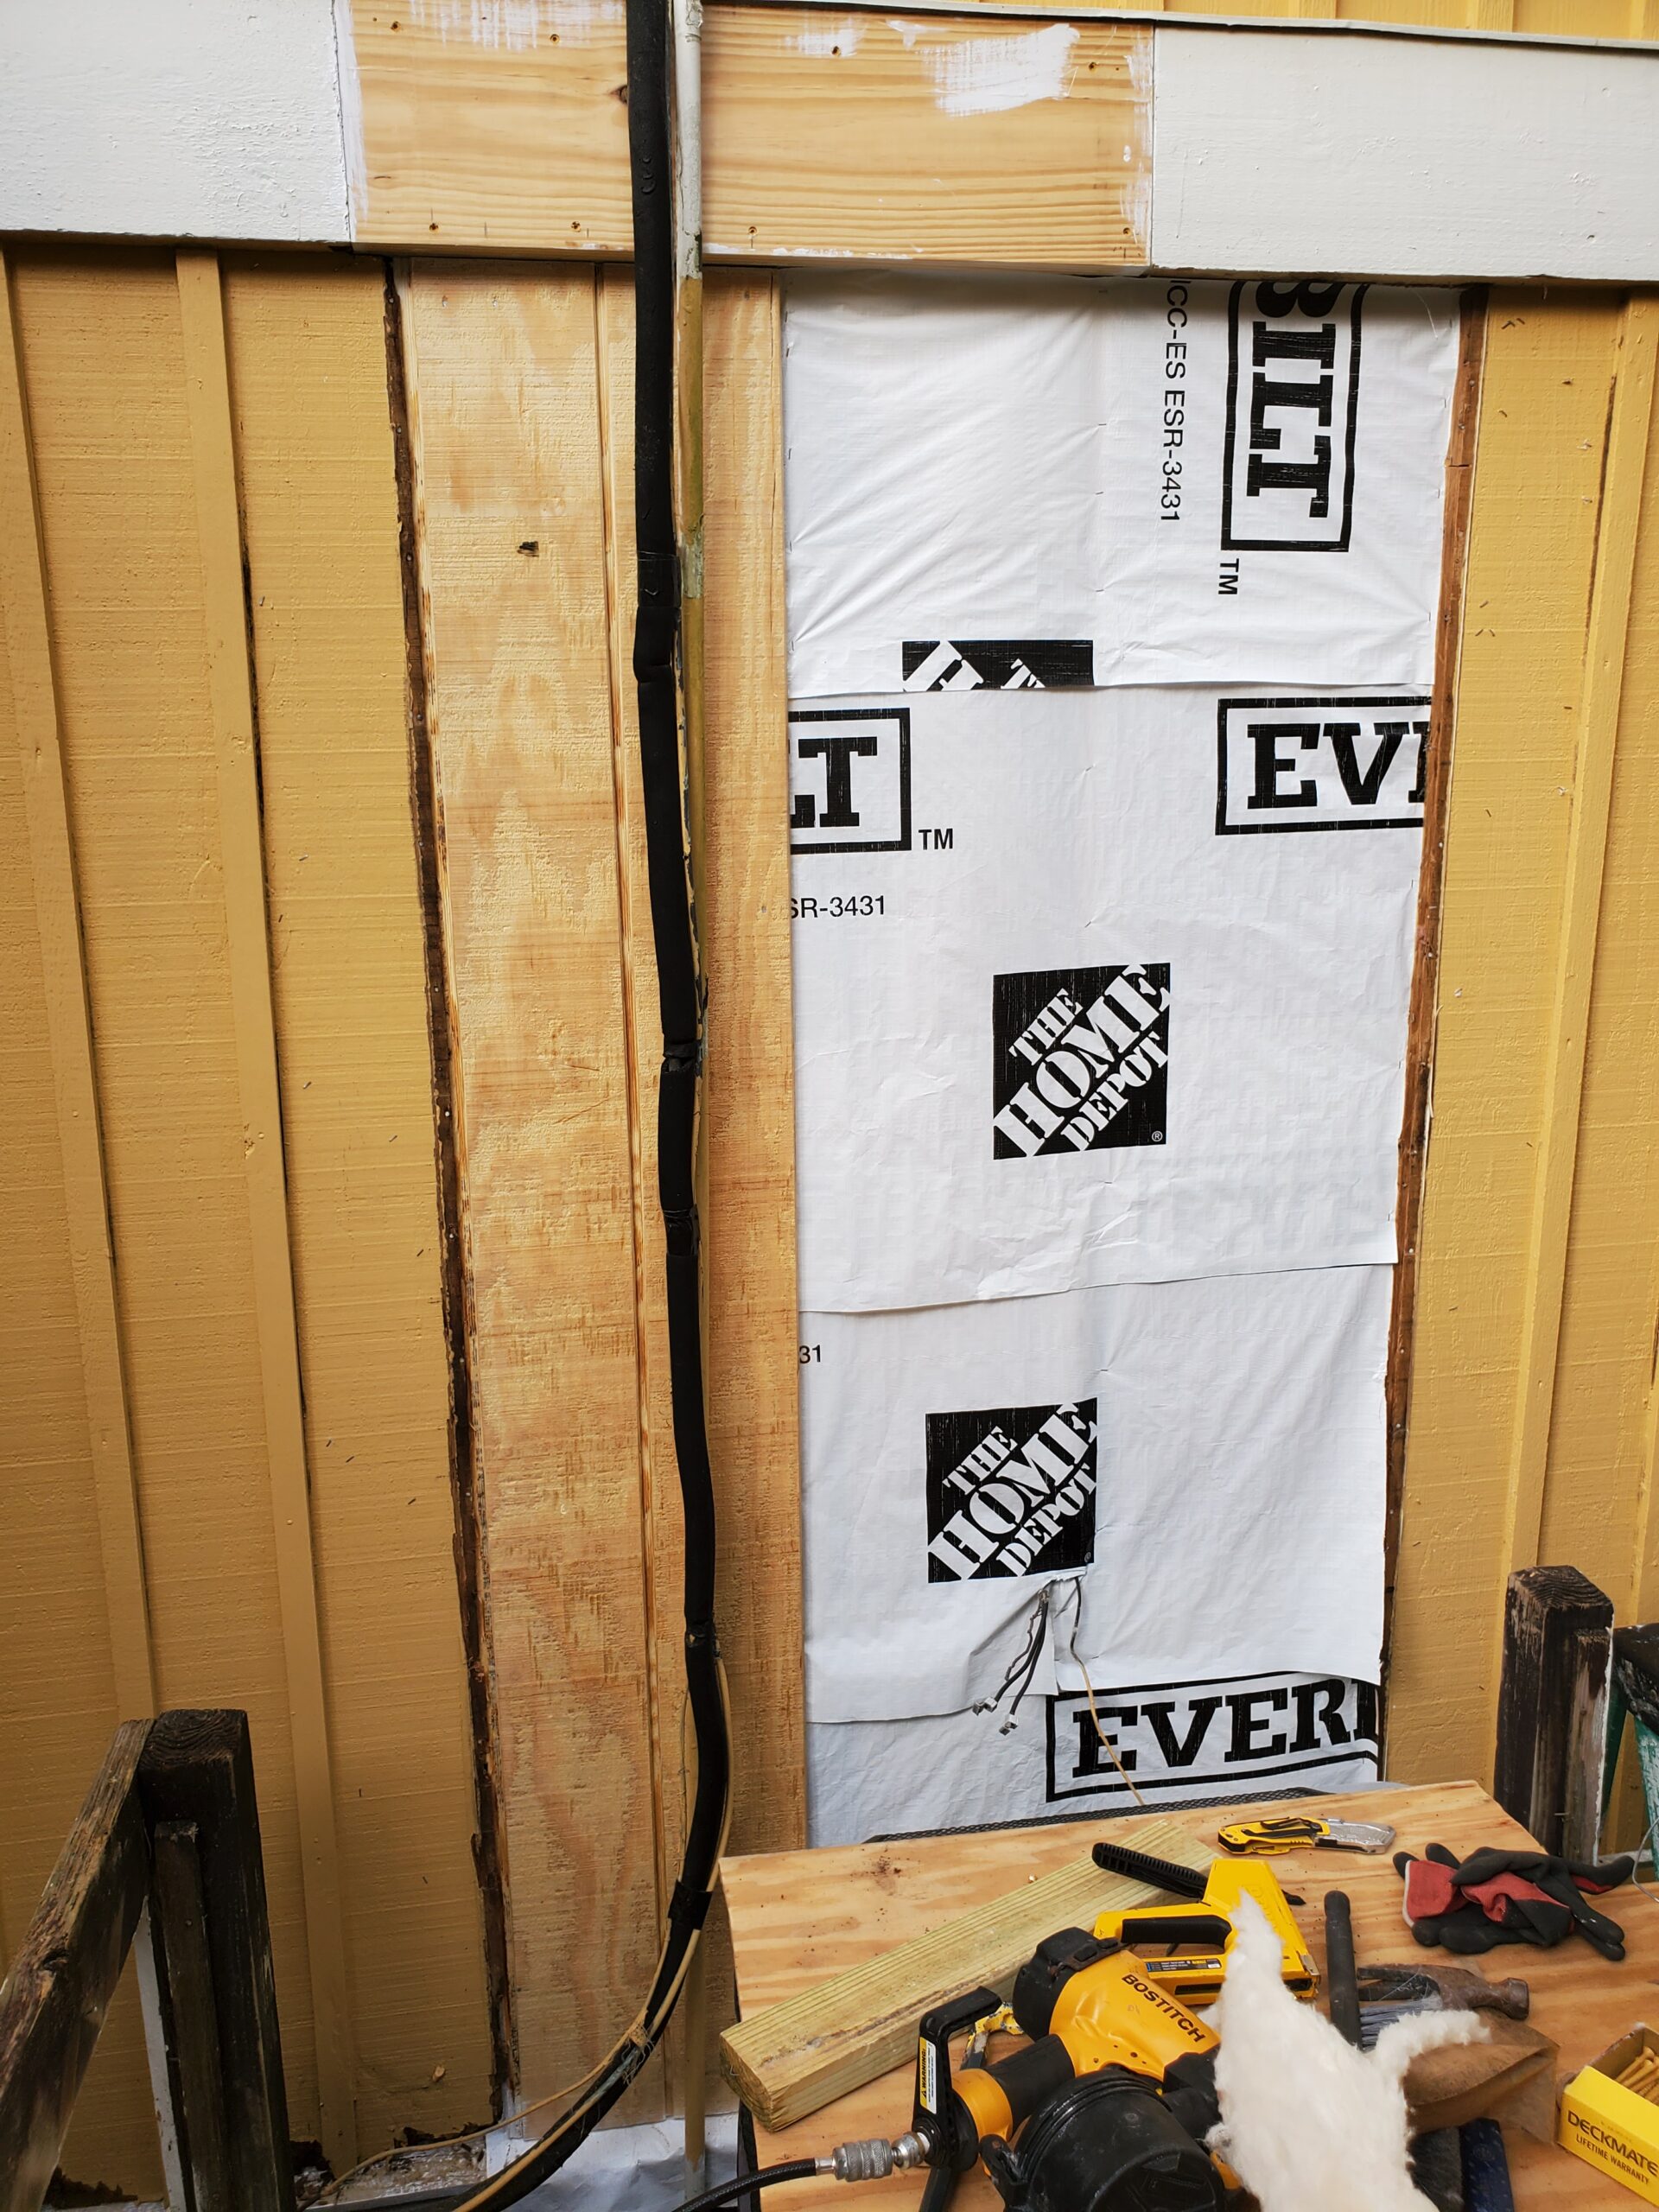
With the framing sound and the air condenser line properly sealed, I installed new T1-11 siding and 1×2 trim boards to match the existing exterior perfectly. After installation, I primed all new wood and applied two finish coats of exterior paint in the home’s existing color. The repaired section blends seamlessly with the rest of the exterior.
Phase 2: Professional Mold Remediation in Wall and Floor Cavities
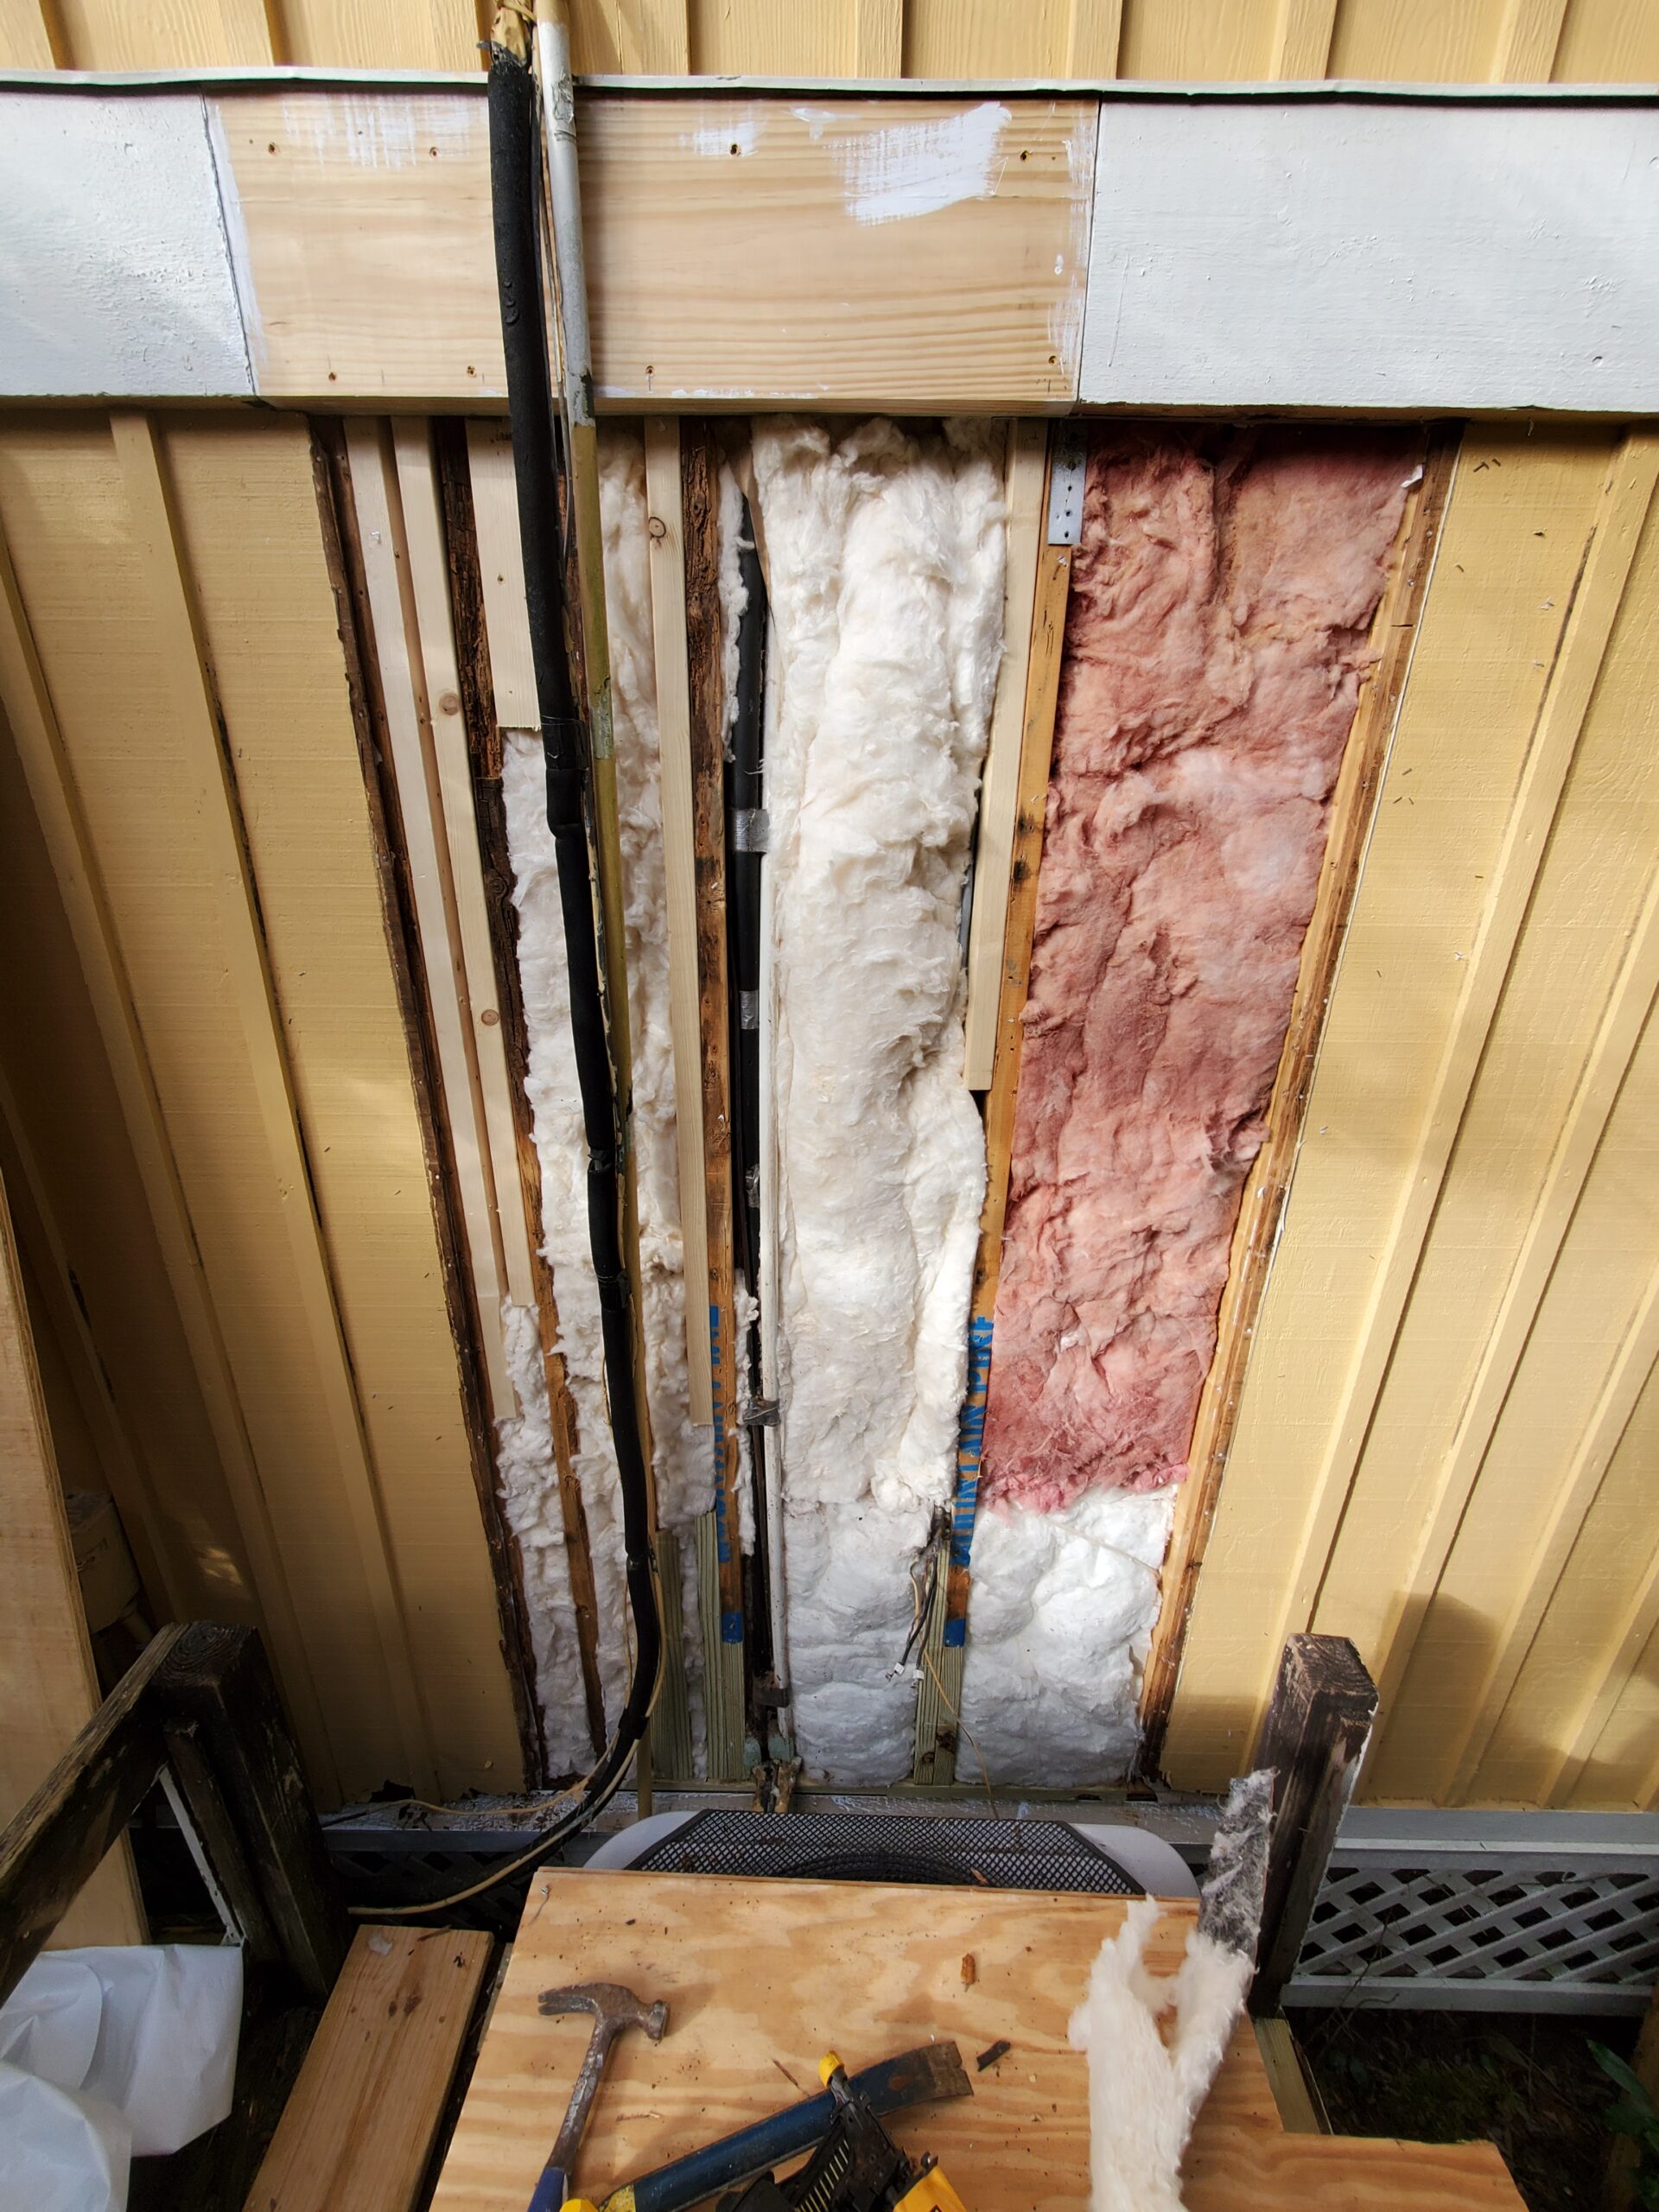
With the water source eliminated, the next critical step was addressing the mold that had developed in both the wall and floor cavities. Proper mold remediation is essential not only for the home’s structural integrity but also for the health and safety of its occupants.
Wall Cavity Mold Treatment: After removing the damaged interior drywall and saturated insulation, I thoroughly treated all moldy areas in the wall cavity. First, I applied a water-vinegar solution to kill active mold. After this treatment dried completely, I followed up with mold-inhibiting primer on all affected wood surfaces for long-term protection against mold regrowth.
Floor Cavity Mold Treatment: Working in the crawl space beneath the house, I removed all saturated floor insulation and treated moldy floor joists using the same two-step process: water-vinegar solution followed by mold primer after drying. This thorough treatment eliminated all active mold and created a protective barrier against future mold development.
Phase 3: Wall and Floor Structural Repairs
Wall Structural Work: The water damage had compromised several wall studs at their base plates. I repaired rotten sections and installed support walls where needed. Using Headlok structural screws, I jacked and sistered damaged studs to restore full structural integrity. For studs with only minor damage at the bottom, I replaced the base plate and secured everything properly.
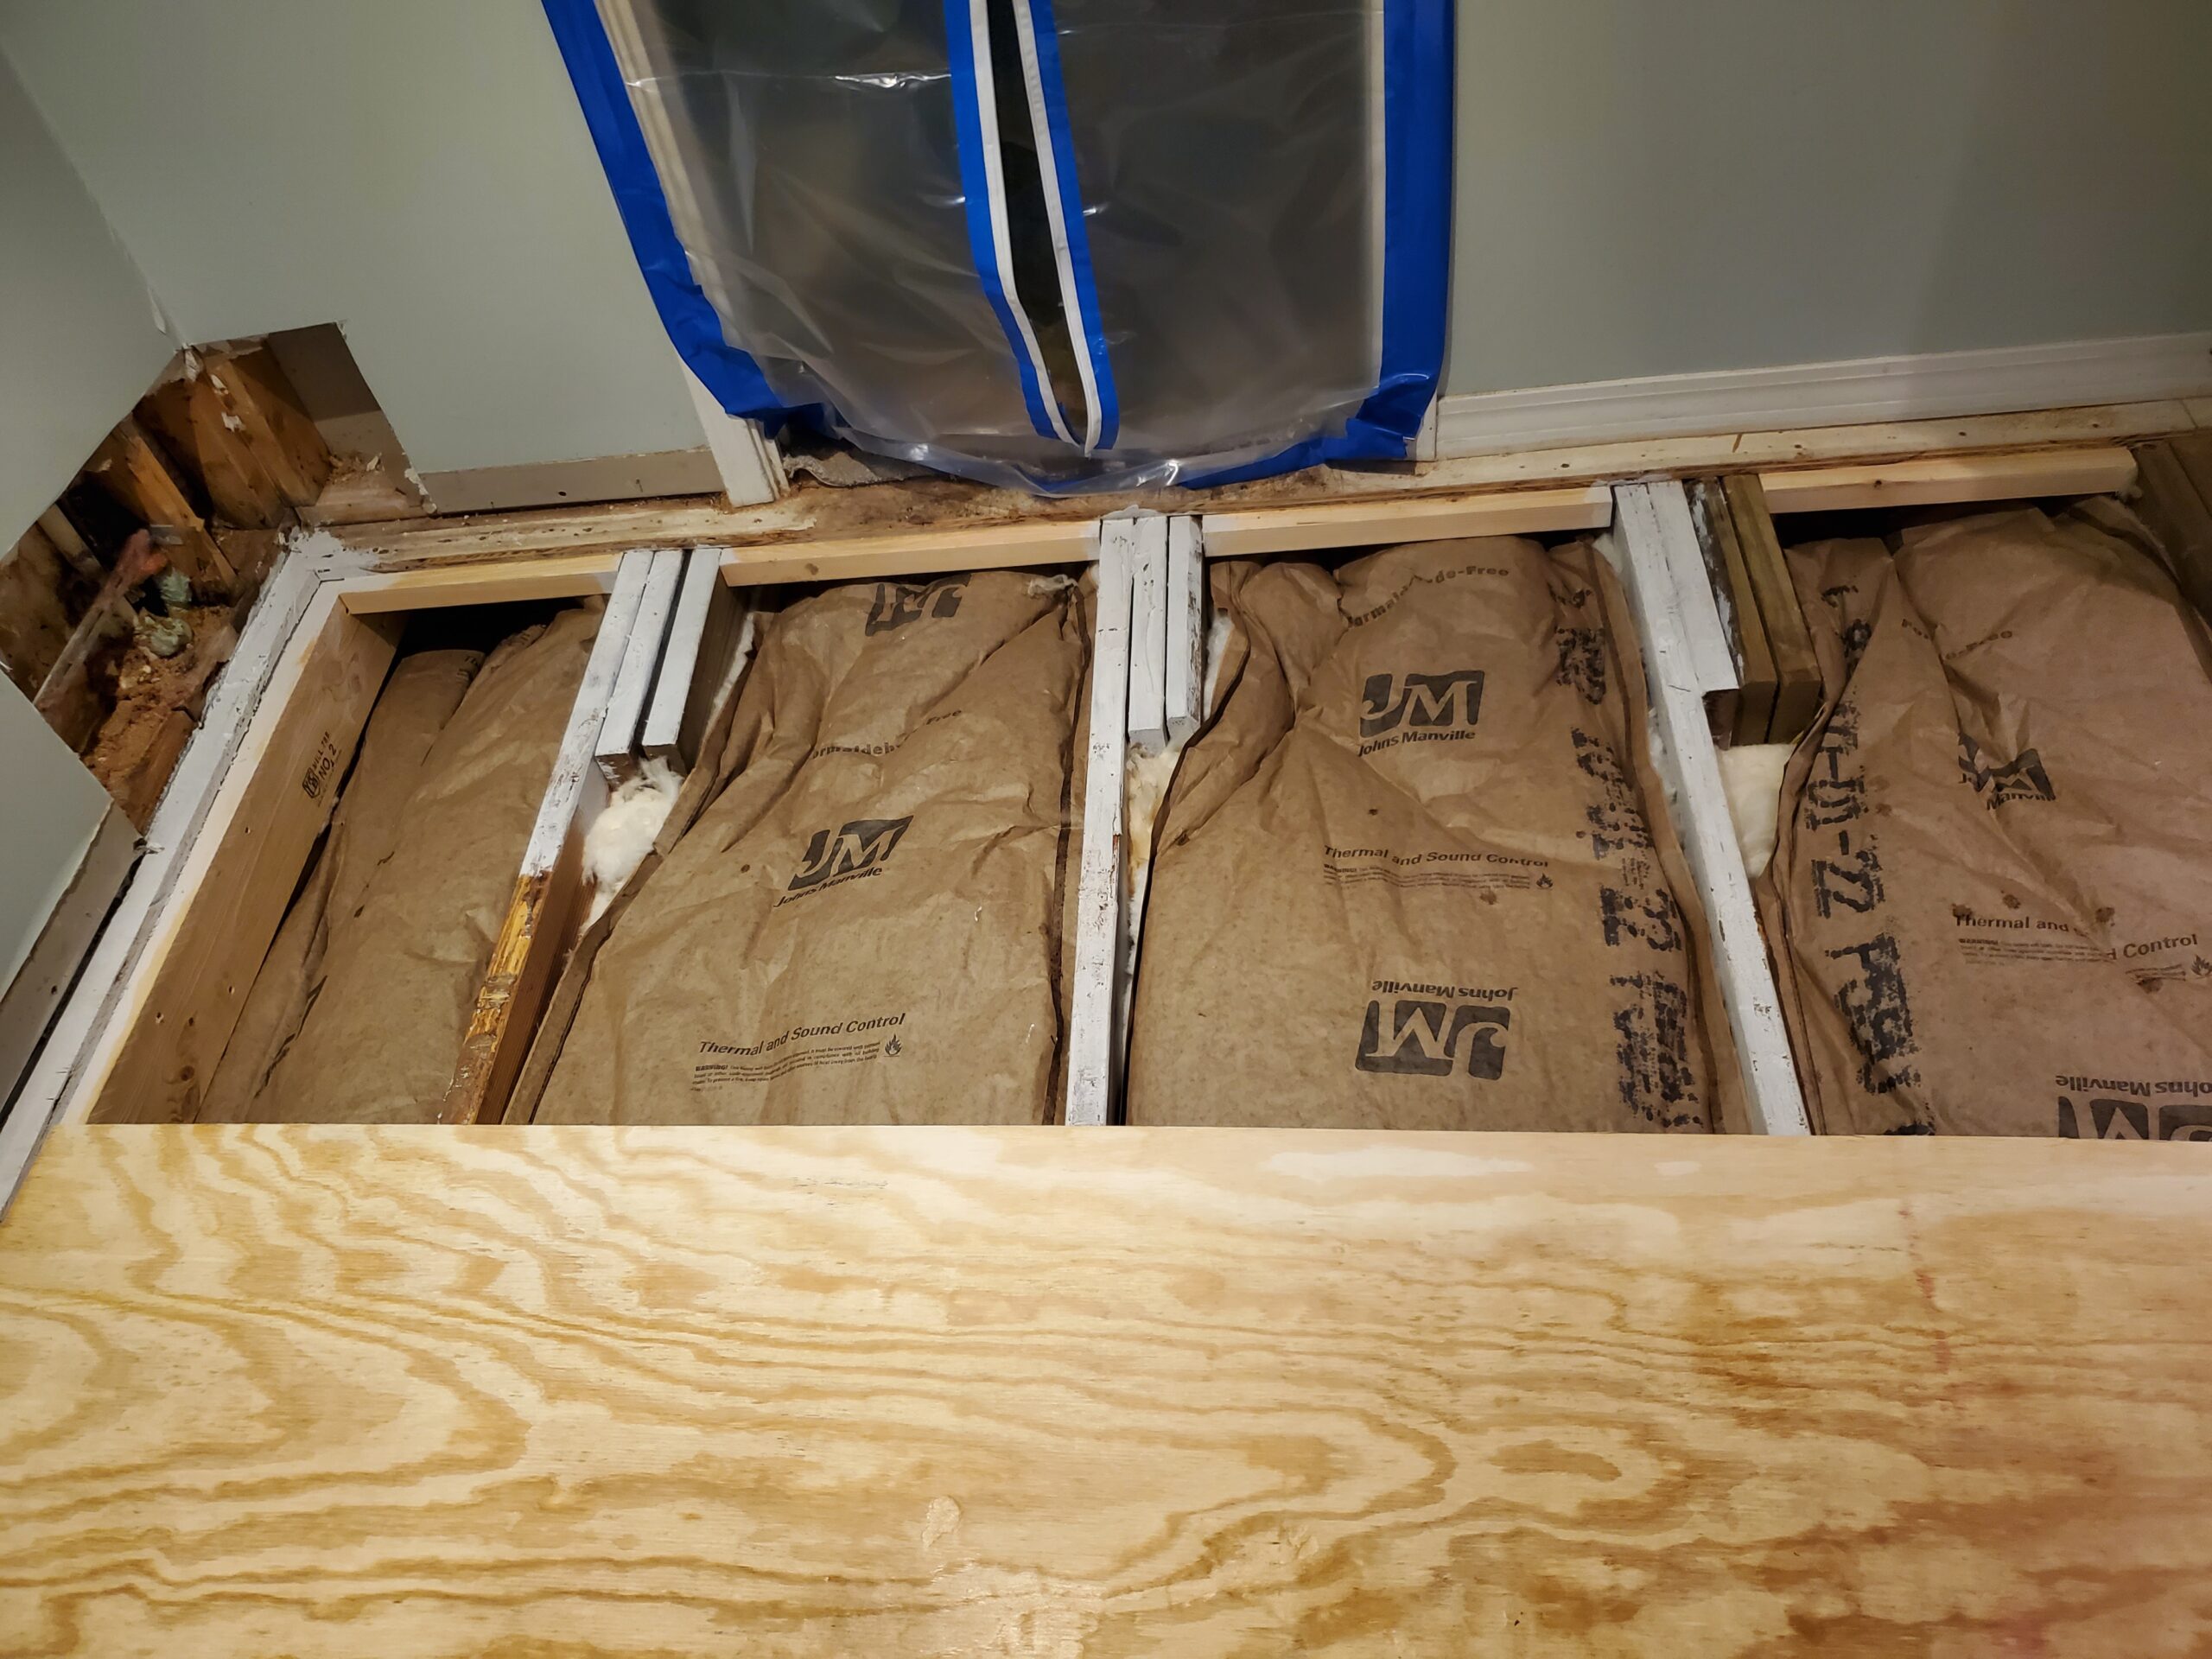
Floor Structural Work: Multiple floor joists had developed moisture damage. Rather than attempting to replace entire joists (which would have been extremely difficult given the home’s construction), I installed three new support joists sistered alongside the damaged ones. This technique effectively doubles the strength of the floor system while being far more practical than full joist replacement. Each sister joist was securely fastened with structural screws to create a single, strong structural member.
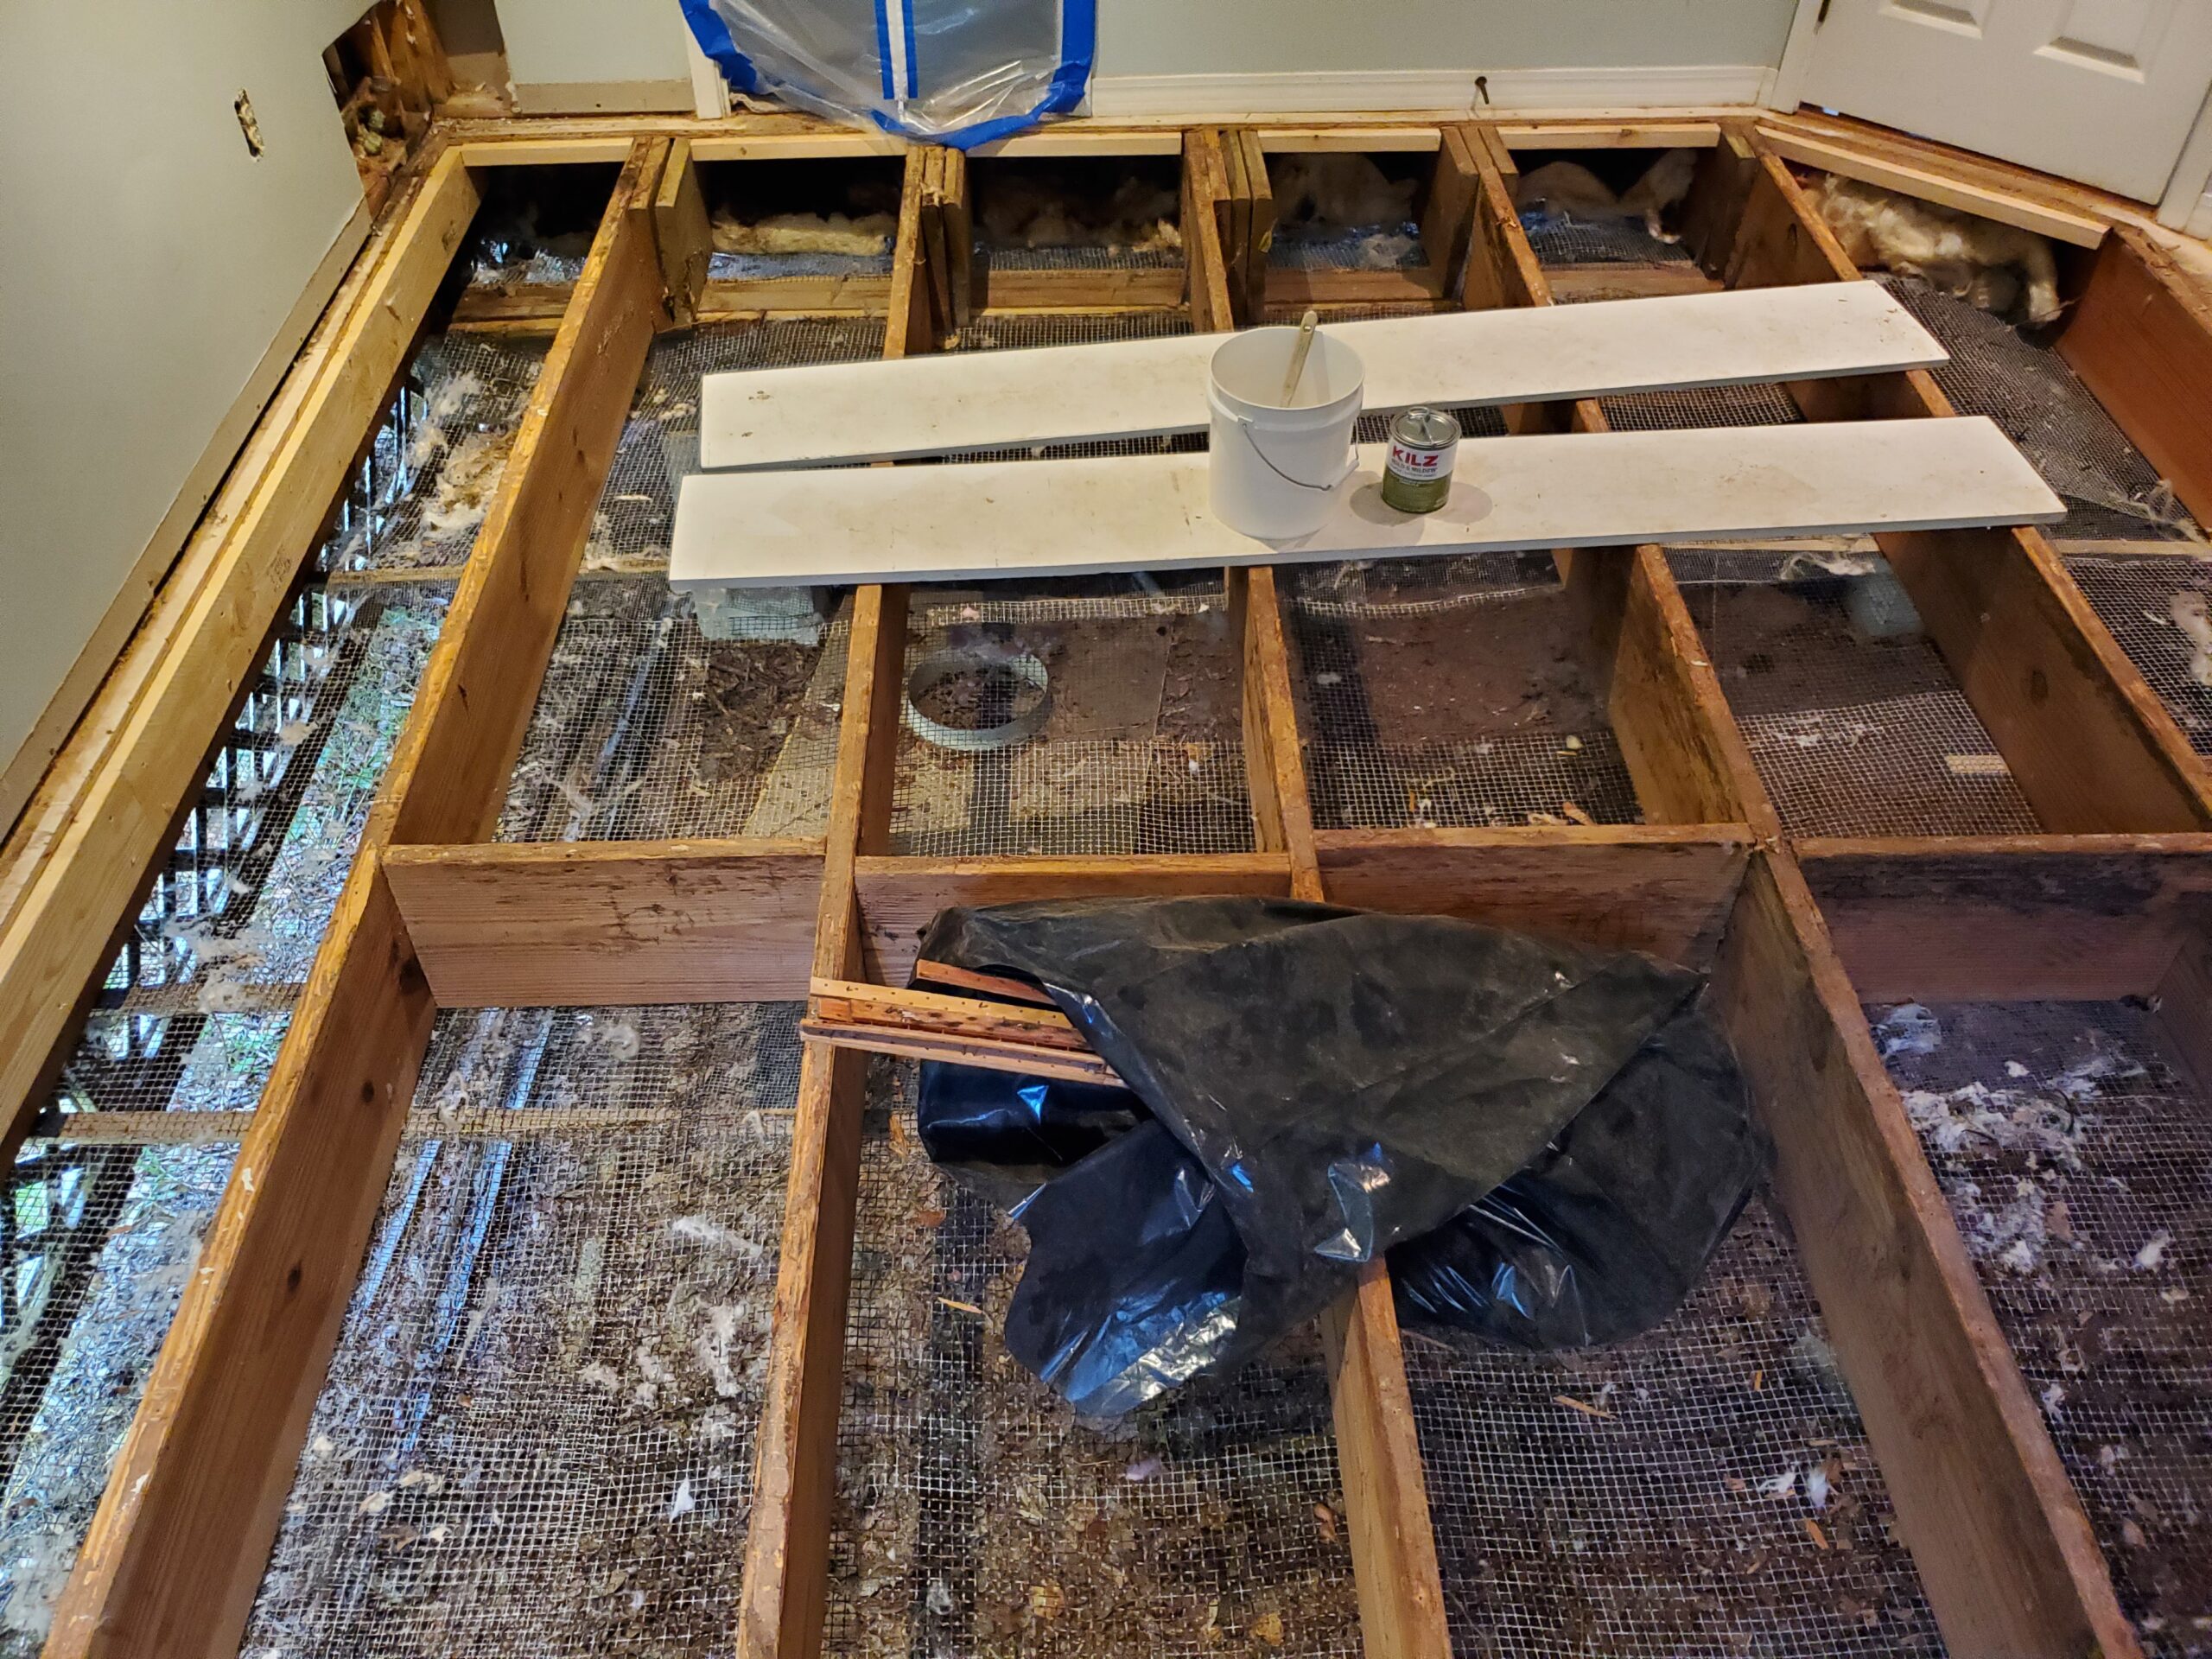
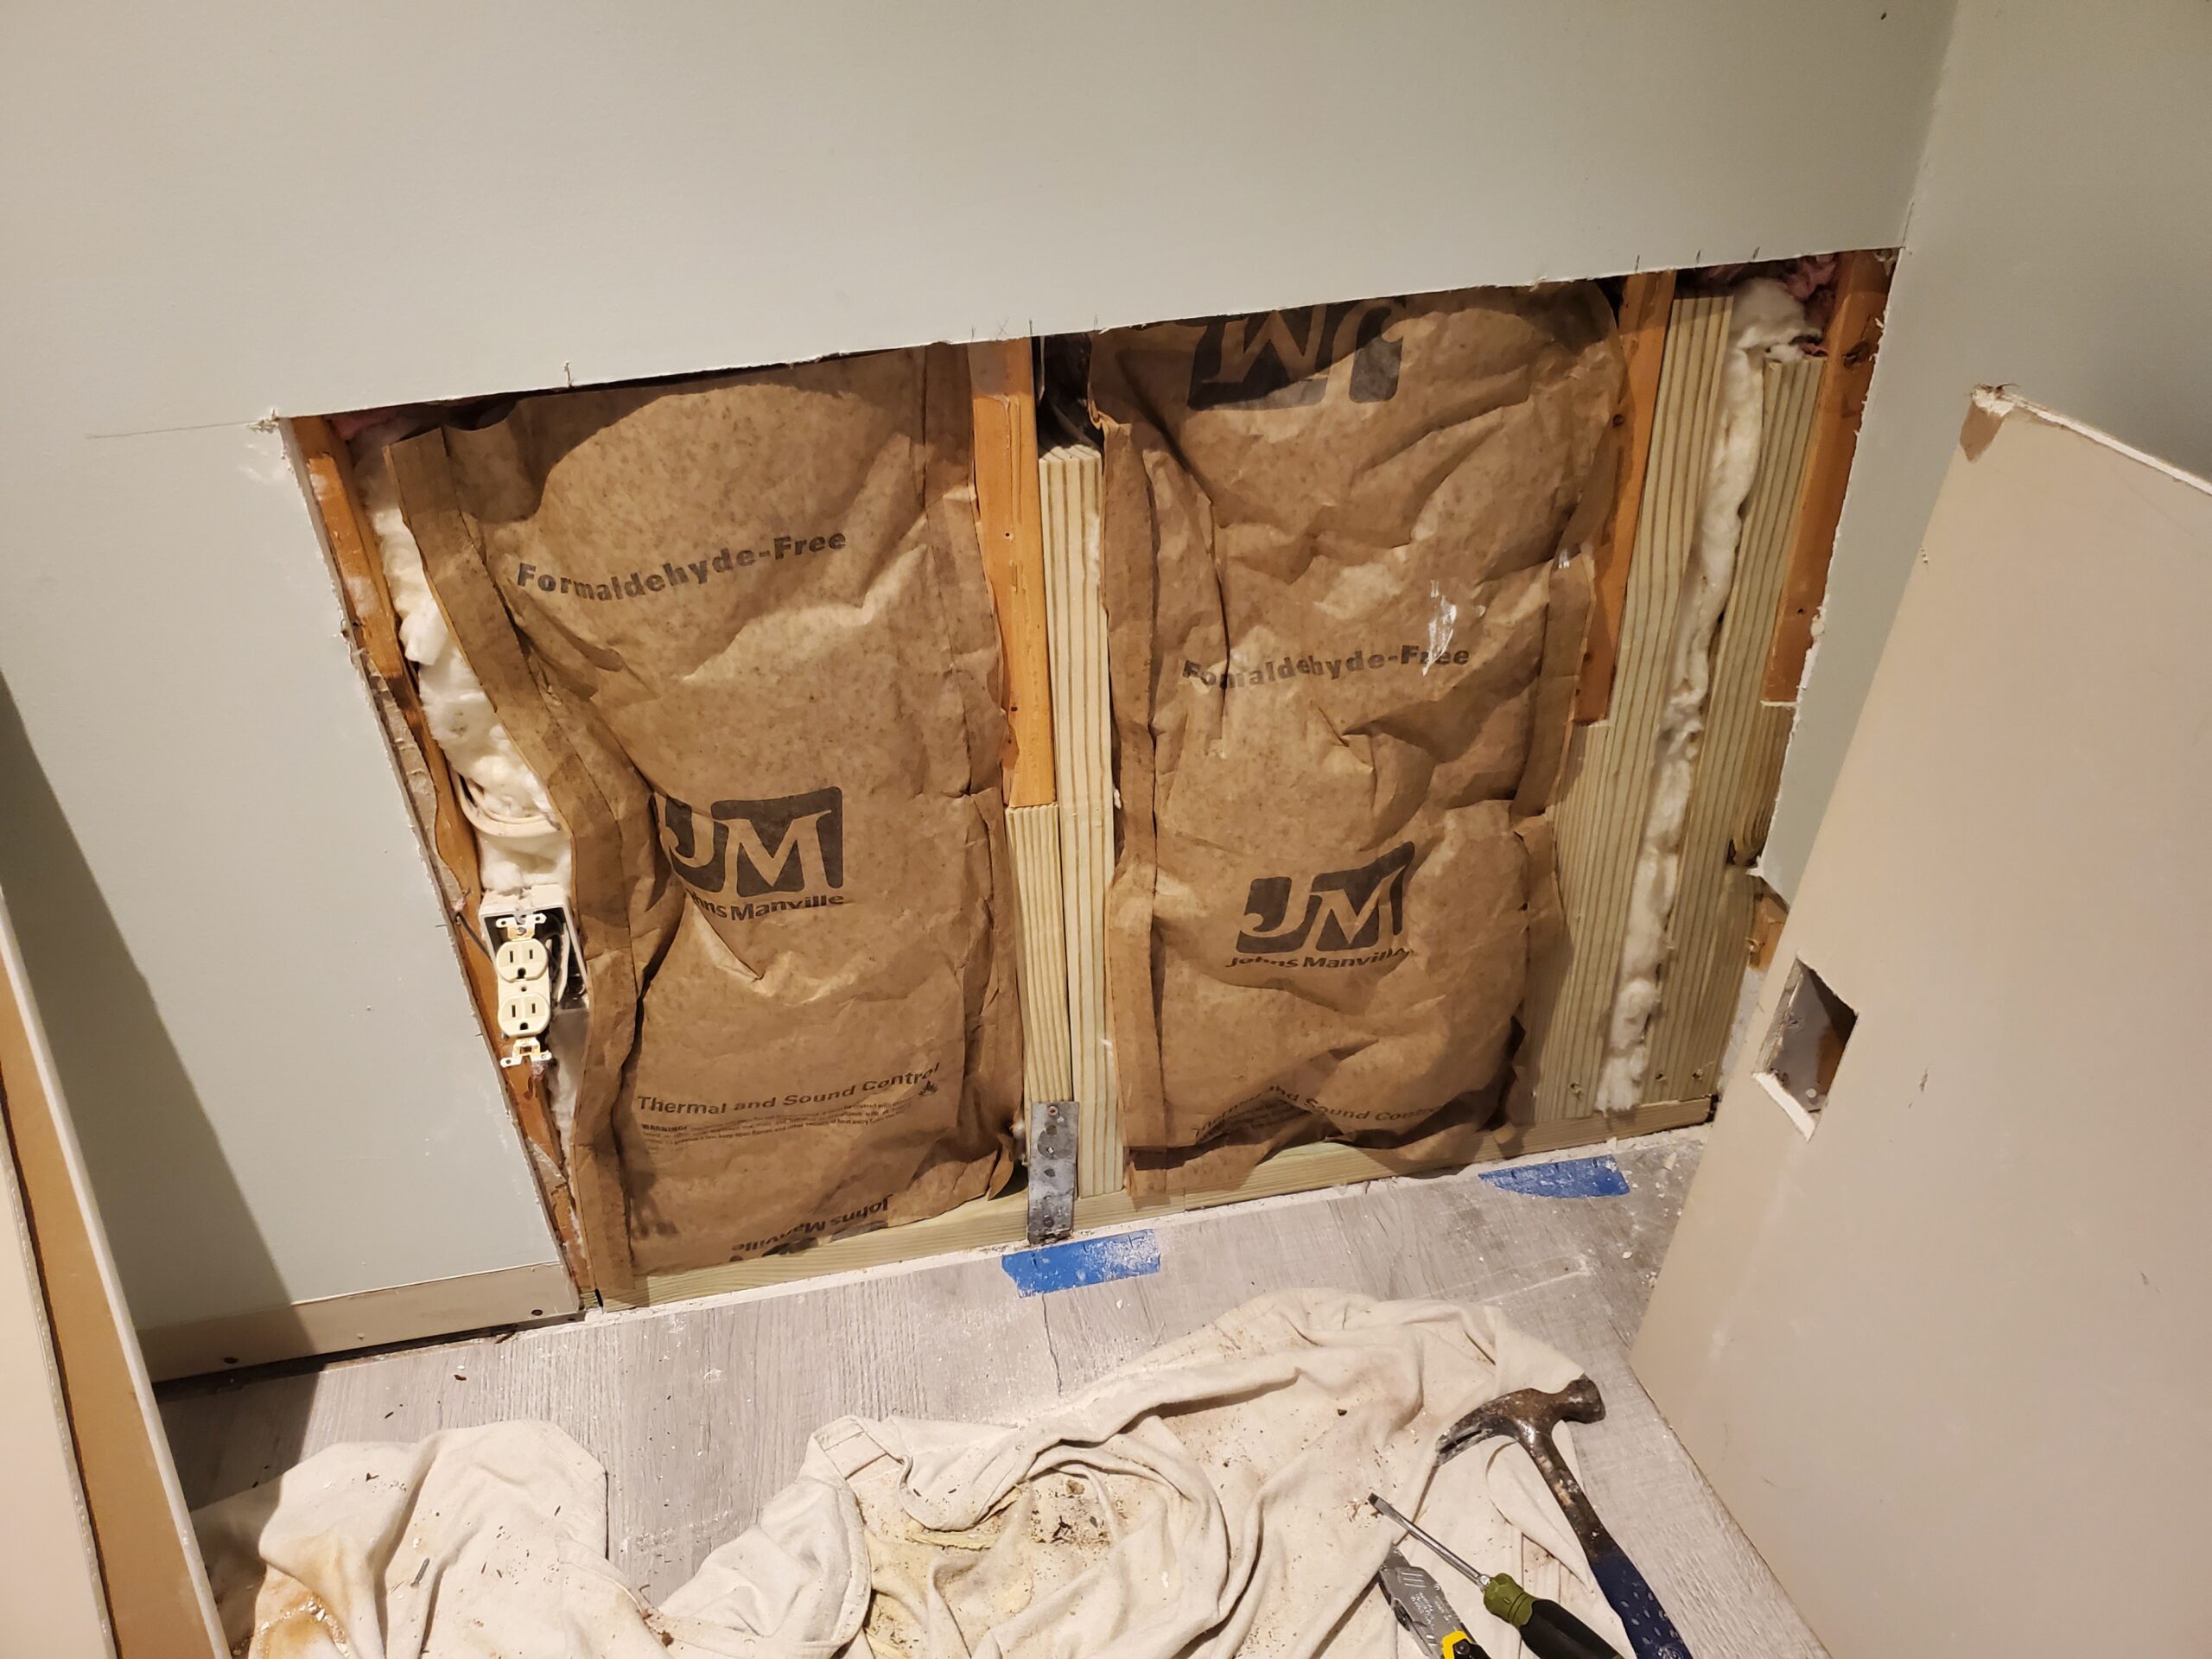
Phase 4: New Insulation Installation
With all structural repairs complete and mold treatment finished, I installed fresh insulation in both locations:
Wall Insulation: New fiberglass batt insulation was installed in the wall cavities before closing them up with new drywall.
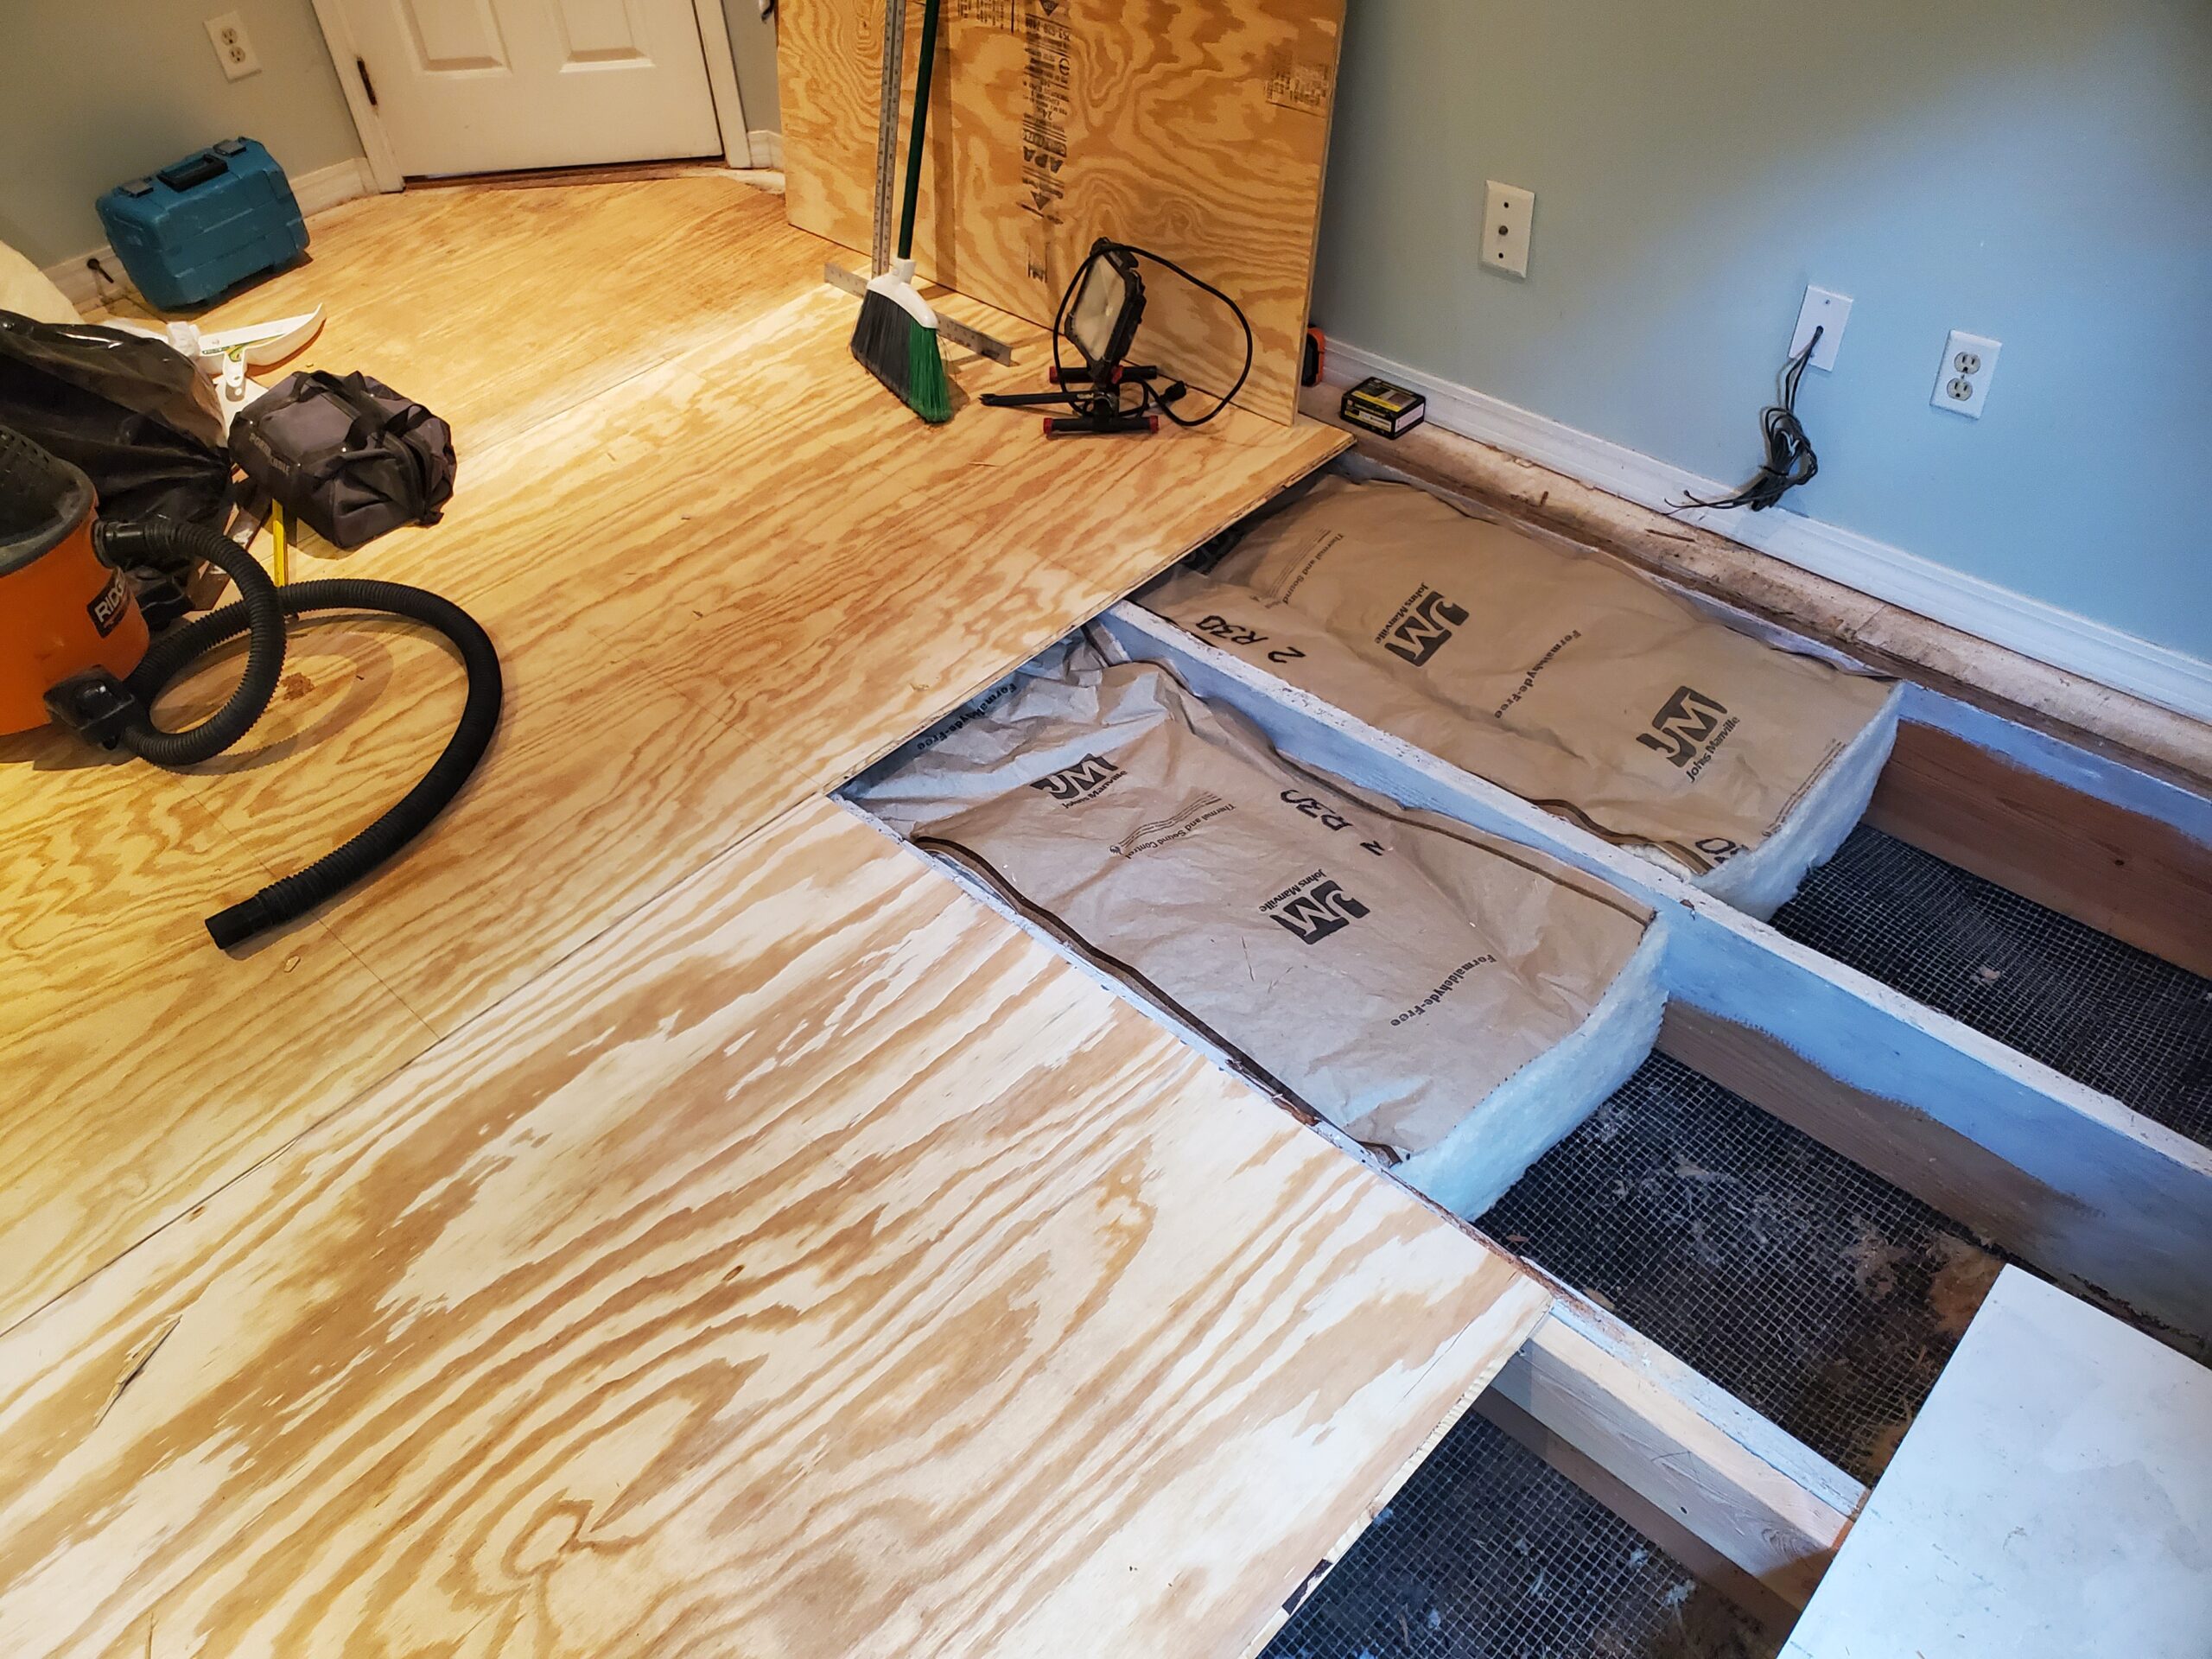
Floor Insulation: I installed 9-inch R-30 insulation in all floor bays, providing excellent thermal performance. I covered the ends of the bays with 1×12 boards to hold the insulation in place and protect it from the elements.
Phase 5: Drywall Installation and Finishing
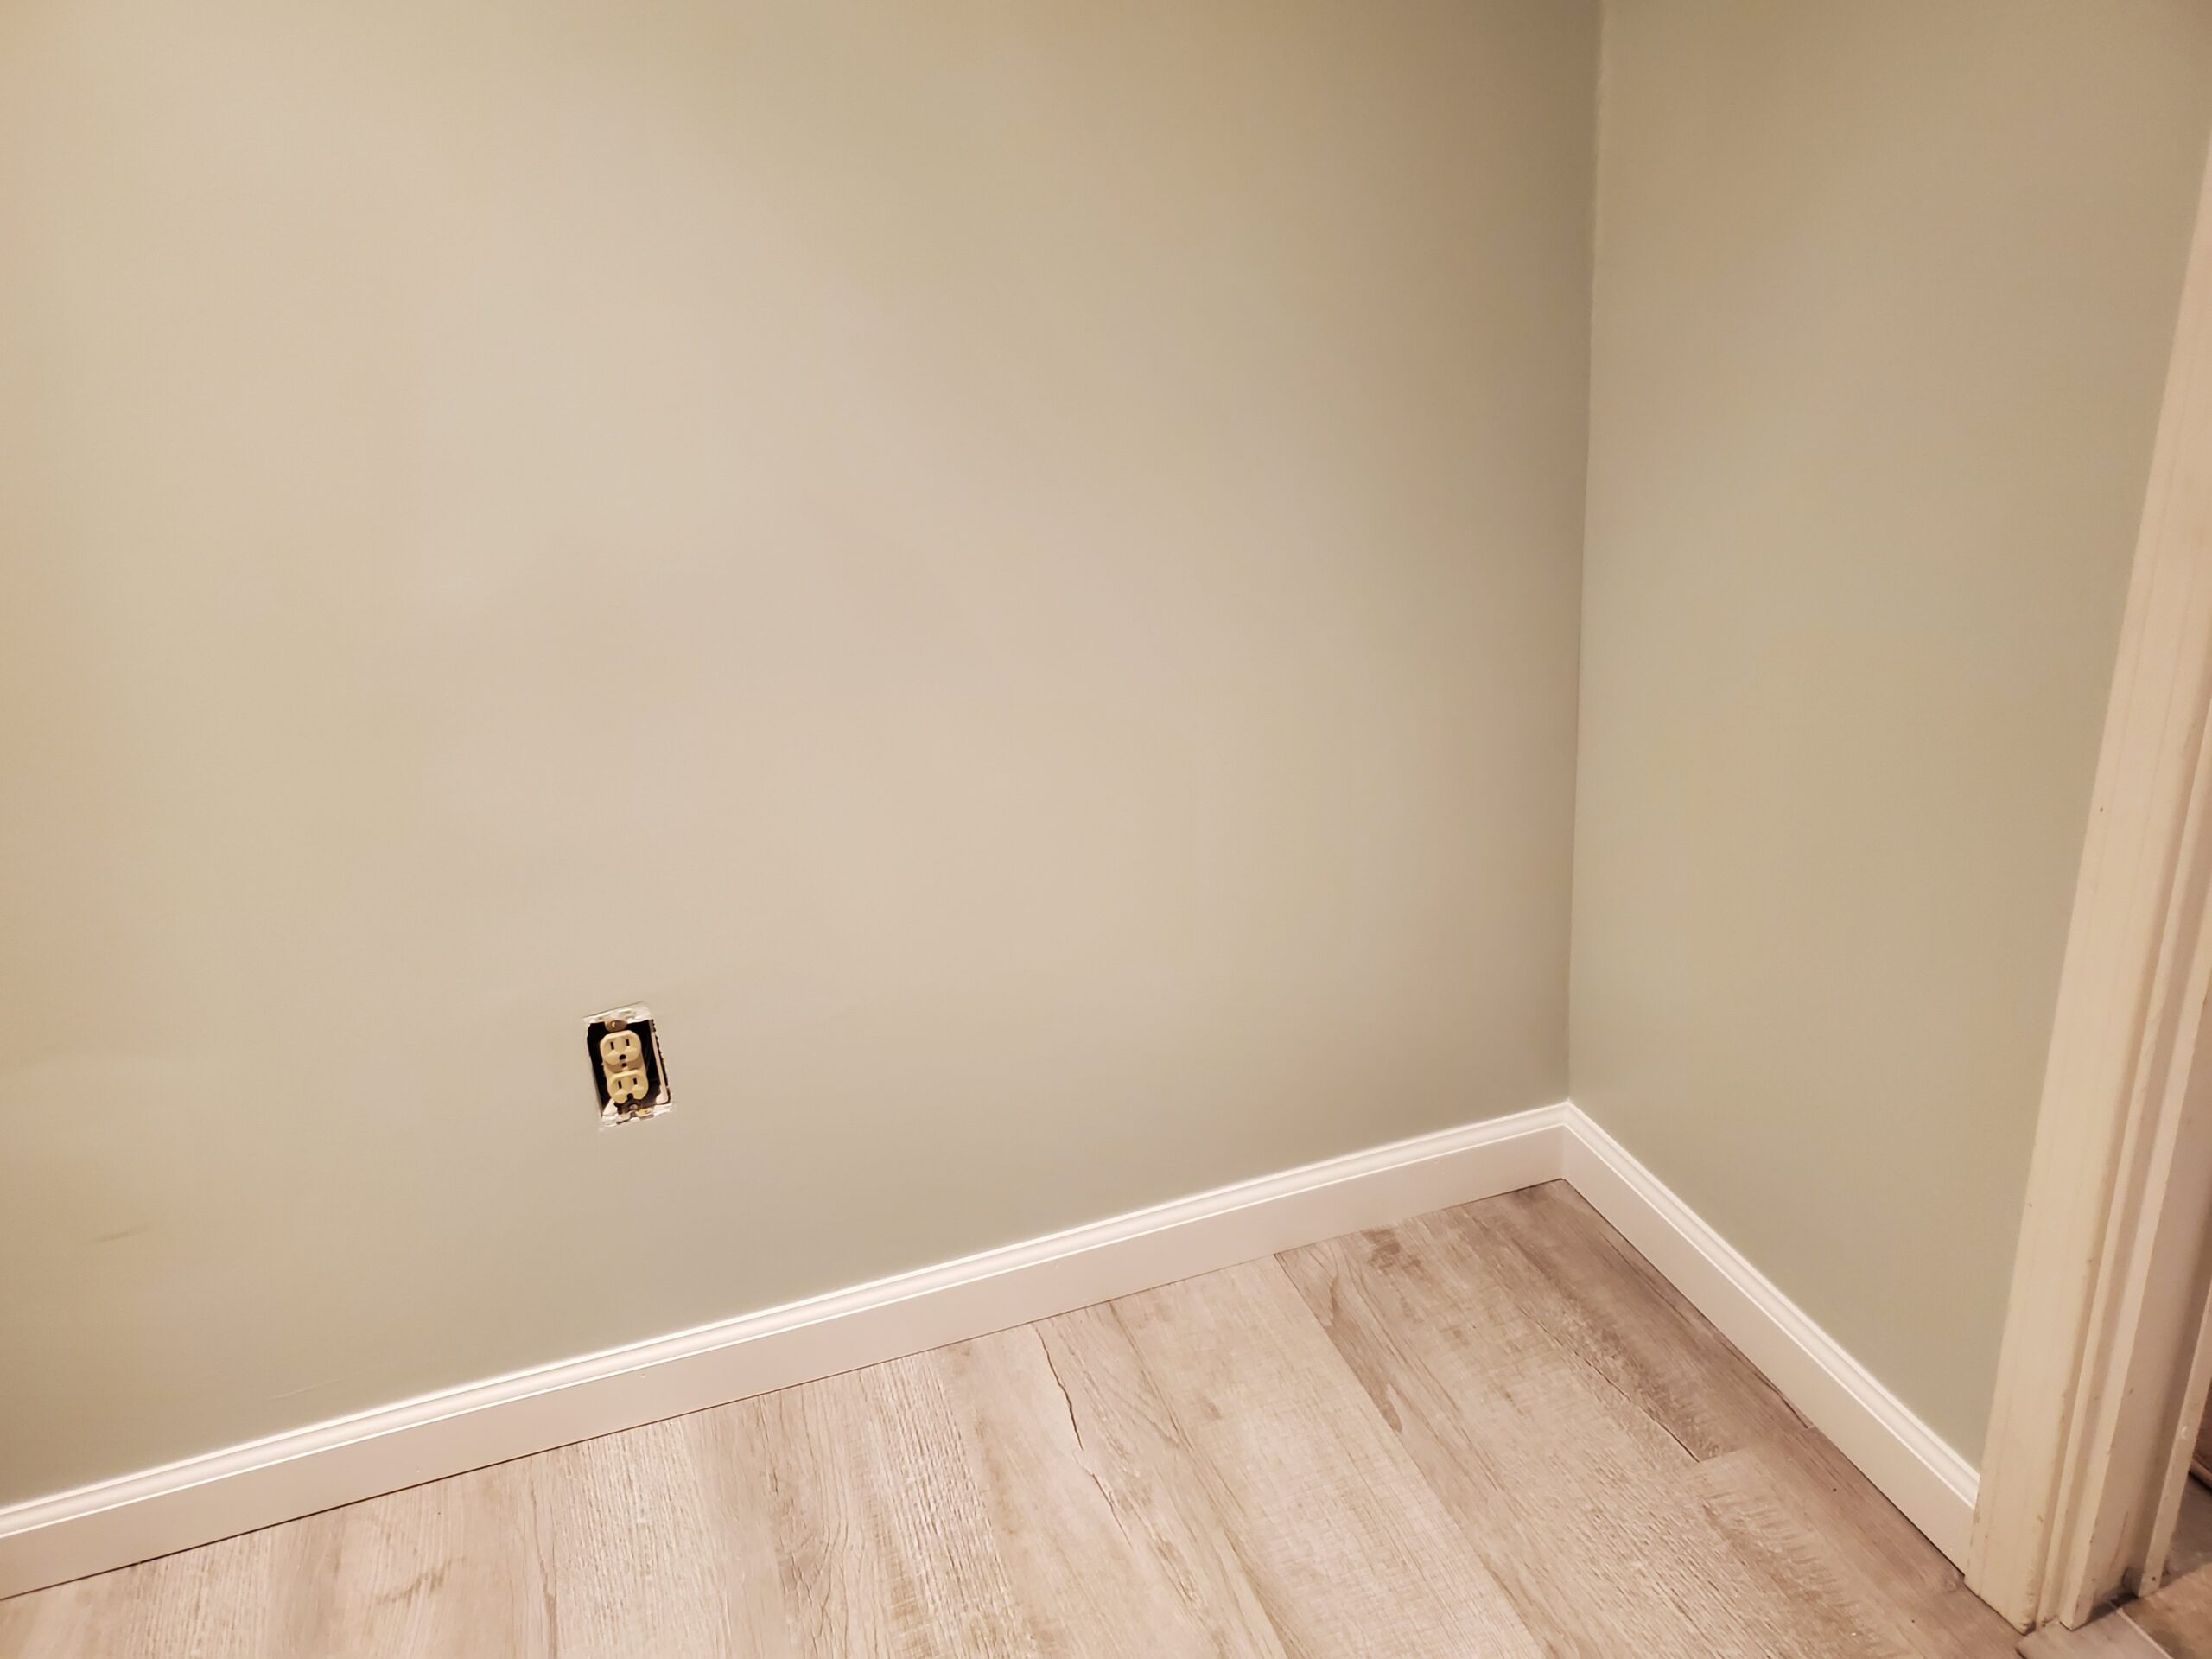
Interior wall restoration included complete drywall replacement in the damaged sections. I installed new drywall, then moved through the critical finishing steps: taping all seams, applying joint compound (mudding), and sanding to create smooth, paint-ready surfaces.
After achieving a perfect finish, I primed the new drywall and painted the entire wall to match the existing room color. I also replaced the baseboard with new traditional baseboard trim (the original had been colonial casing used as base), filled nail holes with wood putty, caulked all gaps, and painted the trim for a professional finished appearance.
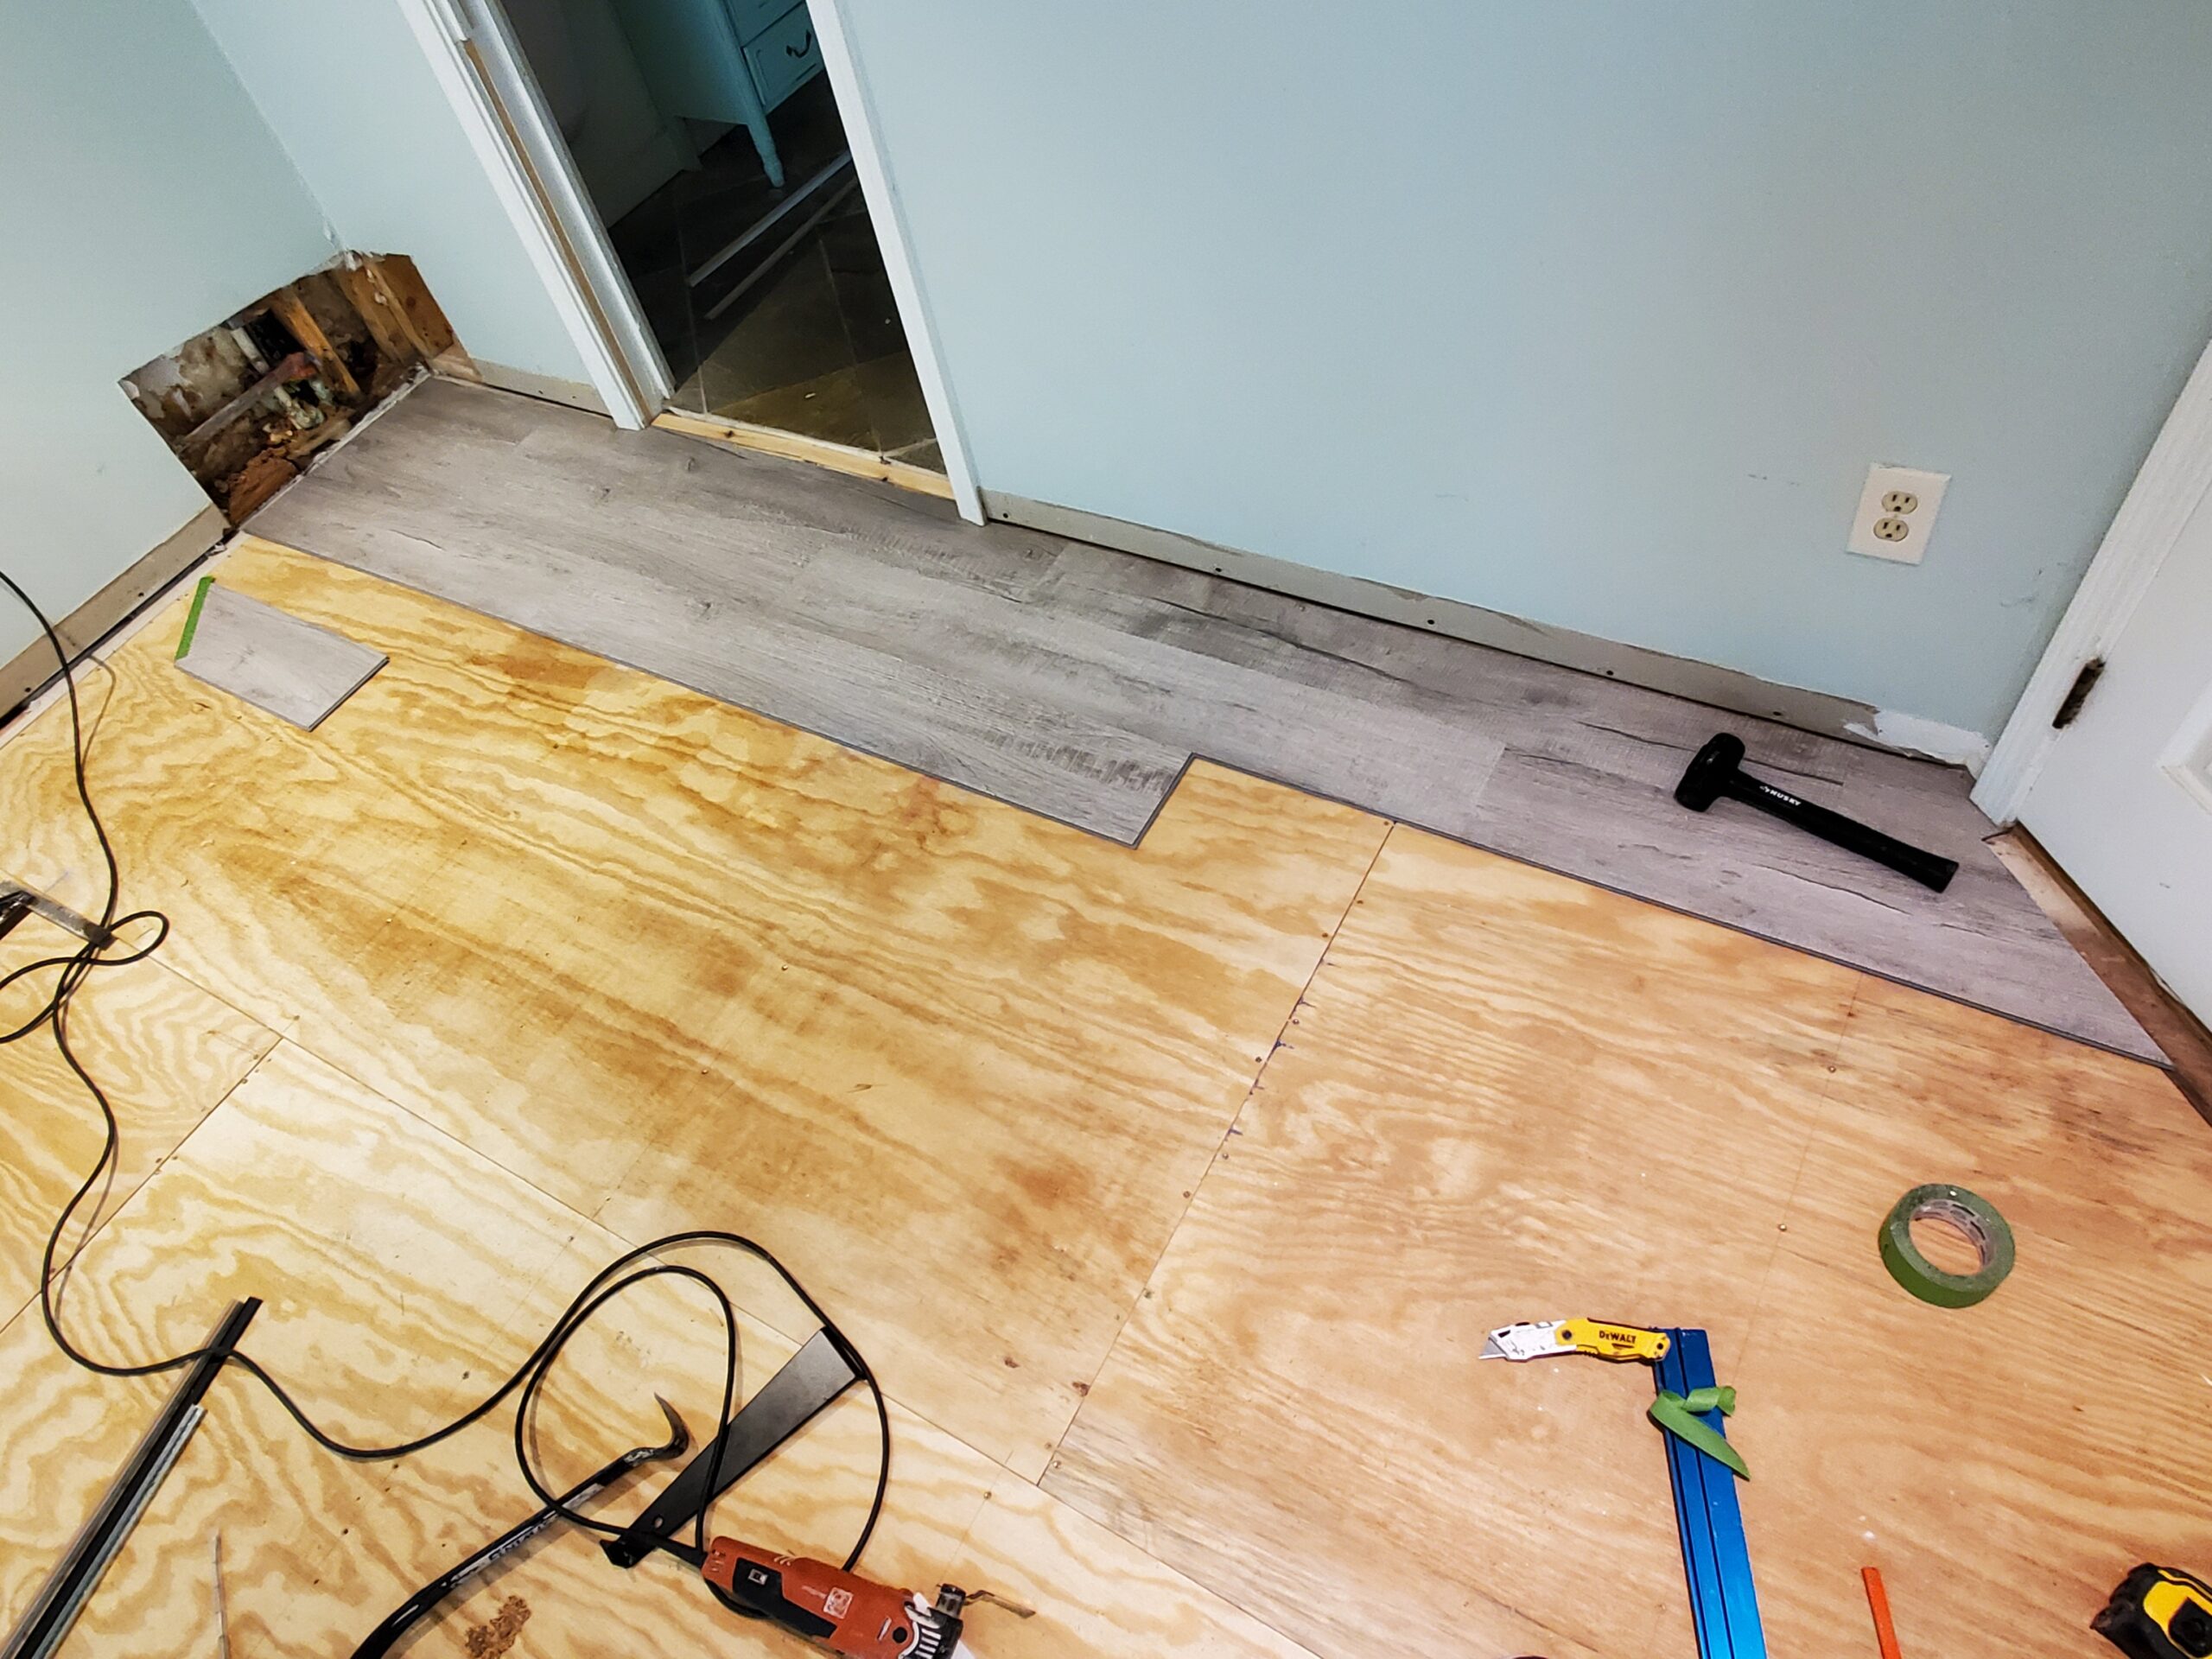
Phase 6: Subfloor Replacement and Luxury Vinyl Plank Installation
With the structural floor repairs complete, I installed a new 23/32-inch tongue and groove Southern Pine plywood subfloor. This premium subflooring provides a solid, level base for the finish flooring. I screwed down every sheet with construction screws to eliminate any possibility of squeaks or movement.
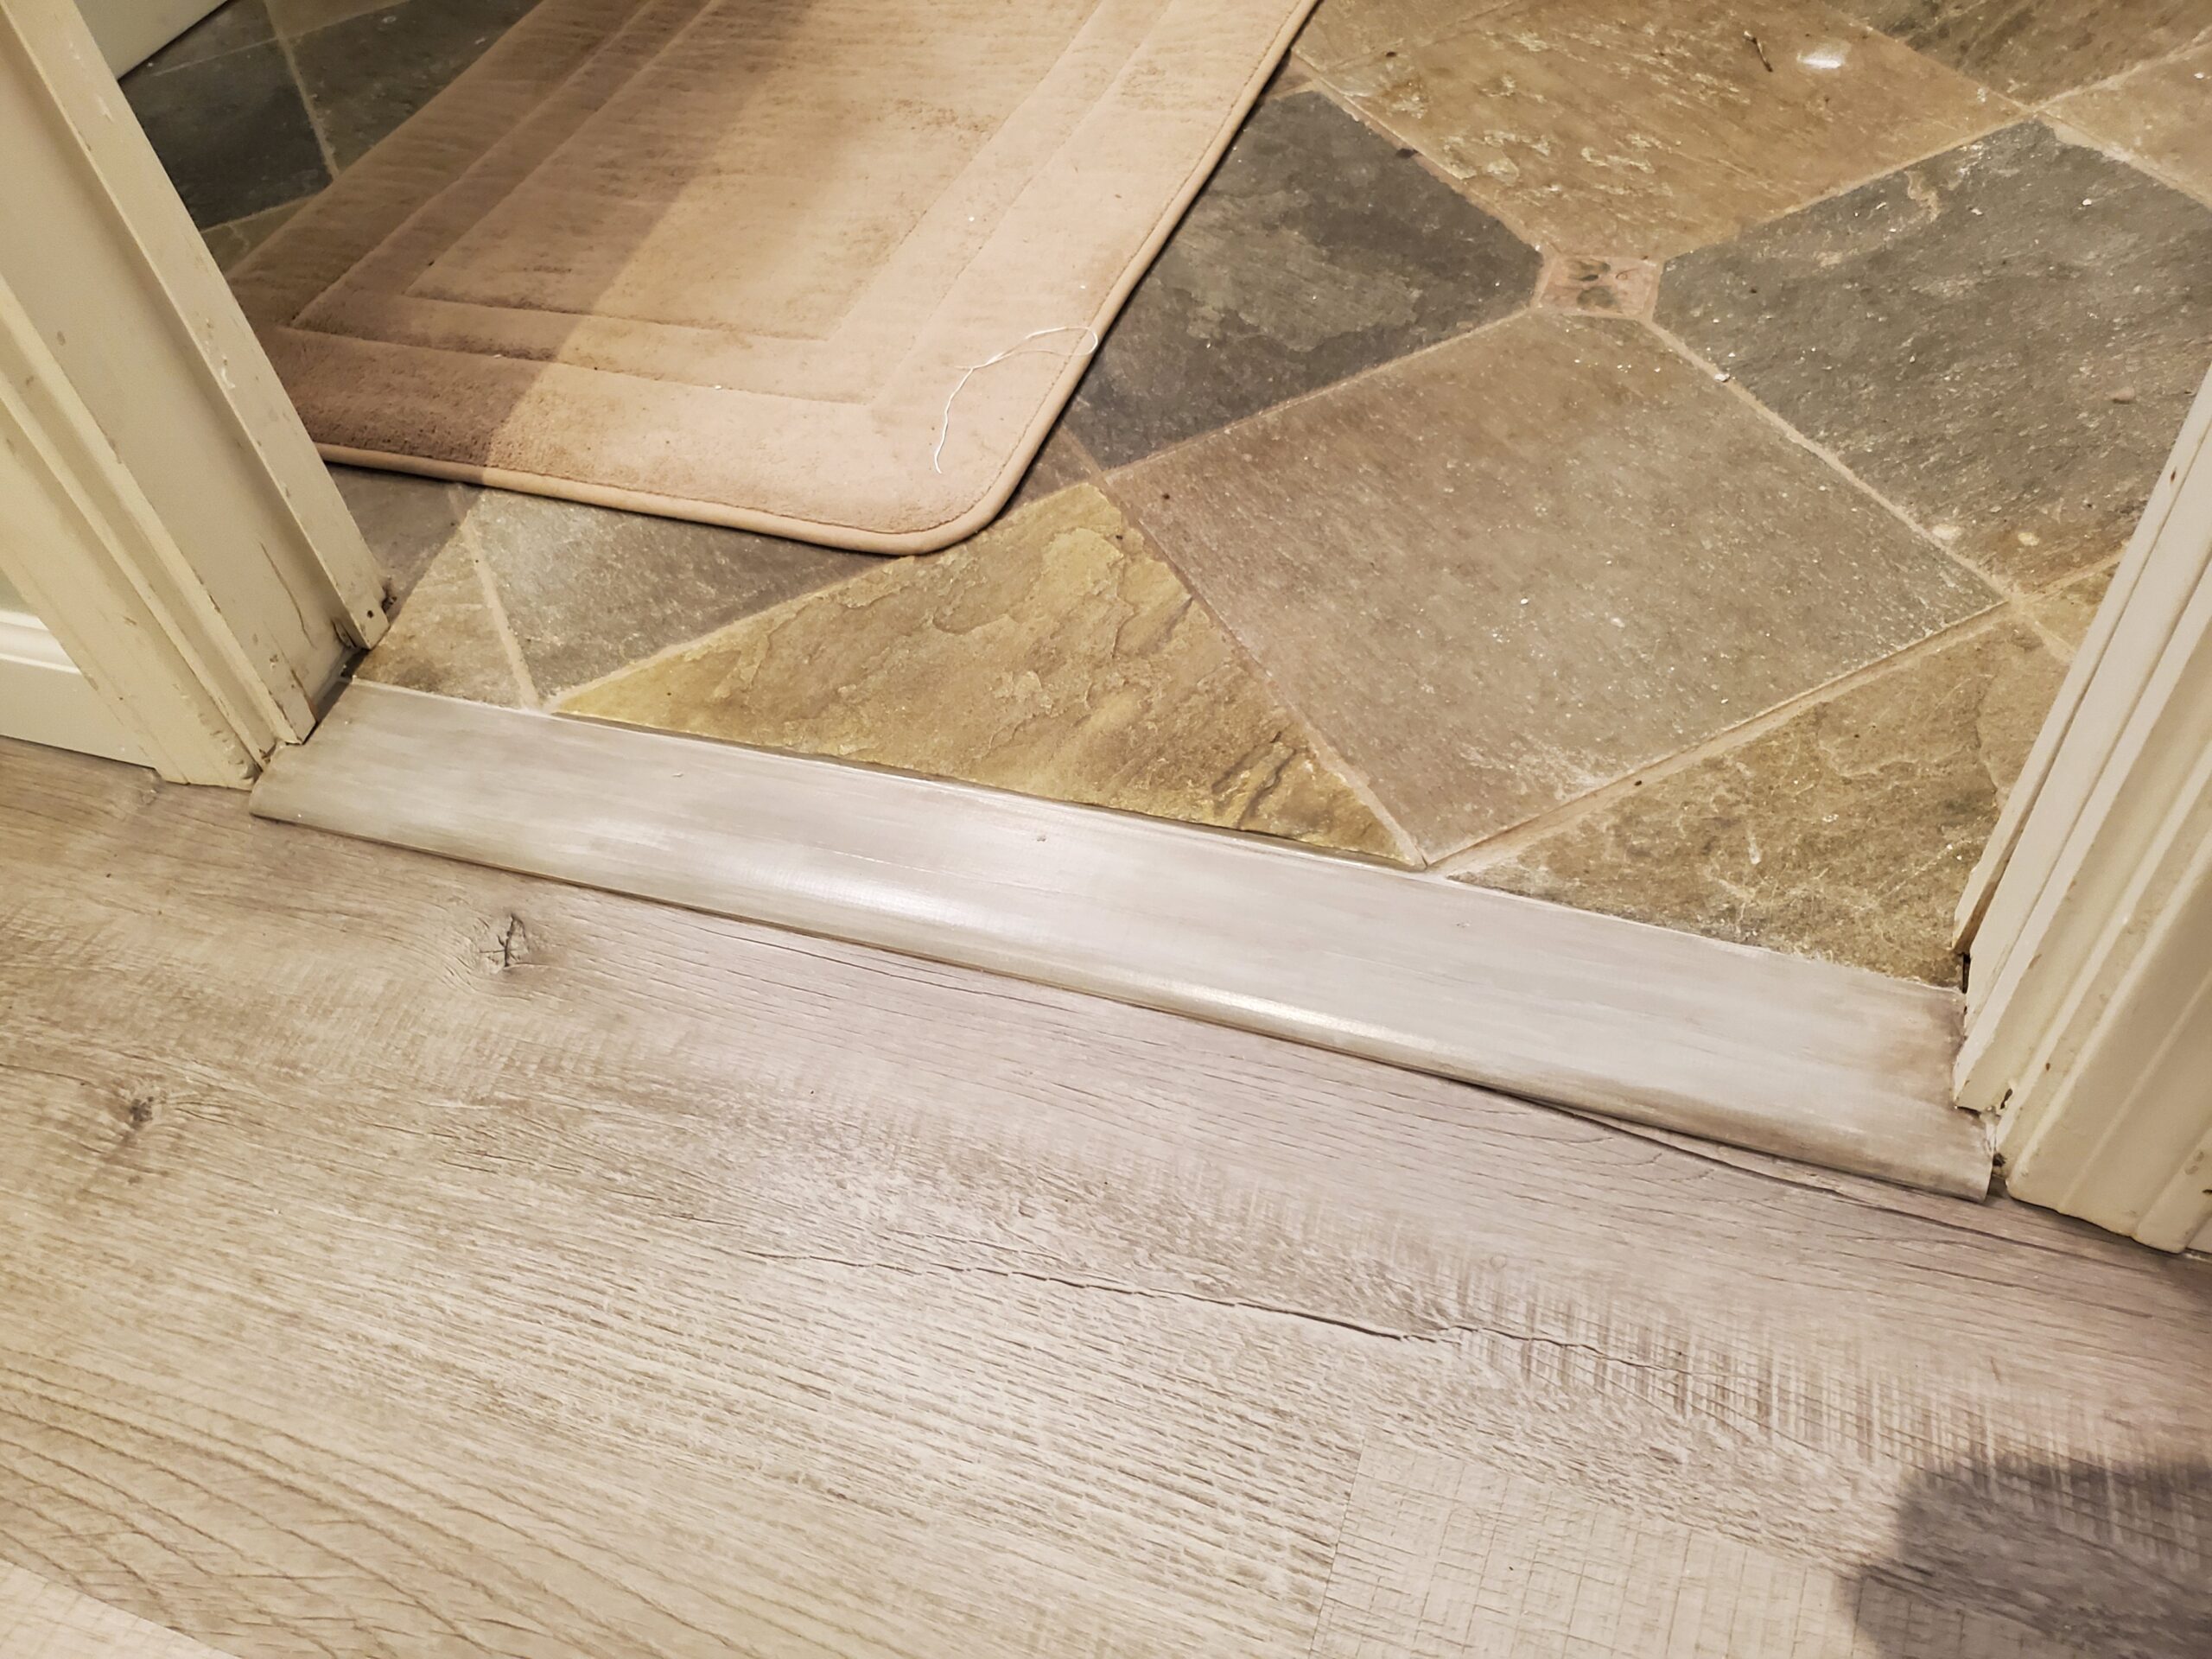
The homeowner had selected luxury vinyl plank (LVP) flooring for its durability, water resistance, and attractive appearance—perfect for an area that had experienced water damage. I installed the LVP flooring throughout the affected room, ensuring proper expansion gaps and tight seams. To complete the professional look, I installed floor transition strips where the new flooring met adjacent rooms, along with coordinating clamshell trim, grey stain, grey caulk, and protective polyurethane finish.
Water Damage Restoration Photo Gallery – South Ponte Vedra Beach Project


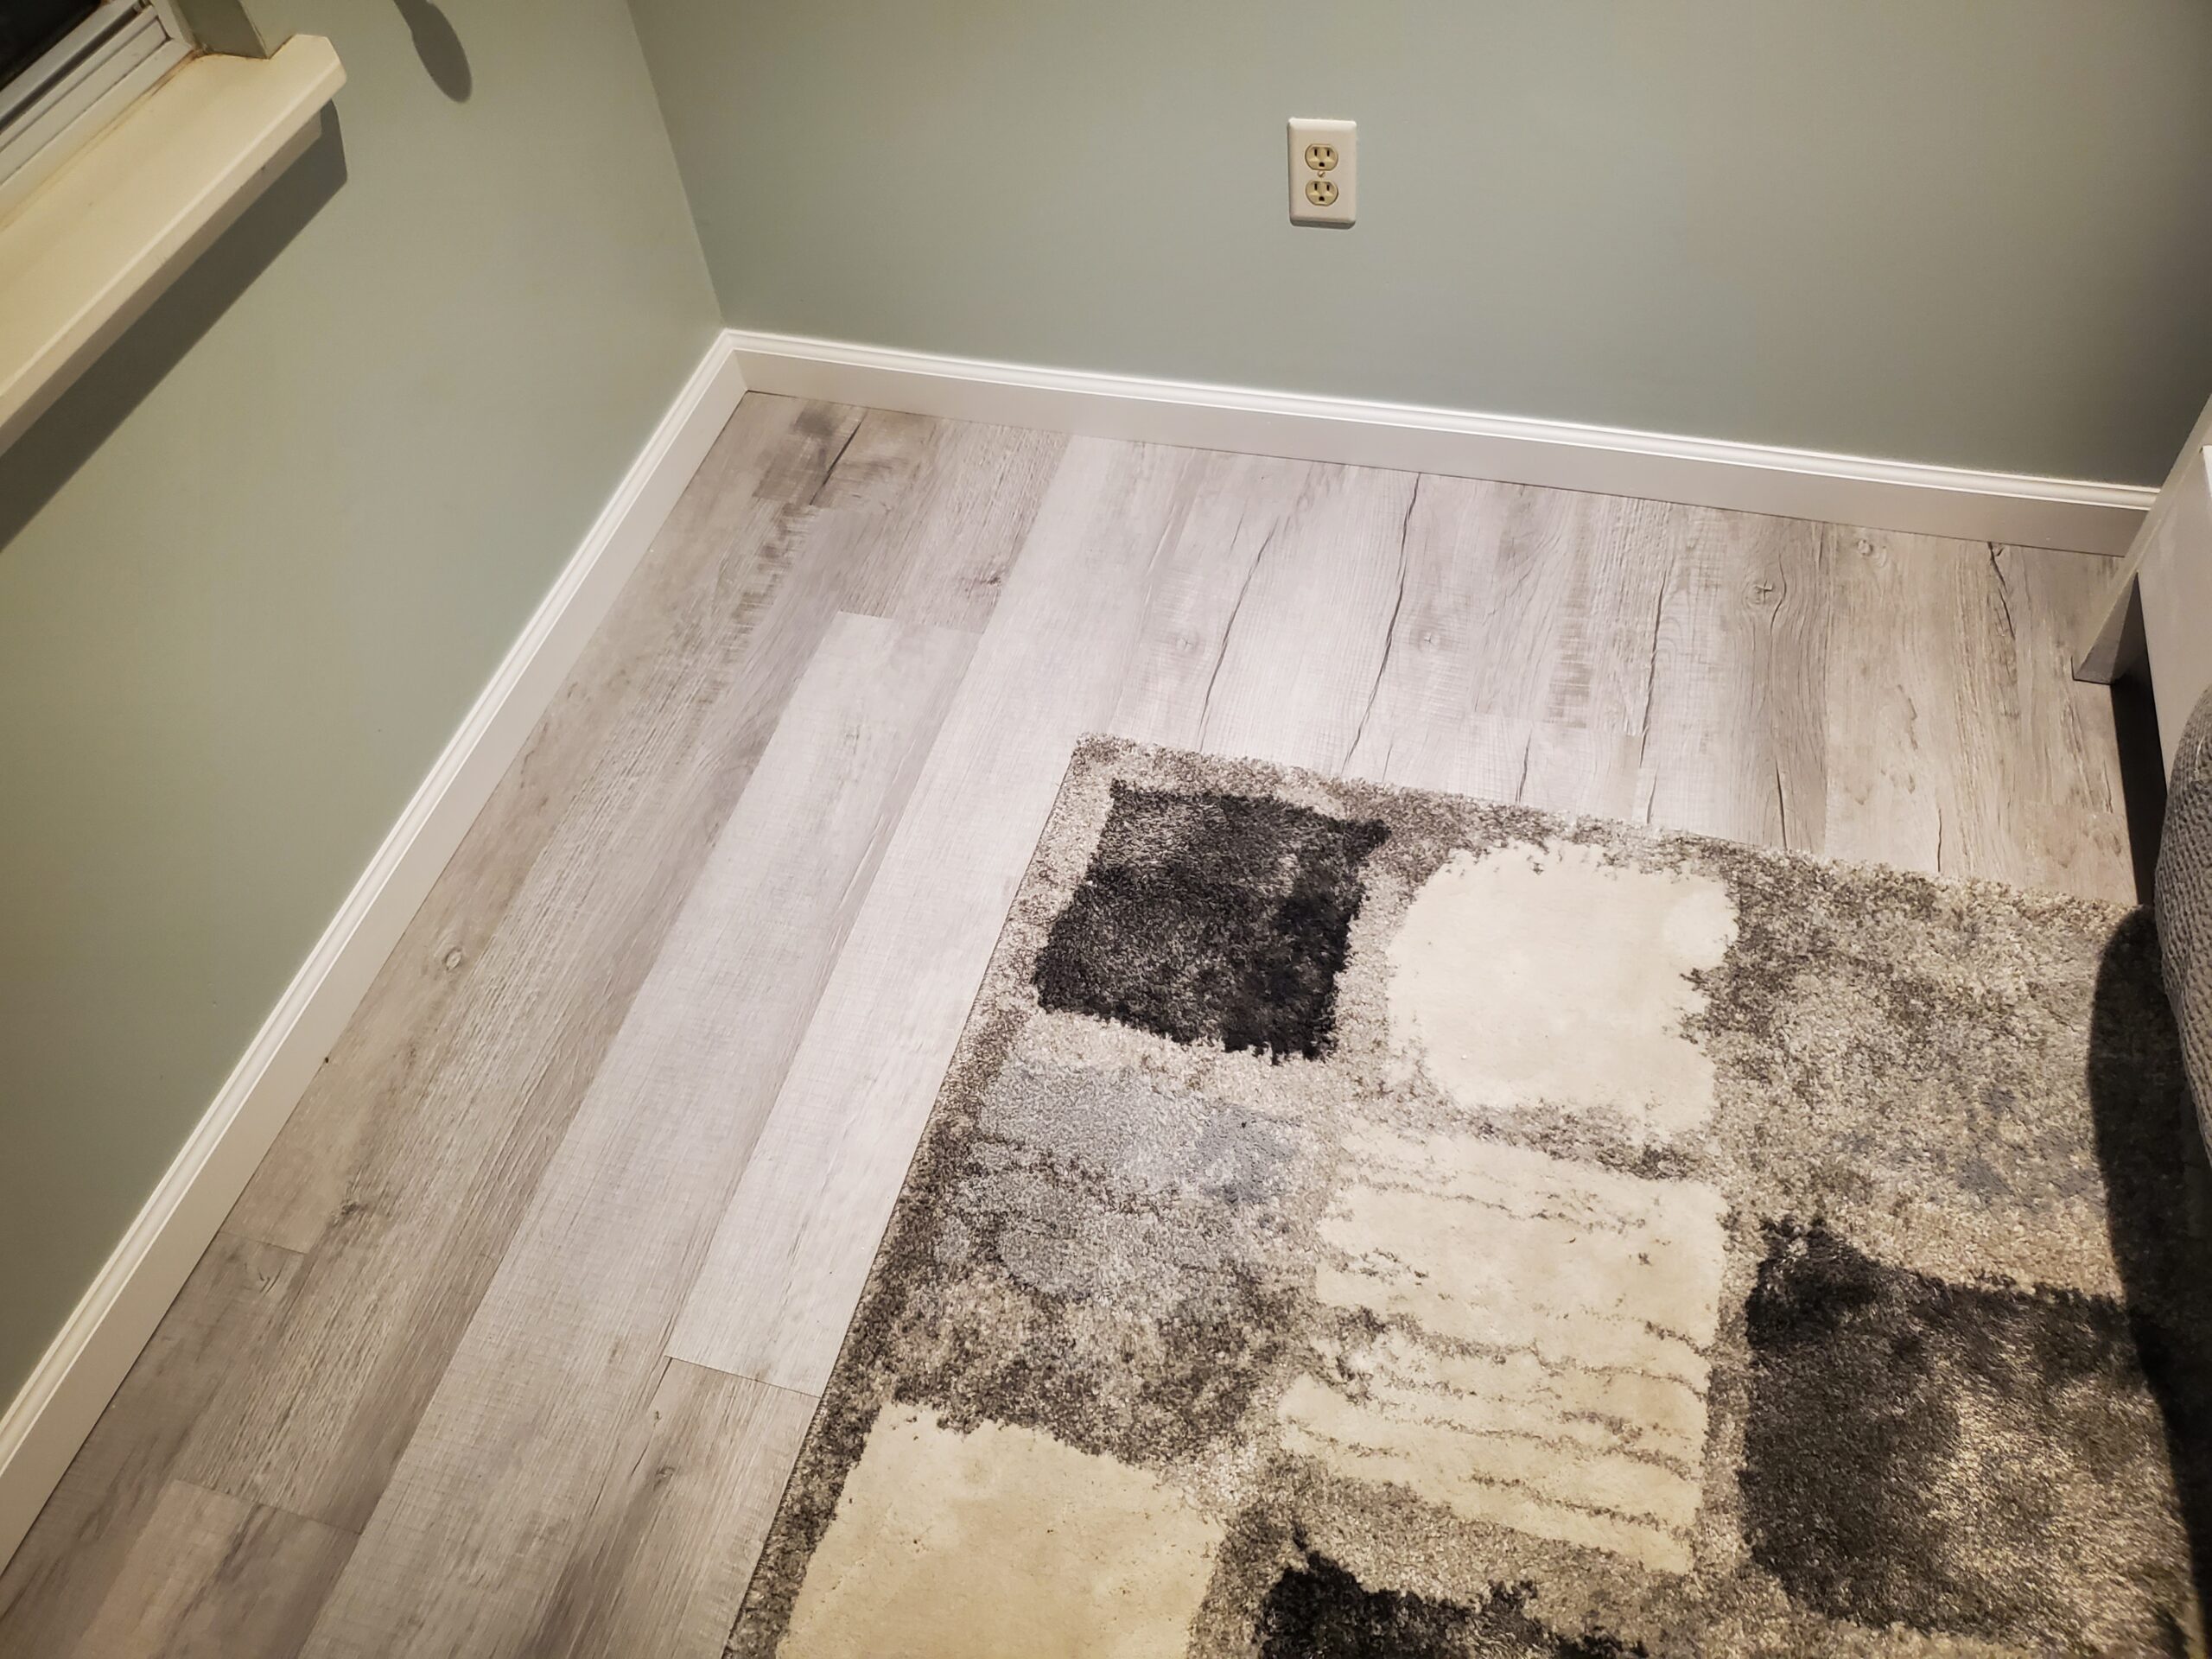
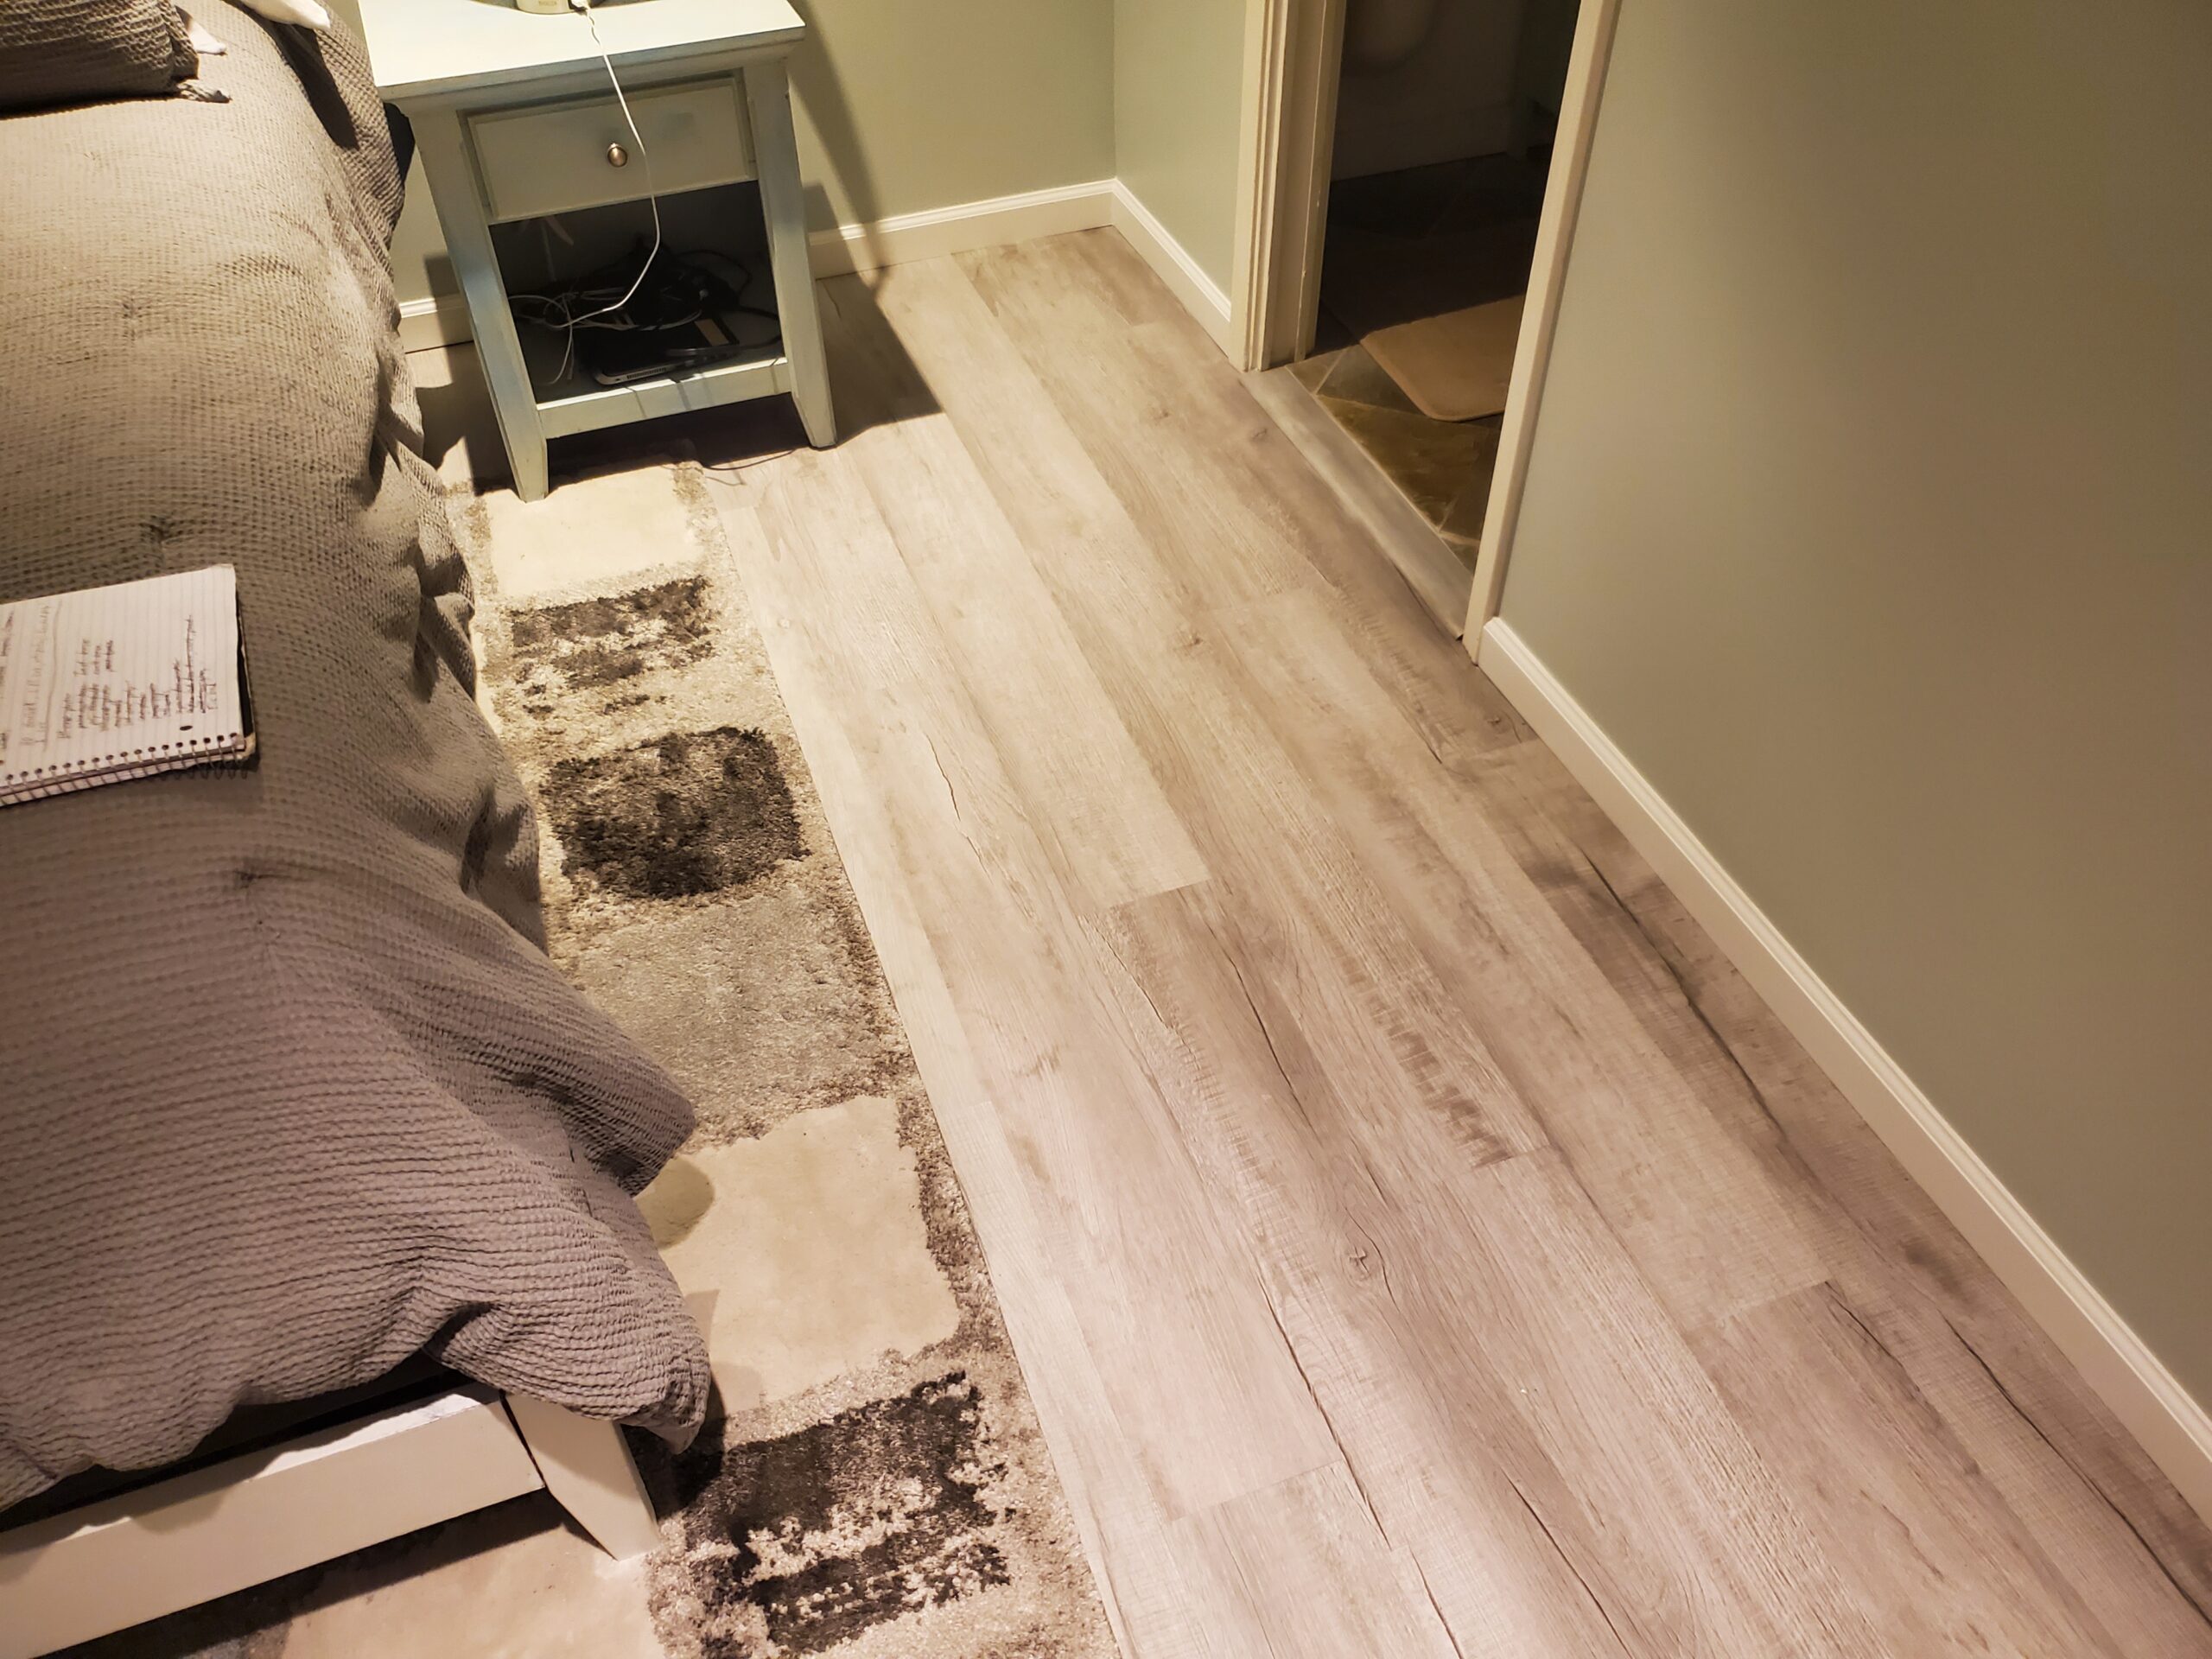
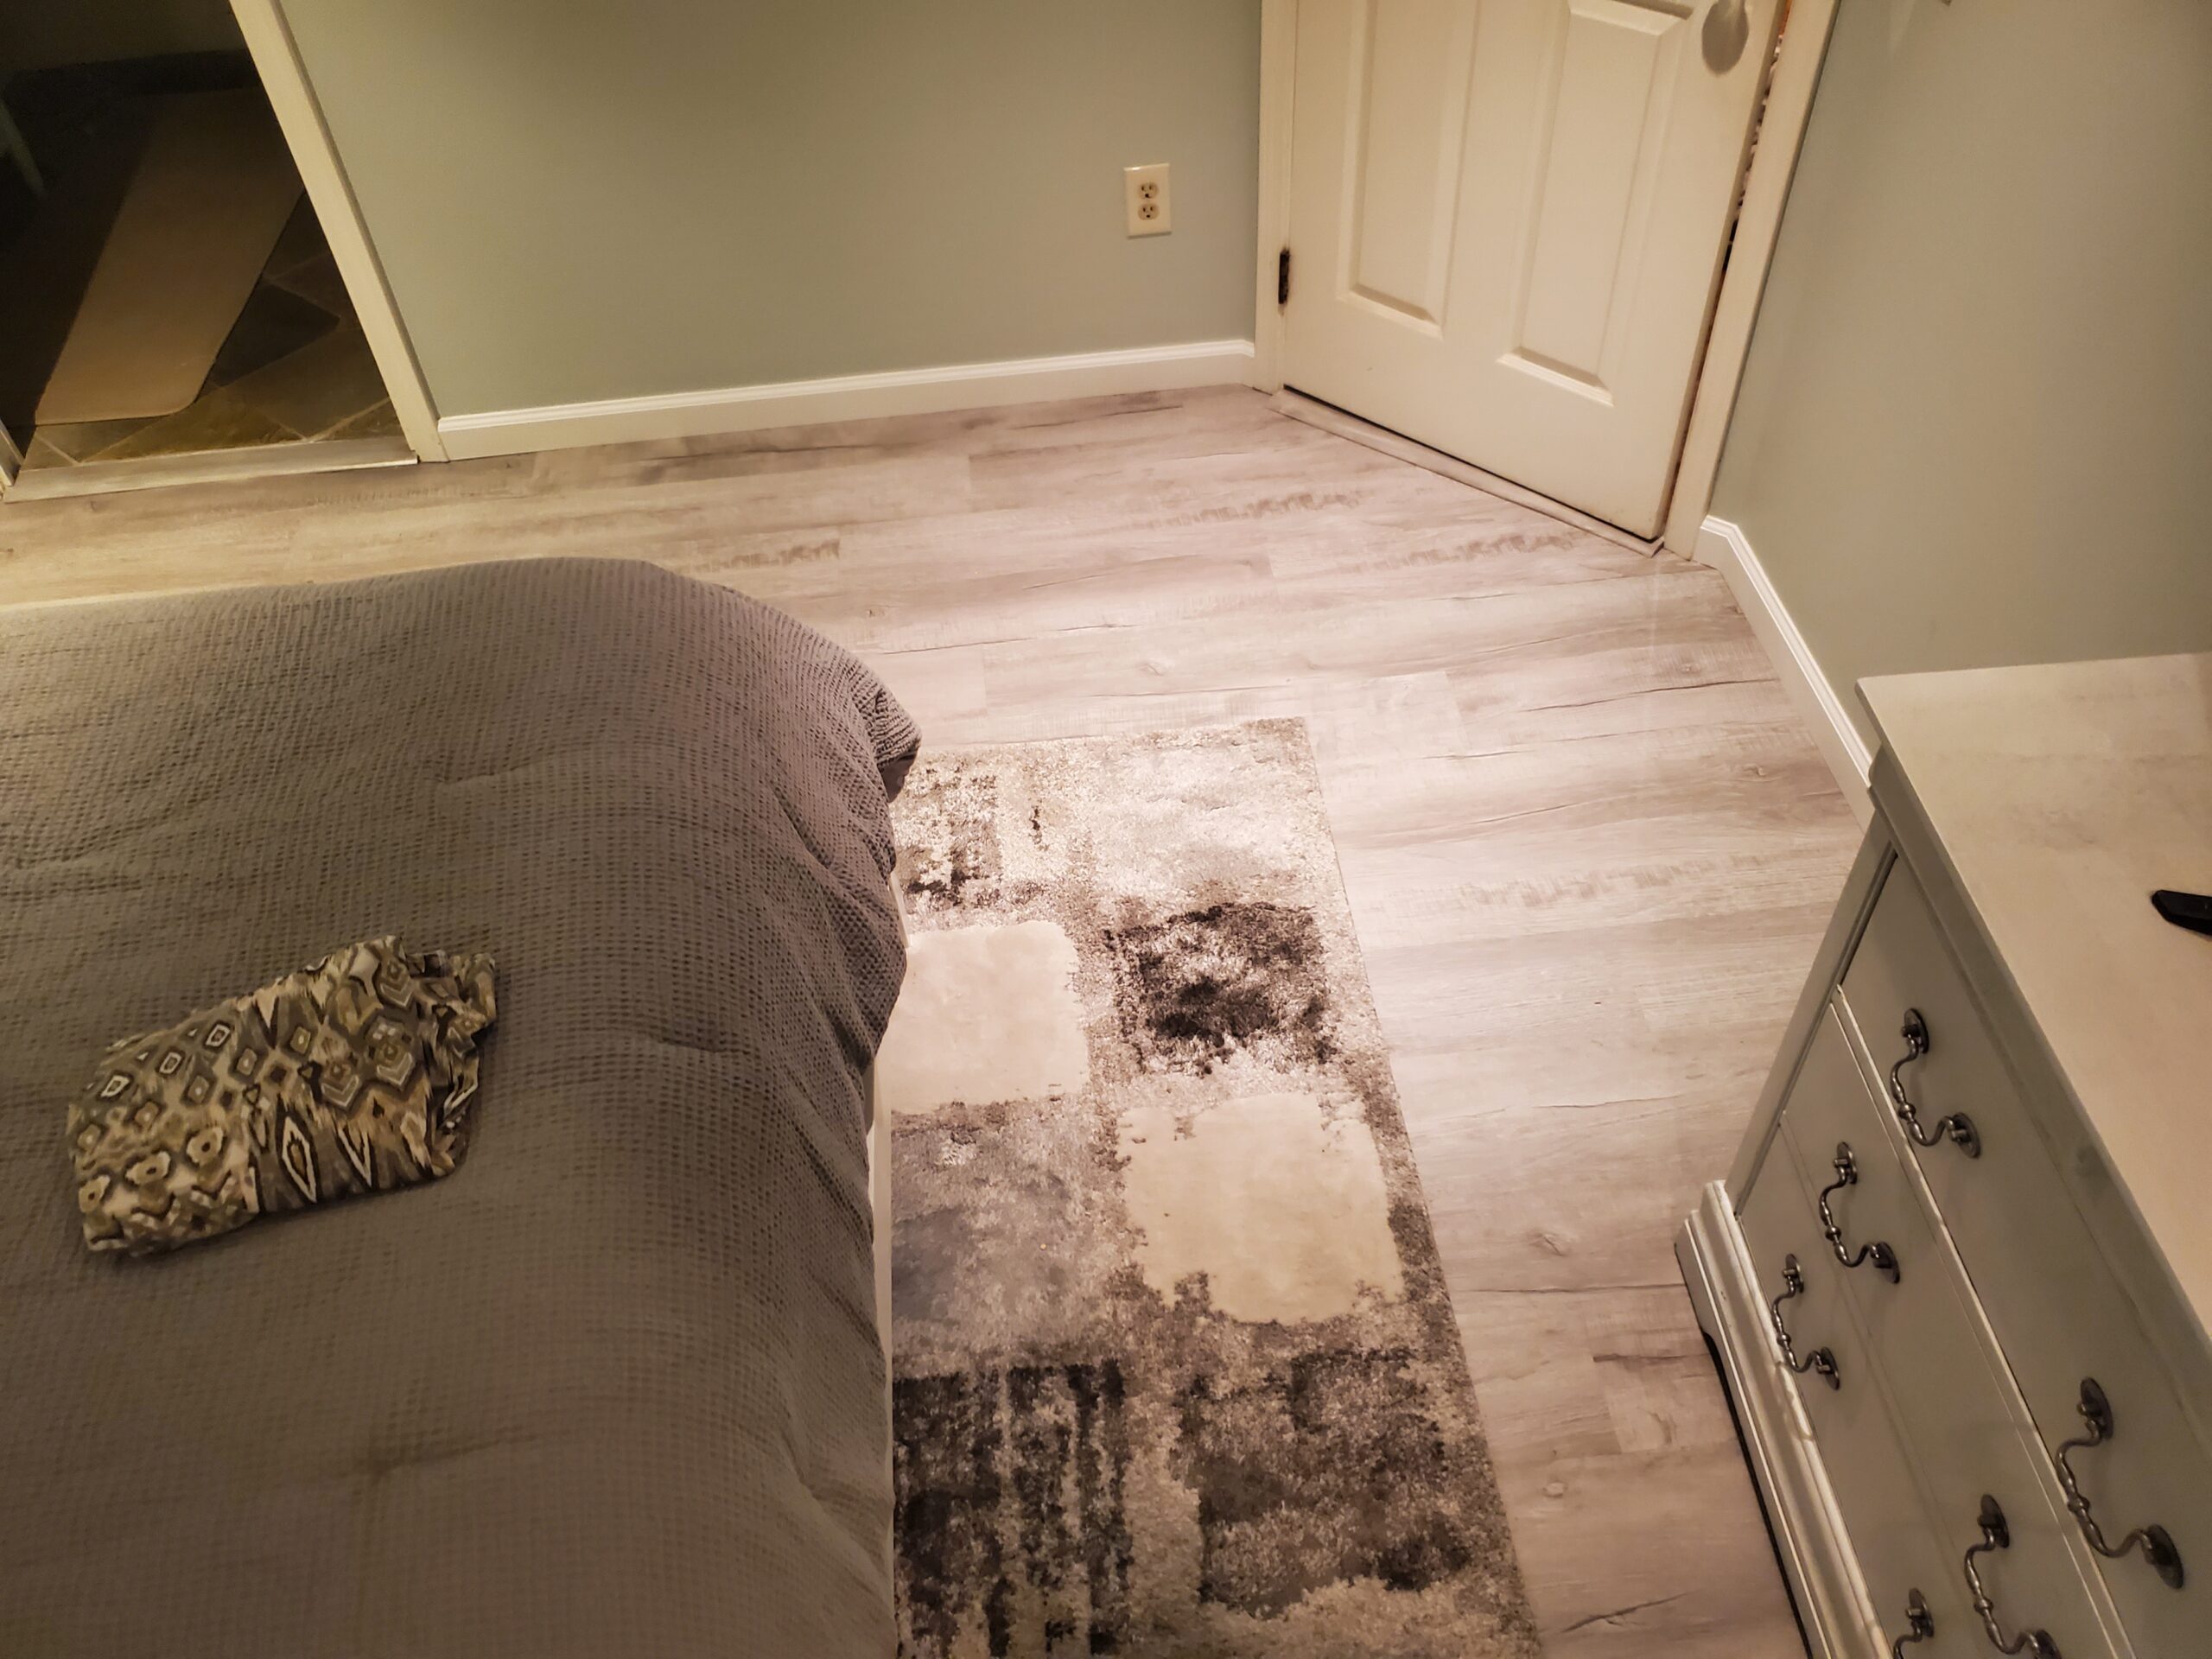

See the transformation from water-damaged structure to beautiful restoration!
The Result: Complete Restoration with Mold-Free, Structurally Sound Construction
The transformation was comprehensive and thorough. What began as extensive water damage with active mold growth and compromised structural elements is now a fully restored space that’s better than new. The exterior is weather-tight with properly sealed penetrations, the wall and floor cavities are mold-free with new insulation, all structural components have been repaired or reinforced, and the interior features fresh drywall, paint, and beautiful luxury vinyl plank flooring.
Most importantly, the homeowner can have peace of mind knowing that the water intrusion source has been eliminated, all mold has been properly remediated, and the structural integrity of their home has been fully restored. This wasn’t just a cosmetic repair—it was a complete restoration done right.
Investment for Comprehensive Water Damage Restoration
Exterior Siding Repair – Complete Scope of Work:
- Remove all rotten board & batten siding (T1-11 siding & 1×2’s)
- Dispose of all debris off-site
- Properly seal air compressor line penetration
- Repair/replace any rotten framing (rotten 2×4’s, etc.)
- Match paint color and prime new materials
- Install new T1-11 and 1×2 trim boards
- Apply finish coat of paint
- Area repaired: approximately 32″ to 48″ wide by 8 feet high
- All materials included
Exterior Work Investment: $1,680 (includes all materials)
Interior Restoration – Complete Scope of Work:
Replace Subfloor: Replace subfloor with 23/32 in. x 4 ft. x 8 ft. Southern Pine tongue and groove plywood sheathing. Screw down subfloor with steel construction screws. Remove debris off-site. Price includes all materials.
Repair Wall – Initial Exposed Section: Install support wall, replace rotten 2×4’s (base plate and studs), jack & sister rotten studs affected (fasten with Headlok screws), spray any residual mold with vinegar solution, apply mold primer when dry, install new insulation and drywall, tape drywall, sand finish, prime repair, replace baseboard, paint entire wall to match existing. Price includes all materials.
Additional Wall Repair: Any additional wall repair needed at bottom of wall per linear 16″ x approximately 2′ high. Performed using same methods as initial wall repair. If only drywall needs replacement (not studs), cost is $120 per linear 16″. Price includes all materials.
Exterior Siding Exploratory Work: Inspect/cut open wall to determine full extent of repair needed. Cover any new holes with plastic sheeting for protection.
Replace Colonial Casing with Baseboard: Remove and replace existing colonial casing base with traditional baseboard, putty holes, caulk, paint. Price includes all materials.
Install Vinyl Laminate Plank Flooring: Professional LVP installation (labor only). Customer-provided flooring materials estimated at $800-$1,200.
Install Floor Support Joists: Install 3 sister joists alongside damaged joists. Includes materials ($25.44).
Replace Insulation: Remove old insulation & dispose off-site. Purchase & install 9″ R-30 insulation. Cover holes at end of bays with 1×12 boards. Includes insulation materials ($277.44).
Additional Materials: Transition materials including clamshell trim, grey stain, grey caulk, and polyurethane finish.
Interior Work Investment: $4,333 (includes all materials except customer-provided LVP flooring)
Total Project Investment: $6,013
Note: This comprehensive water damage restoration project included all labor and materials except the luxury vinyl plank flooring, which was customer-supplied.
Why Choose The Great Handyman for Water Damage Restoration in Jacksonville, FL?
- Comprehensive Restoration Expertise: From exterior siding to mold remediation to structural repairs to flooring—we handle every aspect of water damage restoration
- Professional Mold Remediation: Proper two-step mold treatment process using proven methods for safe, effective mold elimination
- Structural Carpentry Skills: Expert knowledge of proper framing repairs, joist sistering, and structural reinforcement techniques
- Complete Problem Resolution: We don’t just treat symptoms—we identify and fix the root cause to prevent future water damage
- Quality Craftsmanship: Meticulous attention to detail in every phase, from structural work to drywall finishing to flooring installation
- Fair, Transparent Pricing: Detailed scope of work with itemized pricing so you know exactly what’s included
- Serving Jacksonville and Surrounding Areas: Proudly serving homeowners throughout Jacksonville, South Jacksonville (32258), St. Johns County, South Ponte Vedra Beach, and surrounding communities
- Proven Track Record: Over 100+ five-star reviews from satisfied customers who trust us with their most critical home repairs
Experienced Water Damage Restoration? Get Professional Help Today
Whether you’re dealing with water damage from leaks, floods, or moisture issues in Jacksonville, South Jacksonville (32258), St. Johns County, or surrounding areas, The Great Handyman has the expertise to restore your home completely. From mold remediation to structural repairs to beautiful finishing work, we handle water damage restoration projects of all sizes with the same commitment to quality and attention to detail.
Contact Brian Gallagher – The Great Handyman Today:
📞 Call or Text: 904-580-2338
Serving Jacksonville, South Jacksonville (32258), St. Johns County, South Ponte Vedra Beach, Bartram Park, Mandarin, and surrounding areas. Licensed, experienced, and ready to restore your home after water damage.
Don’t let water damage compromise your home’s structure or your family’s health. Get your free estimate today and discover why homeowners throughout Jacksonville trust The Great Handyman for quality water damage restoration at fair prices!